
[ Team LiB ]
Creating Custom Views
The power of views comes not from the predefined views, but from the ability to create
your own custom views. You can customize the current view used on any folder, create
new views, or customize any of the default views included with Outlook.
All custom view options are on the Custom View dialog. Open the dialog by right-
clicking on the field names at the top of the list pane and selecting Custom.
The options you can choose from when customizing or creating views include
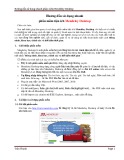
• Fields— Select the fields you want visible in your view, or remove fields you
don't need, using the Show Fields dialog (see Figure 3.6). Use this dialog to
control the number of lines used in the multiline layout. Not all of these options
are available for all view types.
Figure 3.6. Use the Show Fields dialog to select and remove fields from your
view. You can select any item type from the Select Available Fields From list
for use on any other item type; however, not all fields are available on all
items.

• Group By— Enables you to choose specific fields to group by or use the default o
f
Automatically Group According to Arrangement (see Figure 3.7). Automatic
grouping enables you to click on a field name and group by that field or select a
grouping from the smart grouping menu. The Group By dialog also has the default
Expand/Collapse setting for the view.
Figure 3.7. Use the Group By dialog to control how your view is displayed.
Using automatic grouping enables you to change the grouping by right-
clicking on the field names and choosing a new grouping.
Use grouping to group by fields that you need to change, and then drag
the items between fields to change the groups. For example, group by
the Private field, and then drag items between the Private: Yes and
Private: No groups to change the Private setting on the items. You can
also use grouping to change company names and add categories, but
not remove categories.
• Sort— Enables you to choose up to four fields to sort by, in ascending or
descending order. Use this to create views that sort by sender, and then by
received date, for example.
• Filter— Possibly the most powerful option available in views. It uses the same

dialog, conditions, and actions that are used by Search Folders, automatic
formatting, and Advanced Find.
• Other Settings— Provides you with many of the display options for the view,
including the fonts used for the list items and field names, whether AutoPreview
or the Reading Pane is enabled by default, and Quick Flag options (see Figure
3.8).
Figure 3.8. Use Other Settings to set column display and preview options for
your view.
Enable Shade Group Headings to make your group headings smaller
but easier to see.
• Automatic Formatting— Provides you with powerful options for displaying your
Outlook items (see Figure 3.9).
Figure 3.9. Choose Add and enter the condition and font formatting for your

automatic formatting rule. Rules are applied in the order listed, and if two
rules apply to one item, the item is formatted by the first rule.
Automatic formatting uses the same filter dialog as filters and gives you the
opportunity to display filtered items using different font formatting instead of
simply showing or hiding the items. Using automatic formatting in conjunction
with filters, you can create more granular filters by highlighting items that meet
different conditions. For example, you could create a filter to show all email from
your boss and use automatic formatting to colorize messages sent only to you in
blue, messages cc'd to you in green, and messages sent to you and cc'd to others in
red.
Create simple automatic formatting rules by choosing Tools,
Organize, and then Using Colors. Automatic formatting rules created
this way are stored with the view you're using. If you change views,
the messages lose the formatting.
• Format Columns— Use with the one-line view (Reading Pane off) to control how
each field displays and change the name displayed for the fields shown in the view
(see Figure 3.10).
Figure 3.10. Change how the date and size fields display and whether to use

icons or text for the Flag, Importance, and Attachment fields.
Use Format Columns to remove field names from group headings when
using a one-line view.
• Reset Current View— Restore the default views to their original state. This button
is disabled for custom views you create; you'll have to make a copy of your
custom views before editing them if you want to restore the original view settings.
Modifying the view by name won't apply to folders where the view
is one-offed, which is when you customize the view on a folder and
a copy of the view is stored in the folder. You'll have to reset the
view on all folders that are one-offed and then customize the view
again.
To prevent one-offed views, use new views instead of changing the
current view.
Task: Copy Data from a View
One advantage to using Table views is the capability to copy the information displayed
and paste it into a document, which is often very useful for the calendar, contacts, and
tasks.
1. Adjust the view on the folder to show all the fields you want to copy.
2. Select the first item and use Ctrl+A to Select All or hold Shift as you move down


![Sổ tay Excel: Hướng dẫn sử dụng và mẹo hay [Năm hiện tại]](https://cdn.tailieu.vn/images/document/thumbnail/2026/20260520/vispacex_27/135x160/2851779253490.jpg)


%20--%3e%3cdefs%3e%3cstyle%3e%20.st0%20{%20fill:%20%23fff;%20}%20.st1%20{%20fill:%20%237800fa;%20}%20%3c/style%3e%3c/defs%3e%3cpath%20class='st1'%20d='M117.78,12.18H43.11c2.9,3.47,4.65,7.94,4.65,12.82,0,5.6-2.3,10.66-6.01,14.29h76.02l7.22-13.56-7.22-13.56Z'/%3e%3cg%3e%3cpath%20class='st0'%20d='M53.58,26.17h-.59v-1.46h.59v-4.96h2.83c1.78,0,2.67.94,2.67,2.82v5.76c0,1.87-.89,2.81-2.67,2.81h-2.83v-4.96ZM55.36,21.37v3.34h1.1v1.46h-1.1v3.34h1.01c.61,0,.91-.37.91-1.1v-5.93c0-.74-.3-1.1-.91-1.1h-1.01Z'/%3e%3cpath%20class='st0'%20d='M65.99,31.14h-1.8l-.31-2.07h-2.19l-.31,2.07h-1.64l1.82-11.39h2.62l1.82,11.39ZM65.28,18.04c-.25.46-.51.77-.75.94-.21.15-.47.22-.79.22-.26,0-.57-.07-.92-.22l-.38-.15c-.14-.05-.26-.07-.37-.07-.3,0-.53.18-.71.54l-.91-.68c.25-.46.51-.77.75-.94.21-.14.48-.21.79-.21.26,0,.57.07.92.21l.38.15c.14.05.26.07.37.07.3,0,.53-.18.71-.54l.91.68ZM61.91,27.52h1.73l-.87-5.76-.87,5.76Z'/%3e%3cpath%20class='st0'%20d='M74.53,26.89v1.52c0,1.91-.89,2.86-2.67,2.86s-2.67-.95-2.67-2.86v-5.93c0-1.91.89-2.86,2.67-2.86s2.67.95,2.67,2.86v1.11h-1.69v-1.22c0-.75-.31-1.12-.93-1.12s-.93.37-.93,1.12v6.15c0,.74.31,1.11.93,1.11s.93-.37.93-1.11v-1.63h1.69Z'/%3e%3cpath%20class='st0'%20d='M81.4,31.14h-1.8l-.31-2.07h-2.19l-.31,2.07h-1.64l1.82-11.39h2.62l1.82,11.39ZM75.9,19.2l1.52-1.91h1.71l1.51,1.91h-1.61l-.76-.95-.75.95h-1.61ZM77.32,27.52h1.73l-.87-5.76-.87,5.76ZM83.1,15.99l-1.76,1.91h-1.26l1.17-1.91h1.86Z'/%3e%3cpath%20class='st0'%20d='M84.86,19.75c1.78,0,2.67.94,2.67,2.82v1.48c0,1.87-.89,2.81-2.67,2.81h-.85v4.28h-1.79v-11.39h2.64ZM84.01,21.37v3.86h.85c.58,0,.87-.36.87-1.08v-1.71c0-.71-.29-1.07-.87-1.07h-.85Z'/%3e%3cpath%20class='st0'%20d='M93.51,19.75c1.78,0,2.67.94,2.67,2.82v1.48c0,1.87-.89,2.81-2.67,2.81h-.85v4.28h-1.79v-11.39h2.64ZM92.66,21.37v3.86h.85c.58,0,.87-.36.87-1.08v-1.71c0-.71-.29-1.07-.87-1.07h-.85Z'/%3e%3cpath%20class='st0'%20d='M98.8,31.14h-1.79v-11.39h1.79v4.88h2.03v-4.88h1.83v11.39h-1.83v-4.88h-2.03v4.88Z'/%3e%3cpath%20class='st0'%20d='M105.36,24.55h2.46v1.62h-2.46v3.34h3.09v1.63h-4.88v-11.39h4.88v1.63h-3.09v3.18ZM108.17,17.29l-1.76,1.91h-1.26l1.17-1.91h1.86Z'/%3e%3cpath%20class='st0'%20d='M112.2,19.75c1.78,0,2.67.94,2.67,2.82v1.48c0,1.87-.89,2.81-2.67,2.81h-.85v4.28h-1.79v-11.39h2.64ZM111.35,21.37v3.86h.85c.58,0,.87-.36.87-1.08v-1.71c0-.71-.29-1.07-.87-1.07h-.85Z'/%3e%3c/g%3e%3ccircle%20class='st1'%20cx='25'%20cy='25'%20r='20'/%3e%3cpath%20class='st0'%20d='M32.78,19.27c2.92,0,4.43,2.55,5.28,5.33l.71,2.17c.14.38-.33.75-.71.75h-5.61c.19-.33.24-.71.09-1.08l-.75-2.45c-.43-1.32-.99-2.64-1.79-3.77.75-.57,1.65-.94,2.78-.94h0ZM25,18.38c3.25,0,4.9,2.78,5.89,5.89l.76,2.45c.14.42-.33.8-.8.8h-11.69c-.42,0-.94-.38-.8-.8l.75-2.45c.99-3.11,2.64-5.89,5.89-5.89h0ZM25,11.35c1.74,0,3.11,1.37,3.11,3.11s-1.37,3.11-3.11,3.11-3.11-1.41-3.11-3.11,1.41-3.11,3.11-3.11h0ZM17.27,19.27c1.08,0,1.98.38,2.73.94-.8,1.13-1.37,2.45-1.74,3.77l-.8,2.45c-.14.38-.05.75.09,1.08h-5.56c-.42,0-.9-.38-.75-.75l.71-2.17c.9-2.78,2.41-5.33,5.33-5.33h0ZM17.27,12.91c1.51,0,2.78,1.27,2.78,2.83s-1.27,2.83-2.78,2.83-2.83-1.27-2.83-2.83,1.27-2.83,2.83-2.83h0ZM32.78,12.91c1.56,0,2.78,1.27,2.78,2.83s-1.23,2.83-2.78,2.83-2.83-1.27-2.83-2.83,1.27-2.83,2.83-2.83h0ZM27.07,28.56v.09c0,.57-.24,1.08-.61,1.46h0v.05c-.38.33-.9.57-1.46.57s-1.08-.24-1.46-.61h0c-.38-.38-.61-.9-.61-1.46v-.09h1.41v.09c0,.19.05.38.19.47v.05c.09.09.28.19.47.19s.38-.09.47-.19v-.05c.14-.09.24-.28.24-.47t-.05-.09h1.41ZM30.99,28.56v.09c0,1.65-.66,3.16-1.74,4.24-1.08,1.08-2.59,1.79-4.24,1.79s-3.16-.71-4.24-1.79l-.05-.05c-1.04-1.08-1.7-2.55-1.7-4.2v-.09h1.41v.09c0,1.27.47,2.4,1.27,3.25h.05c.85.85,1.98,1.37,3.25,1.37s2.4-.52,3.25-1.37c.85-.8,1.37-1.98,1.37-3.25v-.09h1.37ZM34.99,28.56v.09c0,2.78-1.13,5.28-2.92,7.07-1.79,1.79-4.29,2.92-7.07,2.92s-5.23-1.13-7.07-2.92c-1.79-1.79-2.92-4.29-2.92-7.07v-.09h1.41v.09c0,2.4.94,4.53,2.5,6.08,1.56,1.56,3.72,2.5,6.08,2.5s4.52-.94,6.08-2.5c1.56-1.56,2.5-3.68,2.5-6.08v-.09h1.41Z'/%3e%3c/svg%3e)