Creating a Table
You can use Enterprise Manager to add a table to a database. In this section, you'll add a
table to the Northwind database to store the details of a person. This table will be called
Persons, and will contain the columns shown in Table 2.8.
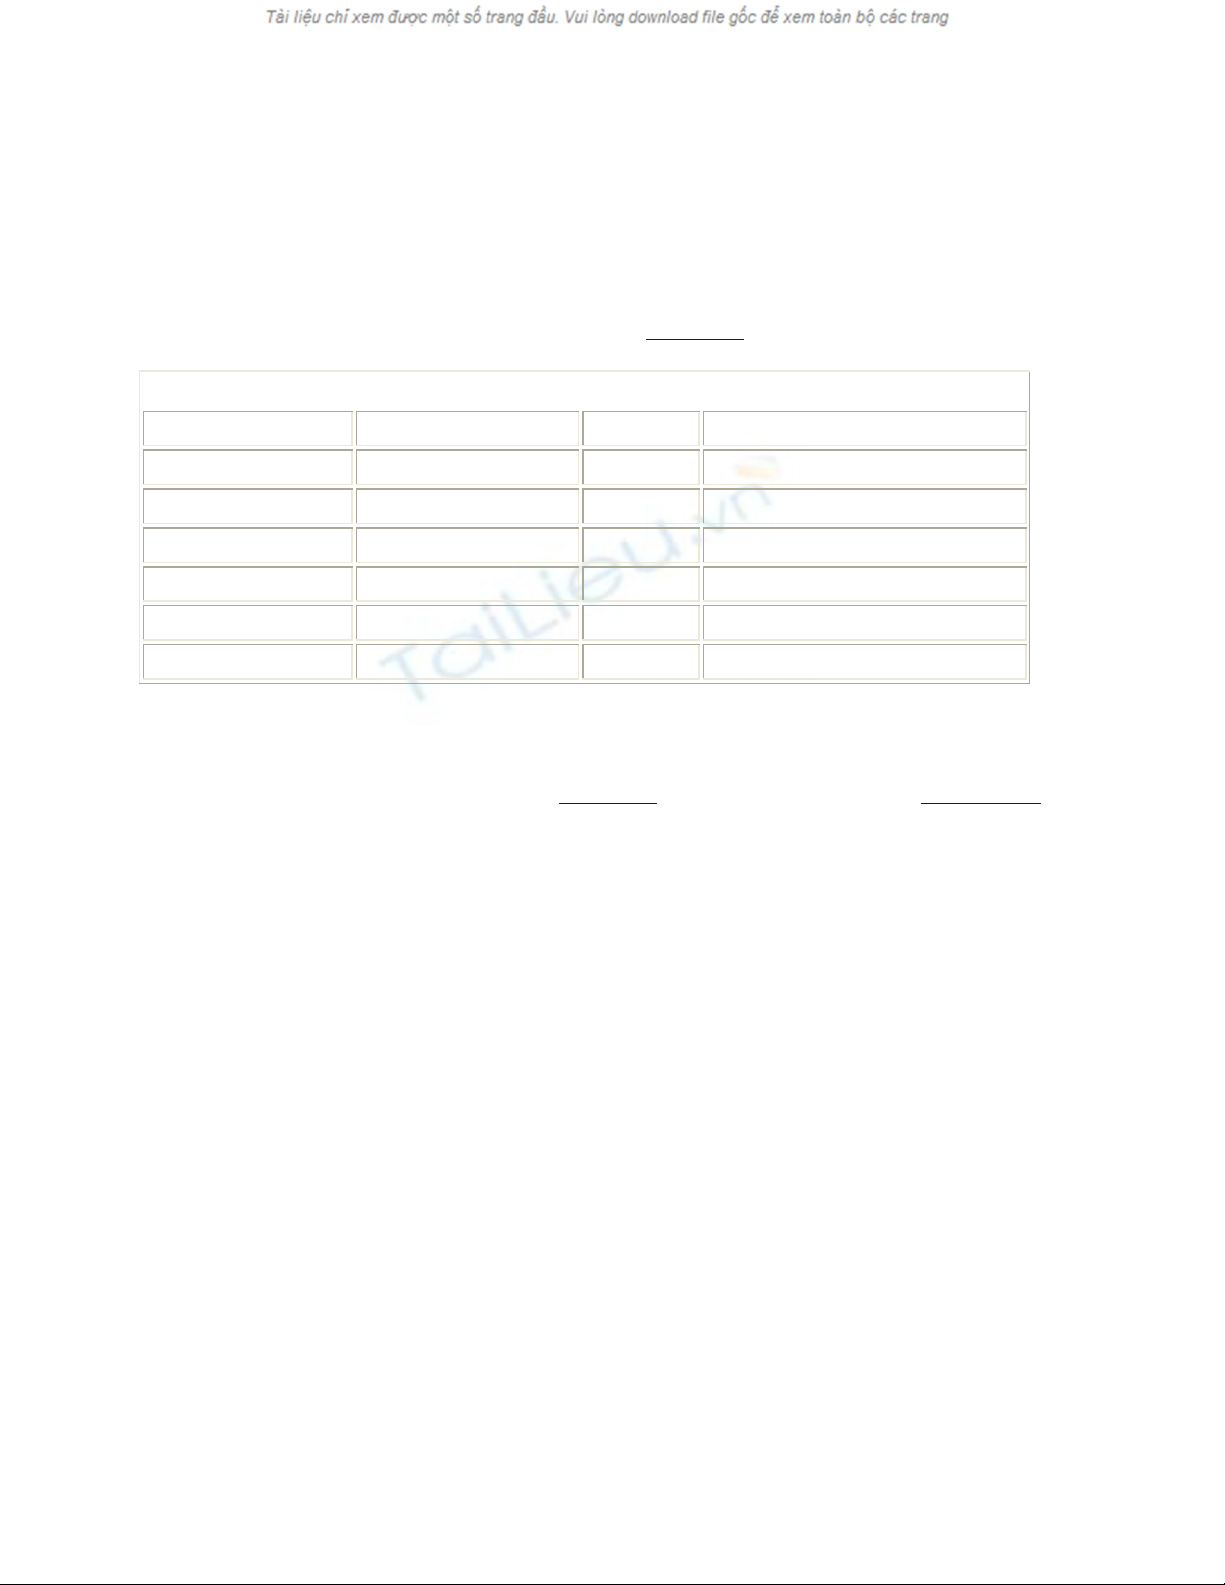
Table 2.8: DEFINITION FOR THE COLUMNS OF THE Persons TABLE
COLUMN NAME DATABASE TYPE LENGTH ALLOWS NULL VALUES?
PersonID int 4 No
FirstName nvarchar 15 No
LastName nvarchar 15 No
DateOfBirth datetime 8 Yes
Address nvarchar 50 Yes
EmployerID nchar 5 No
To create a table in the Northwind database, you select the Tables node of the Northwind
database in Enterprise Manager and select Action ➣ New Table. You'll then see the table
designer. Add the columns as shown in Table 2.8 to the table, as shown in Figure 2.20.
Figure 2.20: Adding a new table
N
ote The length of some of the data types is fixed. For example, the int type always uses
4 bytes of storage space, so you can't change the length of an int column from 4.
Similarly, the datetime type always uses 8 bytes of storage space. You can change
the length of nchar and nvarchar columns because those types are designed to store
variable-length data.

Click the Save button on the toolbar to save the table. In the Choose Name dialog, enter
Persons as the name, and click OK to save your table, as shown in Figure 2.21.
Figure 2.21: Entering the name of the table
N
ote Once you've saved your table, you can return to the table designer at any time by
selecting the table in the Tables node of Enterprise Manager, right-clicking the
table, and selecting Design Table.
In the rest of this chapter, you'll learn how to:
• Get additional information about the columns in a table using the Columns tab.
• Set the primary key of a table.
• Set the permissions that allow access to the contents of a table.
• Create a relationship between tables.
• Create an index to allow faster access to the information in a table.
• Create a constraint to restrict values that may be stored in a column.
The Columns Tab
In the area beneath the grid, you'll notice a tab named Columns. The Columns tab
contains additional information about the currently selected column in the grid, and
Figure 2.20, shown earlier, shows the information on the PersonID column. As you
change your selected column, the information in the Columns tab will change.
You can enter an optional description for a column in the Description field of the
Columns tab. The Default Value field allows you to supply an initial value when a new
row is added to the table; you can of course supply your own value to a column that will
override the default value.
The Precision field shows the maximum number of digits that may be used to store a
number, including those that might be stored to the right of a decimal point. The Scale
field shows the maximum number of digits to the right of a decimal point. For example,
the precision and scale of an int column are 10 and 0, meaning that an int column can
store up to 10 digits, with no digits to the right of a decimal point-no digits to the right
because an int is an integral number. The precision and scale for a money column are 19
and 4, meaning that a money column can store up to 19 digits, with up to four of those
digits to the right of a decimal point.

The Identity field allows you specify whether SQL Server should automatically assign a
value to a field. If you set the Identity field to Yes, then you can also specify values for
the Identity Seed and Identity Increment fields. You use the Identity Seed field to set the
initial value for the column, and you use the Identity Increment field to specify the
increment for value. For example, if you set the Identity Seed to 1 and the Identity
Increment to 1, then the first value for the column would be 1, the next would be 2, and
so on. The ProductID column of the Products table is an example of a column that uses
an identity to set its value.
The IsRowGuid field specifies whether a uniqueidentifier column is a globally unique
identifier known as a GUID.
Tip SQL Server doesn't automatically supply a value for a GUID. If you want SQL
Server to generate a GUID, you can use the SQL Server NEWID() function. The
N
EWID() function always returns a different value. You can then use the output from
this function as the Default Value for your uniqueidentifier column. For example,
you would set the Default Value field to [NEWID()]. You'll learn more about SQL
Server functions in the next chapter.
The Formula field allows you to set a formula that is used to assign a value to a column.
The Collation field specifies the rules that are used to sort and compare characters. You
might need to set this when working with foreign languages. For further details, consult
the SQL Server Books Online documentation.
Setting the Primary Key
Next, you'll set the primary key for the Persons table to PersonID. To do this, click on the
first row in the grid containing the PersonID column, and click the Set primary key
button on the toolbar. Once you've done this, you'll see a small key icon to the left of
PersonID.
Setting the Permissions
To set the permissions for your table, click the Show permissions button on the toolbar of
the table designer. Grant SELECT, INSERT, UPDATE, and DELETE permissions to the
public role, as shown in Figure 2.22. These permissions allow public users to retrieve,
add, modify, and remove rows from the Persons table.

Figure 2.22: Setting the permissions
Click OK to continue.
Creating the Relationship
You'll be creating a relationship between your Persons table and the Customers table. To
view the relationships screen, click the Manage Relationships button on the toolbar of the
table designer. Click New to start creating the relationship. Pick the Customers table as
the primary key table and pick the CustomerID column from this table. Make sure
Persons is selected as the foreign key table, and pick the EmployerID column from this
table. Figure 2.23 shows this. You'll notice that the relationship name is automatically set
to FK_Persons_Customers.
Figure 2.23: Creating the relationship
The check boxes at the bottom the page are as follows:

• Check existing data on creation This applies your constraint to data that might
already exist in the database when you add your relationship to the foreign key
table.
• Enforce relationship for replication Replication allows you to copy information
to a different database. When you enable Enforce relationship for replication, your
constraint is applied to the foreign key table when that table is copied to a different
database during replication.
• Enforce relationship for INSERTs and UPDATEs This applies your constraint
to rows that are added, modified, or removed from the foreign key table. It also
prevents a row in the primary key table from being deleted when there is a
matching row in your foreign key table.
• Cascade Update Related Fields This causes SQL Server to automatically update
the foreign key values of your relationship when the primary key value is
modified.
• Cascade Delete Related Fields This causes SQL Server to automatically remove
rows from the foreign key table whenever the referenced row in the primary key
table is removed. Click Close to continue.
Creating an Index
An index allows the database to quickly locate a row when you request retrieval of that
row based on a particular column value. In this section, you'll create an index on the
LastName column of your Persons table.
To view the indexes for your Persons table, click the Manage Indexes/Keys button on the
toolbar of the table designer. Click New to start creating a new index. Set the index name
as IX_LastName_ Persons, pick the LastName column, and set the order as ascending.
Figure 2.24 shows this.
Figure 2.24: Creating an index


%20--%3e%3cdefs%3e%3cstyle%3e%20.st0%20{%20fill:%20%23fff;%20}%20.st1%20{%20fill:%20%237800fa;%20}%20%3c/style%3e%3c/defs%3e%3cpath%20class='st1'%20d='M117.78,12.18H43.11c2.9,3.47,4.65,7.94,4.65,12.82,0,5.6-2.3,10.66-6.01,14.29h76.02l7.22-13.56-7.22-13.56Z'/%3e%3cg%3e%3cpath%20class='st0'%20d='M53.58,26.17h-.59v-1.46h.59v-4.96h2.83c1.78,0,2.67.94,2.67,2.82v5.76c0,1.87-.89,2.81-2.67,2.81h-2.83v-4.96ZM55.36,21.37v3.34h1.1v1.46h-1.1v3.34h1.01c.61,0,.91-.37.91-1.1v-5.93c0-.74-.3-1.1-.91-1.1h-1.01Z'/%3e%3cpath%20class='st0'%20d='M65.99,31.14h-1.8l-.31-2.07h-2.19l-.31,2.07h-1.64l1.82-11.39h2.62l1.82,11.39ZM65.28,18.04c-.25.46-.51.77-.75.94-.21.15-.47.22-.79.22-.26,0-.57-.07-.92-.22l-.38-.15c-.14-.05-.26-.07-.37-.07-.3,0-.53.18-.71.54l-.91-.68c.25-.46.51-.77.75-.94.21-.14.48-.21.79-.21.26,0,.57.07.92.21l.38.15c.14.05.26.07.37.07.3,0,.53-.18.71-.54l.91.68ZM61.91,27.52h1.73l-.87-5.76-.87,5.76Z'/%3e%3cpath%20class='st0'%20d='M74.53,26.89v1.52c0,1.91-.89,2.86-2.67,2.86s-2.67-.95-2.67-2.86v-5.93c0-1.91.89-2.86,2.67-2.86s2.67.95,2.67,2.86v1.11h-1.69v-1.22c0-.75-.31-1.12-.93-1.12s-.93.37-.93,1.12v6.15c0,.74.31,1.11.93,1.11s.93-.37.93-1.11v-1.63h1.69Z'/%3e%3cpath%20class='st0'%20d='M81.4,31.14h-1.8l-.31-2.07h-2.19l-.31,2.07h-1.64l1.82-11.39h2.62l1.82,11.39ZM75.9,19.2l1.52-1.91h1.71l1.51,1.91h-1.61l-.76-.95-.75.95h-1.61ZM77.32,27.52h1.73l-.87-5.76-.87,5.76ZM83.1,15.99l-1.76,1.91h-1.26l1.17-1.91h1.86Z'/%3e%3cpath%20class='st0'%20d='M84.86,19.75c1.78,0,2.67.94,2.67,2.82v1.48c0,1.87-.89,2.81-2.67,2.81h-.85v4.28h-1.79v-11.39h2.64ZM84.01,21.37v3.86h.85c.58,0,.87-.36.87-1.08v-1.71c0-.71-.29-1.07-.87-1.07h-.85Z'/%3e%3cpath%20class='st0'%20d='M93.51,19.75c1.78,0,2.67.94,2.67,2.82v1.48c0,1.87-.89,2.81-2.67,2.81h-.85v4.28h-1.79v-11.39h2.64ZM92.66,21.37v3.86h.85c.58,0,.87-.36.87-1.08v-1.71c0-.71-.29-1.07-.87-1.07h-.85Z'/%3e%3cpath%20class='st0'%20d='M98.8,31.14h-1.79v-11.39h1.79v4.88h2.03v-4.88h1.83v11.39h-1.83v-4.88h-2.03v4.88Z'/%3e%3cpath%20class='st0'%20d='M105.36,24.55h2.46v1.62h-2.46v3.34h3.09v1.63h-4.88v-11.39h4.88v1.63h-3.09v3.18ZM108.17,17.29l-1.76,1.91h-1.26l1.17-1.91h1.86Z'/%3e%3cpath%20class='st0'%20d='M112.2,19.75c1.78,0,2.67.94,2.67,2.82v1.48c0,1.87-.89,2.81-2.67,2.81h-.85v4.28h-1.79v-11.39h2.64ZM111.35,21.37v3.86h.85c.58,0,.87-.36.87-1.08v-1.71c0-.71-.29-1.07-.87-1.07h-.85Z'/%3e%3c/g%3e%3ccircle%20class='st1'%20cx='25'%20cy='25'%20r='20'/%3e%3cpath%20class='st0'%20d='M32.78,19.27c2.92,0,4.43,2.55,5.28,5.33l.71,2.17c.14.38-.33.75-.71.75h-5.61c.19-.33.24-.71.09-1.08l-.75-2.45c-.43-1.32-.99-2.64-1.79-3.77.75-.57,1.65-.94,2.78-.94h0ZM25,18.38c3.25,0,4.9,2.78,5.89,5.89l.76,2.45c.14.42-.33.8-.8.8h-11.69c-.42,0-.94-.38-.8-.8l.75-2.45c.99-3.11,2.64-5.89,5.89-5.89h0ZM25,11.35c1.74,0,3.11,1.37,3.11,3.11s-1.37,3.11-3.11,3.11-3.11-1.41-3.11-3.11,1.41-3.11,3.11-3.11h0ZM17.27,19.27c1.08,0,1.98.38,2.73.94-.8,1.13-1.37,2.45-1.74,3.77l-.8,2.45c-.14.38-.05.75.09,1.08h-5.56c-.42,0-.9-.38-.75-.75l.71-2.17c.9-2.78,2.41-5.33,5.33-5.33h0ZM17.27,12.91c1.51,0,2.78,1.27,2.78,2.83s-1.27,2.83-2.78,2.83-2.83-1.27-2.83-2.83,1.27-2.83,2.83-2.83h0ZM32.78,12.91c1.56,0,2.78,1.27,2.78,2.83s-1.23,2.83-2.78,2.83-2.83-1.27-2.83-2.83,1.27-2.83,2.83-2.83h0ZM27.07,28.56v.09c0,.57-.24,1.08-.61,1.46h0v.05c-.38.33-.9.57-1.46.57s-1.08-.24-1.46-.61h0c-.38-.38-.61-.9-.61-1.46v-.09h1.41v.09c0,.19.05.38.19.47v.05c.09.09.28.19.47.19s.38-.09.47-.19v-.05c.14-.09.24-.28.24-.47t-.05-.09h1.41ZM30.99,28.56v.09c0,1.65-.66,3.16-1.74,4.24-1.08,1.08-2.59,1.79-4.24,1.79s-3.16-.71-4.24-1.79l-.05-.05c-1.04-1.08-1.7-2.55-1.7-4.2v-.09h1.41v.09c0,1.27.47,2.4,1.27,3.25h.05c.85.85,1.98,1.37,3.25,1.37s2.4-.52,3.25-1.37c.85-.8,1.37-1.98,1.37-3.25v-.09h1.37ZM34.99,28.56v.09c0,2.78-1.13,5.28-2.92,7.07-1.79,1.79-4.29,2.92-7.07,2.92s-5.23-1.13-7.07-2.92c-1.79-1.79-2.92-4.29-2.92-7.07v-.09h1.41v.09c0,2.4.94,4.53,2.5,6.08,1.56,1.56,3.72,2.5,6.08,2.5s4.52-.94,6.08-2.5c1.56-1.56,2.5-3.68,2.5-6.08v-.09h1.41Z'/%3e%3c/svg%3e)