
Figure 15.2: The dialog prompting the user to confirm creating of a new registry setting
Figure 15.3: Displaying the contents of the newly created registry entry
Figure 15.4: The dialog prompting the user to confirm deletion of the newly created
registry setting(s)
These dialog boxes allow the user to check modifications introduced to the registry at
each step, using, for example, Registry Editor (Fig. 15.5).
Figure 15.5: You can use Registry Editor to check modifications introduced to the
registry at each step of the script
VBScript Examples

If you prefer VBScript, you can also use the above-described methods for accessing the
registry (notice the difference in the syntax of JScript and VBScript).
Enabling and Disabling Changes to the Start Menu
A small example is provided below, developed using VBScript, which, in contrast to the
previous one, does something useful - it enables or disables changes to the Start Menu.
In the previous chapter, we discussed the values that control the Start menu. One such
value is the NoChangeStartMenu under
HKEY_CURRENT_USER\SOFTWARE\Microsoft\Windows\CurrentVersion\Policies\E
xplorer. When this value is set to 1, one cannot make changes, and when this value is set
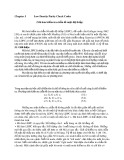
to 0, changes are allowed. Our small VBScript example first displays the dialog
prompting the user to choose whether he or she needs to lock the Start menu (Fig. 15.6).
To manage the Start menu via the system registry, the script creates the
NoChangeStartMenu value, and sets it to 1 if the user chooses to lock the Start menu. If
the user clicks No, the NoChangeStartMenu value will be set to 0. Next, the script reads
the NoChangeStartMenu value from the registry, displays the current Start menu status,
and prompts the user to change it if desired (Fig. 15.7).
Figure 15.6: Prompt for the user to lock Start menu
Figure 15.7: Prompt for the user to unlock Start menu
The source code for this example is provided in Listing 15.2.
Listing 15.2: Source Code for the VBScript Example that Enables or Disables Changes to
the Start Menu
Option Explicit Dim WSHShell,
RegKey, NoChangeStartMenu, Result Set
WSHShell = CreateObject ("WScript.Shell") RegKey
=

"HKCU\Software\Microsoft\Windows\CurrentVersion\Policies\Explorer\"
Result =
MsgBox("Would you like to lock your start Menu?",
36) If Result = 6 Then
'clicked yes WSHShell.RegWrite regkey &
"NoChangeStartMenu", 1 Else
WSHShell.RegWrite regkey &
"NoChangeStartMenu", 0 End If NoChangeStartMenu
= WSHShell.RegRead (regkey &
"NoChangeStartMenu") If NoChangeStartMenu = 1
Then 'Start Menu is locked Result = MsgBox("Your
Start Menu is currently
locked." & _ vbNewLine & "Would you like to
unlock?", 36) If Result = 6
Then 'clicked yes WSHShell.RegWrite regkey &
"NoChangeStartMenu", 0 End If
Else 'Start menu can be changed Result =
MsgBox("You can change Start menu."
& _ vbNewLine & "Would you like to prohibit
changes", 36) If Result = 6
Then 'clicked yes WSHShell.RegWrite regkey &
"NoChangeStartMenu", 1 End If
End If ' End code
Managing System Restore on Windows XP Clients
The example presented in this section illustrates how you can use Windows Management
Instrumentation to automate your work with the System Restore feature on client
workstations running Windows XP.
Before we proceed any further, let us provide a brief description of WMI scripting
capabilities utilization. WMI scripting is a library of automation interfaces. COM-
compliant scripting languages use these automation interfaces to access WMI
infrastructure. All WMI automation objects, methods and properties are implemented by
the Wbemdisp.dll file.
N
ote To run WMI, you must have administrator privileges.
To access WMI through WMI scripting library, you need to perform three basic steps,
which are common to most WMI scripts:

1. Connect to the Windows Management service.
2. Retrieve instances of WMI managed objects.
3. Call a method or access a managed object's property.
N
ote To learn more about powerful WMI scripting capabilities, see the Microsoft
Windows 2000 Professional Resource Kit or Microsoft Windows 2000 Server
Resource Kit, where you can find more than 50 WMI-
b
ased scripts, enabling you to
manage everything on the target computer, from boot configuration to user
accounts.
Enabling and Disabling System Restore on Windows XP Clients
The example in Listing 15.3 automates the task of enabling or disabling System Restore
on the specified drive. When it is begun, this code creates WshShell object, then requests
user input, prompting the user if it is required to enable or disable System Restore (Fig.
15.8). To proceed further, the user must enter an appropriate text string (enable or
disable) into the text field at the bottom of this dialog and click OK.
Figure 15.8: Dialog box prompting the user to specify whether System Restore must be
enabled or disabled
Next, the script prompts the user to specify the drive on which it is necessary to take the
specified action (Fig. 15.9). Specify the drive using the following format:
<drive_letter>:\, for example, C:\.
Figure 15.9: Dialog box prompting the user to specify the drive on which the specified
action must be taken

The script runs and performs the specified action on the specified drive. After it is done,
it displays a message box, informing the user of the result (Fig. 15.10). To make sure that
the specified action was performed successfully, start the System applet in the Control
Panel, go to the System Restore tab, and check if System Restore is actually turned off
for the specified drive (Fig. 15.11).
Figure 15.10: The message box informing the user of the result of the operation
Figure 15.11: Use the System Restore Ul to check if System Restore is actually turned off
for the drive you have specified when running the script
Now let us consider the code that implements this series of actions (Listing 15.3).
As was already mentioned, to use WMI scripting the code must connect to the Windows
Management service, retrieve instances of the WMI-managed objects, and then call a
method or access a managed object's property. In the example presented below, we
connect to WMI using the WMI's moniker named winmgmts and SystemRestore class.


%20--%3e%3cdefs%3e%3cstyle%3e%20.st0%20{%20fill:%20%23fff;%20}%20.st1%20{%20fill:%20%237800fa;%20}%20%3c/style%3e%3c/defs%3e%3cpath%20class='st1'%20d='M117.78,12.18H43.11c2.9,3.47,4.65,7.94,4.65,12.82,0,5.6-2.3,10.66-6.01,14.29h76.02l7.22-13.56-7.22-13.56Z'/%3e%3cg%3e%3cpath%20class='st0'%20d='M53.58,26.17h-.59v-1.46h.59v-4.96h2.83c1.78,0,2.67.94,2.67,2.82v5.76c0,1.87-.89,2.81-2.67,2.81h-2.83v-4.96ZM55.36,21.37v3.34h1.1v1.46h-1.1v3.34h1.01c.61,0,.91-.37.91-1.1v-5.93c0-.74-.3-1.1-.91-1.1h-1.01Z'/%3e%3cpath%20class='st0'%20d='M65.99,31.14h-1.8l-.31-2.07h-2.19l-.31,2.07h-1.64l1.82-11.39h2.62l1.82,11.39ZM65.28,18.04c-.25.46-.51.77-.75.94-.21.15-.47.22-.79.22-.26,0-.57-.07-.92-.22l-.38-.15c-.14-.05-.26-.07-.37-.07-.3,0-.53.18-.71.54l-.91-.68c.25-.46.51-.77.75-.94.21-.14.48-.21.79-.21.26,0,.57.07.92.21l.38.15c.14.05.26.07.37.07.3,0,.53-.18.71-.54l.91.68ZM61.91,27.52h1.73l-.87-5.76-.87,5.76Z'/%3e%3cpath%20class='st0'%20d='M74.53,26.89v1.52c0,1.91-.89,2.86-2.67,2.86s-2.67-.95-2.67-2.86v-5.93c0-1.91.89-2.86,2.67-2.86s2.67.95,2.67,2.86v1.11h-1.69v-1.22c0-.75-.31-1.12-.93-1.12s-.93.37-.93,1.12v6.15c0,.74.31,1.11.93,1.11s.93-.37.93-1.11v-1.63h1.69Z'/%3e%3cpath%20class='st0'%20d='M81.4,31.14h-1.8l-.31-2.07h-2.19l-.31,2.07h-1.64l1.82-11.39h2.62l1.82,11.39ZM75.9,19.2l1.52-1.91h1.71l1.51,1.91h-1.61l-.76-.95-.75.95h-1.61ZM77.32,27.52h1.73l-.87-5.76-.87,5.76ZM83.1,15.99l-1.76,1.91h-1.26l1.17-1.91h1.86Z'/%3e%3cpath%20class='st0'%20d='M84.86,19.75c1.78,0,2.67.94,2.67,2.82v1.48c0,1.87-.89,2.81-2.67,2.81h-.85v4.28h-1.79v-11.39h2.64ZM84.01,21.37v3.86h.85c.58,0,.87-.36.87-1.08v-1.71c0-.71-.29-1.07-.87-1.07h-.85Z'/%3e%3cpath%20class='st0'%20d='M93.51,19.75c1.78,0,2.67.94,2.67,2.82v1.48c0,1.87-.89,2.81-2.67,2.81h-.85v4.28h-1.79v-11.39h2.64ZM92.66,21.37v3.86h.85c.58,0,.87-.36.87-1.08v-1.71c0-.71-.29-1.07-.87-1.07h-.85Z'/%3e%3cpath%20class='st0'%20d='M98.8,31.14h-1.79v-11.39h1.79v4.88h2.03v-4.88h1.83v11.39h-1.83v-4.88h-2.03v4.88Z'/%3e%3cpath%20class='st0'%20d='M105.36,24.55h2.46v1.62h-2.46v3.34h3.09v1.63h-4.88v-11.39h4.88v1.63h-3.09v3.18ZM108.17,17.29l-1.76,1.91h-1.26l1.17-1.91h1.86Z'/%3e%3cpath%20class='st0'%20d='M112.2,19.75c1.78,0,2.67.94,2.67,2.82v1.48c0,1.87-.89,2.81-2.67,2.81h-.85v4.28h-1.79v-11.39h2.64ZM111.35,21.37v3.86h.85c.58,0,.87-.36.87-1.08v-1.71c0-.71-.29-1.07-.87-1.07h-.85Z'/%3e%3c/g%3e%3ccircle%20class='st1'%20cx='25'%20cy='25'%20r='20'/%3e%3cpath%20class='st0'%20d='M32.78,19.27c2.92,0,4.43,2.55,5.28,5.33l.71,2.17c.14.38-.33.75-.71.75h-5.61c.19-.33.24-.71.09-1.08l-.75-2.45c-.43-1.32-.99-2.64-1.79-3.77.75-.57,1.65-.94,2.78-.94h0ZM25,18.38c3.25,0,4.9,2.78,5.89,5.89l.76,2.45c.14.42-.33.8-.8.8h-11.69c-.42,0-.94-.38-.8-.8l.75-2.45c.99-3.11,2.64-5.89,5.89-5.89h0ZM25,11.35c1.74,0,3.11,1.37,3.11,3.11s-1.37,3.11-3.11,3.11-3.11-1.41-3.11-3.11,1.41-3.11,3.11-3.11h0ZM17.27,19.27c1.08,0,1.98.38,2.73.94-.8,1.13-1.37,2.45-1.74,3.77l-.8,2.45c-.14.38-.05.75.09,1.08h-5.56c-.42,0-.9-.38-.75-.75l.71-2.17c.9-2.78,2.41-5.33,5.33-5.33h0ZM17.27,12.91c1.51,0,2.78,1.27,2.78,2.83s-1.27,2.83-2.78,2.83-2.83-1.27-2.83-2.83,1.27-2.83,2.83-2.83h0ZM32.78,12.91c1.56,0,2.78,1.27,2.78,2.83s-1.23,2.83-2.78,2.83-2.83-1.27-2.83-2.83,1.27-2.83,2.83-2.83h0ZM27.07,28.56v.09c0,.57-.24,1.08-.61,1.46h0v.05c-.38.33-.9.57-1.46.57s-1.08-.24-1.46-.61h0c-.38-.38-.61-.9-.61-1.46v-.09h1.41v.09c0,.19.05.38.19.47v.05c.09.09.28.19.47.19s.38-.09.47-.19v-.05c.14-.09.24-.28.24-.47t-.05-.09h1.41ZM30.99,28.56v.09c0,1.65-.66,3.16-1.74,4.24-1.08,1.08-2.59,1.79-4.24,1.79s-3.16-.71-4.24-1.79l-.05-.05c-1.04-1.08-1.7-2.55-1.7-4.2v-.09h1.41v.09c0,1.27.47,2.4,1.27,3.25h.05c.85.85,1.98,1.37,3.25,1.37s2.4-.52,3.25-1.37c.85-.8,1.37-1.98,1.37-3.25v-.09h1.37ZM34.99,28.56v.09c0,2.78-1.13,5.28-2.92,7.07-1.79,1.79-4.29,2.92-7.07,2.92s-5.23-1.13-7.07-2.92c-1.79-1.79-2.92-4.29-2.92-7.07v-.09h1.41v.09c0,2.4.94,4.53,2.5,6.08,1.56,1.56,3.72,2.5,6.08,2.5s4.52-.94,6.08-2.5c1.56-1.56,2.5-3.68,2.5-6.08v-.09h1.41Z'/%3e%3c/svg%3e)