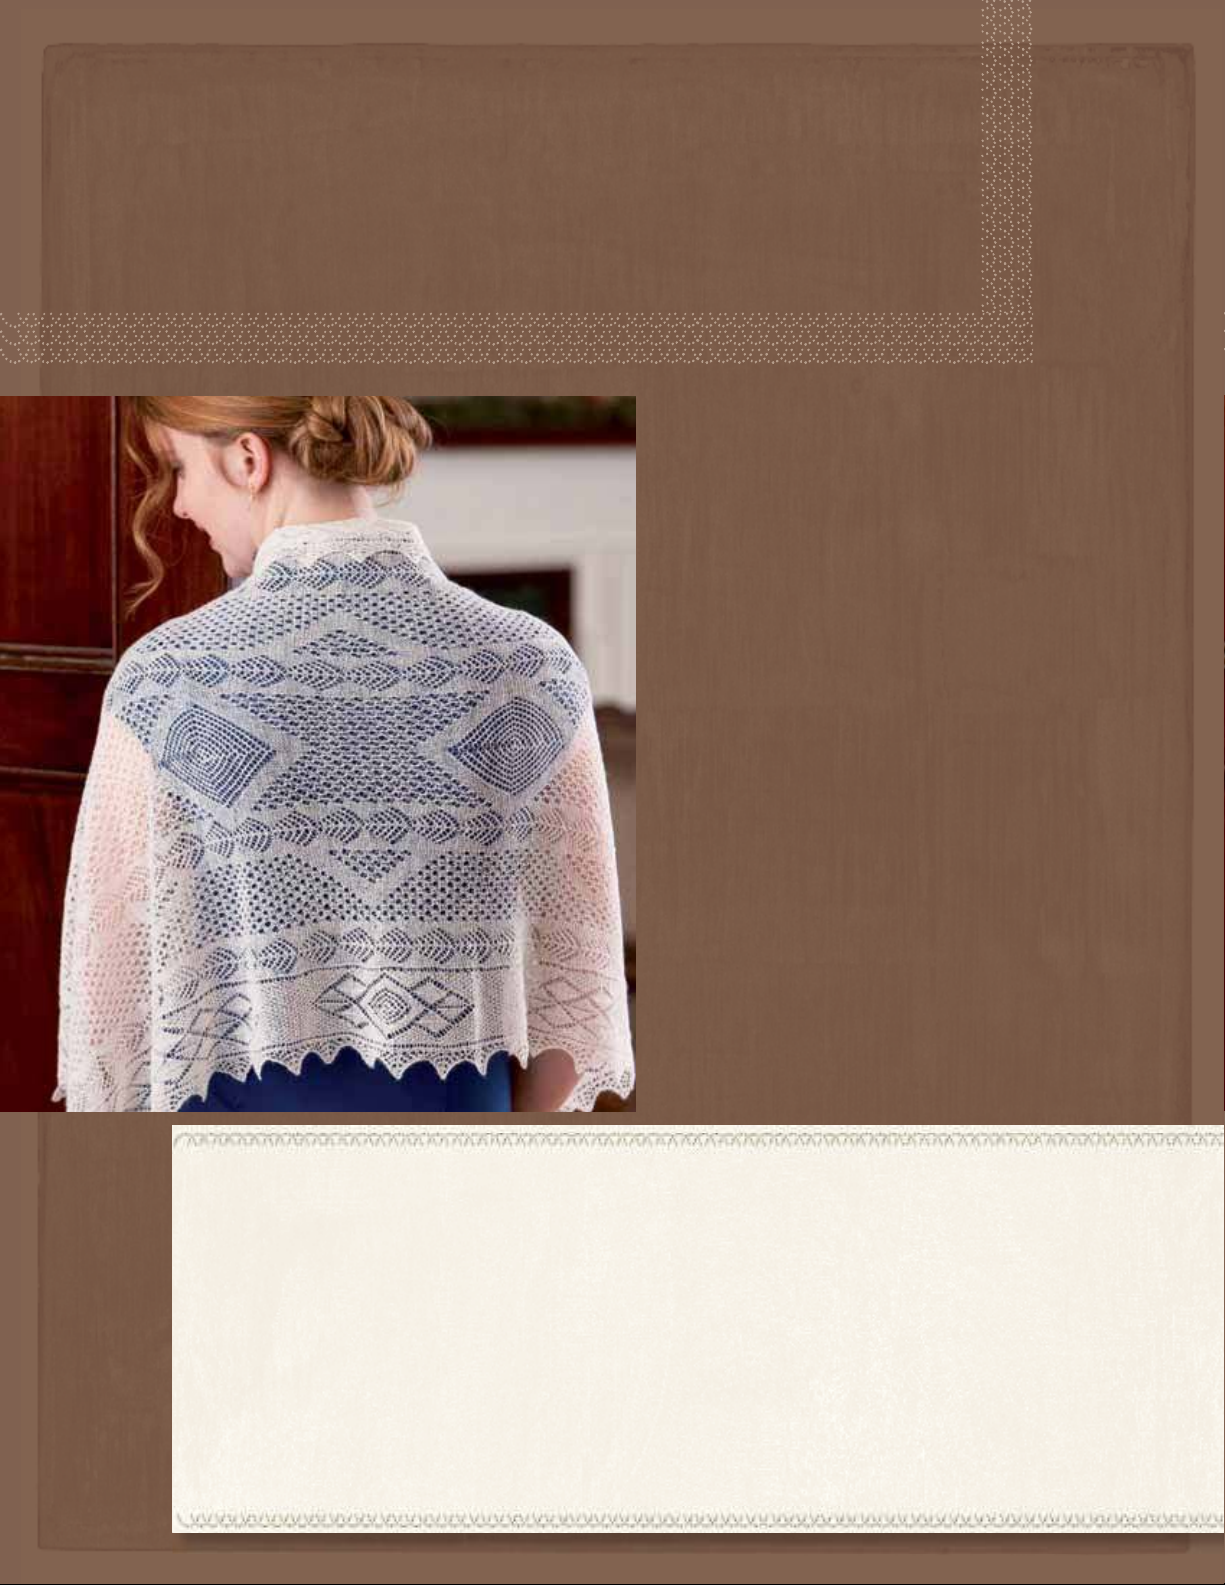
This shawl combines traditional
Orenburg motifs such as peas, fish
eyes, and diamonds, along with New
Zealand ferns and other elements.
materials
FINISHED SIZE
About 24" (61 cm) wide and 50" (127 cm)
long, after blocking.
YARN
Lace (Lace #0).
Shown here: Margaret Stove Artisan Gossamer
Lace (100% New Zealand merino wool;
547yd [500 m]/18 g): undyed natural,
4 skeins.
NEEDLES
U.S. size 0 (2 mm): straight. Adjust needle size if
necessary to obtain the correct gauge.
NOTIONS
Thin, colorfast scrap yarn; stitch holders; stitch
markers (m); tapestry needle.
GAUGE
43 sts and 55 rows = 4" (10 cm) in Fern patt from
chart; 30 sts of Diamond Border patt from chart
meas about 3" (7.5 cm) wide; 45 sts of Center patt
from chart meas about 4½" (11.5 cm) wide); all
gauges are after washing and blocking.
New Zealand
TRIBUTE TO ORENBURG
2
Stitch
Guide
Sl 1, K2tog, Psso
Sl 1 st as if to knit, k2tog, pass slipped st over—2 sts dec’d.
Sl 2, K1, P2sso
Sl 2 sts as if to k2tog, k1, pass 2 slipped sts over—2 sts
dec’d.
P2tog, K2tog in Same 2 Sts
Purl 2 sts tog but do not slip sts from lefthand needle,
then knit the same 2 sts tog and slip both sts from
lefthand needle—2 sts made from 2 sts.
Notes
• The shawl begins by working four separate corner pieces
first. After working the edging along two sides of the first
corner, stitches for the lower diamond border are picked
up along the third side of the same corner. The lower
diamond border and edging are worked in one piece
across the lower edge of the shawl, then the live stitches
at the end of the diamond border are grafted to one
side of the second corner. The edging continues around
two sides of the second corner to complete the bottom
section of the shawl.
• For the main section, stitches are picked up along the
upper edges of the first two corners and lower border.
This section consists of a diamond border and edging at
each side, and a center section worked in a combination
of fern, Russian peas, and center patterns. All stitches of
the main section are worked upwards at the same time.
• When the main section has been completed, the third
corner is grafted to the live stitches at the top of the
righthand diamond border, and then an edging is
worked around the two outer sides of the third corner.
The top diamond border begins by picking up stitches
from the remaining side of the third corner, and is
worked with its edging across the top of the shawl,
joining to the live stitches of the center section at the
end of each RS row.
• The stitches of the completed top border are grafted to
one side of the fourth corner, then an edging is worked
around the two outer sides of the fourth corner. The
held live stitches of the lefthand border and edging are
grafted to stitches picked up along the remaining side of
the fourth border.
• You may need to experiment to find the best way of
picking up stitches along the sides of the corner pieces.
If picking up a single yarnover loop from the edge does
not produce pleasing results, try picking up in both the
yarnover loop and the adjacent stitch as well.
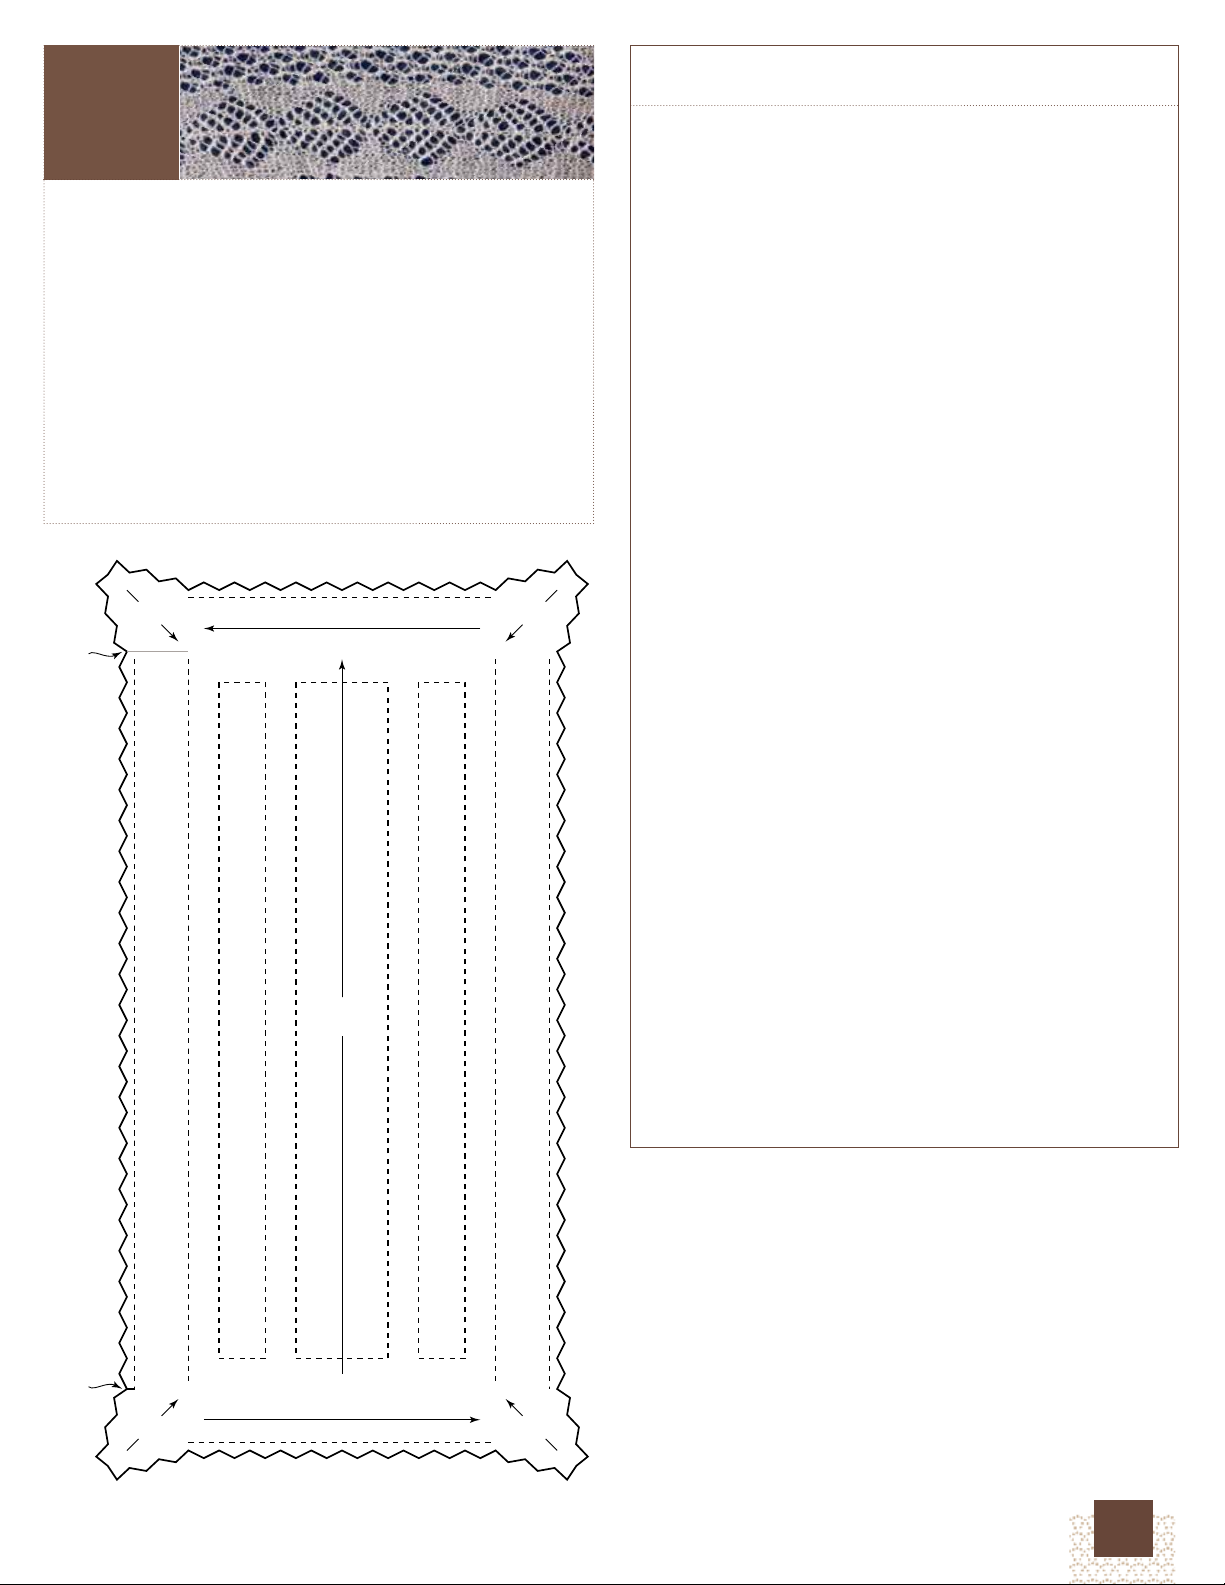
Arrows show direction of knitting.
1st
corner
2nd
corner
4th
corner 3rd
corner
edging
CO
final
pickup
and graft
lower border and edging
upper border and edging
main
section
lefthand border and edging
righthand border and edging
++++++
++++++
xxxxxxx
x
xxxxx
x
xx
x
x
xx
x
x
x
xxx
x
xx
x
x
x
xxx
xxxxx
x
xx
x
xxxxx
x
xx
x
x
xx
x
x
x
xxx
x
xx
x
x
x
xxx
xxxxxxxxxxxxxxxxxxxxxxxxxxxxxxxxxxxx
++++++
++++++
++++++
+++++++++++++++++++++++++++++++++++++++++++++
Arrows show direction of knitting.
+++ = sts picked up and worked
+++ = sts picked up and grafted
xxx = live sts joined
xxx = sts picked up and joined
3
CORNERS (Make 4)
(
)
CO 3 sts loosely.
Row 1: (WS) K3.
Row 2: (RS) [Yo, k1] 3 times—6 sts.
Row 3: Yo, k6—7 sts.
Row 4: Yo, k1, yo, ssk, k1, k2tog, yo, k1—8 sts.
Row 5: Yo, k8—9 sts.
Row 6: Yo, k1, yo, ssk, yo, [sl 1, k2tog, psso] (see Stitch
Guide), yo, k2tog, yo, k1—10 sts.
Mark the double dec just worked in this row by placing a
strand of scrap yarn in the st itself; move this marker up
as you work so you can easily identify this as the center st
for shaping purposes.
Rows 7 and 9: Yo, knit to end—1 st inc’d each row.
Row 8: Yo, k1, *yo, ssk; rep from * to marked st, k1
(center st), **k2tog, yo; rep from ** to last st, k1—1 st
inc’d.
Row 10: Yo, k1, *yo, ssk; rep from * to 1 st before marked
st, yo, [sl 1, k2tog, psso], yo, **k2tog, yo; rep from **
to last st, k1—1 st inc’d.
Rows 11–50: Rep Rows 7–10 ten more times—54 sts.
Mark each end of last row completed with scrap yarn to
indicate where to start picking up sts later.
Rows 51 and 53: Yo, k1, k2tog, knit to last 3 sts, ssk, k1—1
st dec’d.
Row 52: Yo, k1, ssk, k1, *yo, ssk; rep from * to marked st,
k1 (center st), **k2tog, yo; rep from ** to last 4 sts, k1,
k2tog, k1—1 st dec’d.
Row 54: Yo, k1, ssk, k1, *yo, ssk; rep from * to 1 st before
marked st, yo, [sl 1, k2tog, psso], yo, **k2tog, yo; rep
from ** to last 4 sts, k1, k2tog, k1—1 st dec’d.
Rows 55–90: Rep Rows 51–54 nine more times—14 sts
rem.
Rows 91, 93, 95 and 97: Rep Row 51—1 st dec’d each
row.
Row 92: Yo, k1, ssk, k1, yo, ssk, k1, k2tog, yo, k1, k2tog,
k1—1 st dec’d.
Row 94: Yo, k1, ssk, k1, yo, [sl 1, k2tog, psso], yo, k1,
k2tog, k1—1 st dec’d.
Row 96: Yo, k1, ssk, k1, yo, k2tog twice, k1—1 st dec’d.
Row 98: Yo, k1, ssk, yo, [sl 1, k2tog, psso], k1—6 sts rem.
Row 99: Yo, k1, k2tog, ssk, k1—5 sts rem.
Row 100: Yo, k1, [sl 1, k2tog, psso], k1—4 sts rem.
Row 101: Yo, [sl 1, k2tog, psso], k1—3 sts rem.
Row 102: [Sl 1, k2tog, psso]—1 st rem.
Break yarn and draw through rem st to fasten off. Make 3
more corner pieces in the same manner.
First Corner Edging
With RS of corner piece facing, beg at scrap yarn marker
at Row 50, pick up and knit 1 st from each of 25 yo loops
along one side of corner, ending at the corner CO (see
Notes). Pick up and knit 1 more st from side of CO—26
sts. Knit 1 WS row, inc 10 sts evenly—36 sts. Turn work
so RS is facing, and use the backward-loop method (see
Glossary) to CO 6 sts at beg of lefthand needle—42 sts.
The edging is worked in patt from Chart A and is joined
to the sts picked-up from the corner at the end of each
RS row as foll:
Row 1: (RS) Work Row 1 of Chart A to last st, k2tog
(last edging st tog with 1 corner st), turn—1 corner st
joined.
Row 2: (WS) Work Row 2 of Chart A to end.
Row 3: Work next RS row of chart to last st, k2tog,
turn—1 corner st joined.
Row 4: Work next WS row of chart to end.
Rows 5–24: Rep Rows 3 and 4 ten more times, ending
with Row 24 of chart—30 sts rem; 24 corner sts; 6 edg-
ing sts.
Rows 25–71: Cont to join in this manner, work Rows 1–24
of chart once more, then work Rows 1–23 of chart to
end with a RS row—6 edging sts rem; all picked-up
corner sts have been joined. Do not break yarn.
With RS still facing, pick up and knit 1 st from corner CO,
then pick up and knit 1 st from each of 25 yo loops along
next side of corner, ending at scrap yarn marker—32 sts.
Next row: (WS) Knit, inc 10 sts evenly across 26 picked-
up sts, then work Row 24 of chart over rem 6 edging
sts—42 sts.
Joining 1 picked-up corner st at end of each RS row as
before, work Rows 1–24 of Chart A 2 times, then work
Rows 1–23 once, ending with a RS row—6 edging sts rem;
all picked-up corner sts have been joined. This completes
the edging for the outer two sides of the first corner. Do
not break yarn.
4
LOWER DIAMOND BORDER
AND EDGING
With RS still facing and using needle holding 6 edging
sts, pick up and knit 1 st from each of 26 yo loops along
next side of corner from scrap yarn marker to top of
corner, then pick up and knit 1 st from point at top of
corner—33 sts.
Next row: (WS) Knit, inc 6 sts evenly across first 26
picked-up sts, then work last picked-up st and 6 edging
sts as yo, k2tog, k5—39 sts.
The edging sts cont in patt according to Chart B, and the
32 picked-up sts are worked as a 30-st diamond border
with 2 faggoting sts.
Row 1: (RS) Work Row 1 of Chart B over first 7 sts (inc
them to 8 sts), place marker (pm); work Row 1 of Dia-
mond Border chart over 30 sts, yo, ssk (faggoting sts).
Row 2: K2 (faggoting sts), work Row 2 of Diamond Bor-
der chart over 30 sts, slip marker (sl m), work Row 2 of
Chart B over last 8 sts. Slip markers on foll rows as you
come to them.
Rows 3–10: Cont edging and faggoting patts as estab-
lished, and for Diamond Border chart work Rows 3–6
twice.
Rows 11–208: Cont edging and faggoting patts as estab-
lished, and for Diamond Border chart work Rows 7–34
once, work Rows 35–58 twice, work Rows 59–110 once,
work Rows 111–134 twice, work Rows 135–156 once—
last edging row completed is Row 16 of Chart B.
Rows 209–219: Cont edging and faggoting patts as estab-
lished, and for Diamond Border chart work Rows 1–4
twice, then work Rows 1–3 once, ending with Row 3 of
Chart B.
Row 220: K2, work Row 4 of Diamond Border chart over
30 sts, and place 32 sts just worked on a holder, then
place rem 9 edging sts on a separate holder without
working them. Break yarn.
Join Lower Diamond Border
and Second Corner
Hold one of the unattached corner pieces with RS facing,
and join new yarn to point at top. With RS facing, pick up
and knit 1 st from point, then pick up and knit 1 st from
each of 26 yo loops along side of corner to end at scrap
yarn marker—27 sts. Knit 1 WS row, inc 5 sts evenly—32
sts. Break yarn, leaving a long tail for grafting. Transfer
30 sts of diamond border and 2 faggoting sts from holder
to empty needle. Hold needles with picked-up sts and sts
of diamond border and faggoting tog with WS of fabric
touching and RS facing outwards. Using tail threaded on
a tapestry needle and Kitchener St (see Glossary), graft 32
sts from each needle tog. Each set of sts ended with a WS
row, so the working the grafting with RS facing out allows
the graft to supply the missing garter row between the two
pieces.
Second Corner Edging
With RS of second corner facing, join yarn to side of
corner at scrap yarn marker adjacent to diamond border
graft. Pick up and knit 1 st from each of 25 yo loops along
one side of corner, then pick up and knit 1 more st from
side of corner CO—26 sts.
Next row: (WS) Knit, inc 20 sts evenly across 26 picked-
up sts, then work 9 held edging sts as yo, k3tog, k6
(dec them to 8 sts)—54 sts total.
Change to working the edging patt according to Chart A,
and join the sts picked-up from the corner at the end of
each RS row as foll:
Row 1: (RS) Work Row 5 of Chart A to last st, k2tog
(last edging st tog with 1 corner st), turn—1 corner st
joined.
Row 2: (WS) Work Row 6 of Chart A to end.
Row 3: Work next RS row of chart to last st, k2tog,
turn—1 corner st joined.
Row 4: Work next WS row of chart to end.
Rows 5–20: Rep Rows 3 and 4 eight more times, ending
with Row 24 of chart—42 sts rem; 36 corner sts; 6 edg-
ing sts.
Rows 21–91: Cont to join in this manner, work Rows 1–24
of chart 2 times, then work Rows 1–23 of chart to end
with a RS row—6 edging sts rem; all picked-up corner sts
have been joined. Do not break yarn.
With RS still facing and using needle holding 6 edging
sts, pick up and knit 1 st from corner CO, then pick up
and knit 1 st from each of 25 yo loops along next side of
corner, ending at scrap yarn marker—32 sts.
Next row: (WS) Knit, inc 10 sts evenly across 26 picked-
up sts, then work Row 24 of chart over rem 6 edging
sts—42 sts.
Joining 1 picked-up corner st at end of each RS row as
before, work Rows 1–24 of Chart A 2 times, then work
Rows 1–23 once, ending with a RS row—6 edging sts rem;
all picked-up corner sts have been joined. This completes
the edging for the outer two sides of the second corner.
Do not break yarn.

5
MAIN SECTION
With RS still facing and using needle holding 6 edging
sts, pick up and knit 1 st from each of 26 yo loops along
rem side of second corner, 1 st from corner point, 169 sts
along faggoted edge of lower diamond border (about 3
sts for every 4 rows), 1 st in point of first corner, 1 st each
from 26 yo loops along rem side of first corner, and 6 sts
from base of sts CO at beg of first corner edging—235 sts.
Note: The edging and diamond border at each side are
worked at the same time as the central patterns. The
righthand edging and border are worked with the RS
corresponding to the RS of the central patterns. The
lefthand edging and border are worked with the WS cor-
responding to the rest of the piece. This means you will
work the edging and diamond border at the beginning
of every row as RS pattern rows, regardless of which side
of the work is actually facing you, and the edging and
diamond border at the end of every row will be worked as
WS pattern rows.
Set-up row: (WS) Work Row 1 of Chart B over 7 sts (inc
them to 8 sts), pm, knit the next 28 sts inc them evenly
to 32 sts, pm, k165, pm, knit the next 28 sts inc them
evenly to 32 sts, pm, work last 7 sts as yo, k2tog, k5—
244 sts.
Row 1: (RS) Work Row 1 of Chart B over first 7 sts (inc
them to 8 sts), work Row 1 of Diamond Border chart
over 30 sts, work first set of faggoting sts as [yo, ssk],
work 15-st patt from Row 1 of Fern chart 11 times,
work second set of faggoting sts as [k2tog, yo], work
Row 2 of Diamond Border chart over 30 sts reading
the chart from left to right as a WS diamond row, work
Row 2 of Chart B over 8 sts.
Row 2: (WS) Work Row 3 of Chart B over 8 sts (inc them
to 9 sts), work Row 3 of Diamond Border chart over 30
sts, k2 faggoting sts, work Row 2 of Fern chart 11 times,
k2 faggoting sts, work Row 2 of Diamond Border chart
over 30 sts, work Row 2 of Chart B over 8 sts.
Note: For the rest of the main section, on RS rows work
the first set of faggoting sts as yo, ssk, and work the
second set as k2tog, yo. On WS rows, work both sets of
faggoting sts as k2.
Rows 3–10: Cont edging, faggoting, and fern patts as
established; for righthand diamond border at beg of
RS rows work Rows 3–6 twice; for lefthand diamond
border at end of RS rows, work Rows 4–6 once, then
3–6 once, then work Row 7.
Rows 11–24: Cont edging, faggoting, and fern patts as
established; for righthand diamond border work Rows
7–20; and for lefthand diamond border work Rows
8–21—last row completed is Row 24 of Fern chart, Row
24 of righthand edging, and Row 1 of lefthand edging.
Row 25: (RS) Work Row 1 of Chart B over 7 sts (inc them
to 8 sts), work Row 21 of Diamond Border over 30 sts,
[yo, ssk], work Row 1 of Fern chart over 15 sts, pm,
work Row 1 of Right Russian Peas chart over 30 sts,
pm, work Row 1 of Fern chart over 15 sts, pm, work
Row 1 of Center chart over 45 sts, pm, work Row 1 of
Fern chart over 15 sts, pm, work Row 1 of Left Russian
Peas chart over 30 sts, pm, work Row 1 of Fern chart
over 15 sts, [k2tog, yo], work Row 22 of Diamond Bor-
der over 30 sts, work Row 2 of Chart B over 8 sts.
Note: The next part of the main section requires keeping
track of a large number of patterns at once. If you think it
will be helpful, photocopy the charts and reassemble the
different parts into a large overall chart for reference.
Rows 26–552: Cont both sets of faggoting sts as estab-
lished, work the next 527 rows as foll for each patt:
Righthand edging: Work Rows 2–24 of Chart B once, then
Rows 1–24 twenty-one times.
Righthand diamond border: Work Rows 22–34 of Dia-
mond Border once, then Rows 35 to 58 twice, Rows
59–110 once, Rows 111–134 twice, and Rows 135–156
once—183 rows for first large diamond motif. Work
Rows 1–6 once, then Rows 3–6 six times—30 dividing
rows between motifs. Change to Diamond Medallion
chart and work Rows 1–102 once—102 medallion
rows. Change back to Diamond Border chart, and
work Rows 1–6 once, then Rows 3–6 six times—30
dividing rows between motifs. Work Rows 7–34, Rows
35–58 twice, Rows 59–110 once, Rows 111–134 once,
then Rows 111–140 once—182 rows for second large
diamond motif.
All fern patts: Work Rows 2–24 once, then Rows 1–24
twenty-one times.
Right and left Russian peas patts: Work Rows 2–8 once,
work Rows 1–8 ten times, work Rows 9–72 once, work
Rows 73–80 nine times, work Rows 81–160 once, work
Rows 73–80 nine times, work Rows 9–72 once, and
work Rows 1–8 eleven times.
Center patt: Work Rows 2–58 once, work Rows 59–66 ten
times, work Rows 67–170 once, work Rows 59–66 five
times, work Rows 67–170 once, work Rows 59–66 ten
times, and work Rows 171–232 once.
Lefthand diamond border: Work Rows 23–34 of Dia-
mond Border once, then Rows 35 to 58 twice, Rows
59–110 once, Rows 111–134 twice, and Rows 135–156
once—182 rows for first large diamond motif. Work
Rows 1–6 once, then Rows 3–6 six times—30 dividing
rows between motifs. Change to Diamond Medallion
chart and work Rows 1–102 once—102 medallion
rows. Change back to Diamond Border chart, and
work Rows 1–6 once, then Rows 3–6 six times—30
dividing rows between motifs. Work Rows 7–34, Rows
35–58 twice, Rows 59–110 once, Rows 111–134 once,
then Rows 111–141 once—183 rows for second large
diamond motif.


![20 ý tưởng trang trí nhà cửa đơn giản đón Tết 2021 [Mới Nhất]](https://cdn.tailieu.vn/images/document/thumbnail/2021/20210106/gusulanshi/135x160/84750944.jpg)


![Giáo trình Dinh dưỡng ăn uống (Nghề Kỹ thuật pha chế đồ uống, Trình độ Trung cấp) - Trường Cao đẳng Du lịch và Công thương [Mới nhất]](https://cdn.tailieu.vn/images/document/thumbnail/2026/20260504/alfredodistefano10/135x160/11441778230567.jpg)


![Giáo trình Khoa học hàng thực phẩm (Nghề Kỹ thuật chế biến món ăn, Trình độ Trung cấp) - Trường Cao đẳng Du lịch và Công thương [Mới nhất]](https://cdn.tailieu.vn/images/document/thumbnail/2026/20260428/ronaldinho09/135x160/26671777452763.jpg)


