Piano principles
Recording Real Pianos
HUGH ROBJOHNS
The essence of recording a musical instrument is to capture the most faithful
possible rendition of the performance without distorting the tonal quality of the
instrument or veiling it behind undesirable mechanical noises. Every piano pres-
ents its own unique set of problems and solutions and in this workshop I shall be
suggesting some practical techniques to provide a starting point. The key to
recording any musical instrument is to position the microphone in the optimal
place and this task is much easier with an understanding of how the instrument
works, where the sound comes from, how it radiates from the instrument, and
what its frequency and dynamic range is. So, as with all of my workshops to date,
I will start with a brief review of the piano to get a feel of what is involved; for some background information on the development
and design of the piano, see the ‘A Little History’ box.
Sound Creation & Radiation
The fundamental of any vibrating piano string tends to be the strongest component in its sound, although the higher harmon-
ics are at least equally strong in the lowest two octaves due to the restricted physical size of the soundboard. At the lowest note
(27.5Hz) the fundamental can be as much as 25dB below its strongest harmonics, though this is dependent on the design of the
piano. At the upper end, the highest fundamental is around 4100Hz, with harmonics extending beyond 10kHz, although these
tend to be relatively weak. The first partial above the top C is typically 20dB below its fundamental, producing an almost sinu-
soidal sound wave at these upper reaches.
Much of the character of a piano stems from the range of harmonics it produces (many of which are not straightforwardly relat-
ed to the fundamental) and noise components which are percussive in nature. The mechanical noises are primarily between 200
and 500Hz for the lower notes, centre around 200Hz for the middle of the instrument’s compass, and peak at about 1kHz for the
upper regions. This last peak is typically below the fundamental of the notes and so is not masked as effectively as for the lower
and middle regions, becoming more obvious to the ear as a consequence. These artefacts, as well as the harmonic components
generated by a struck string, are all affected by the hardness and density of the felt on the hammers, as well as the dynamic ener-
gy with which the string is struck.
Perhaps surprisingly, the overtones of struck piano strings do not adhere to a strict harmonic frequency relationship because of
the percussive nature of their resonance (compared to a continually stimulated stringed instrument), and tend to be slightly high-
er than the maths would predict. This phenomenon is particularly obvious in the higher registers of smaller pianos where the
strings are stiffer than normal due to their required strength and shortness, and results in a less pure and sonorous sound quality.
With the dampers lifted, a piano will resonate for over 10 seconds in the middle registers and over 40 seconds in the bass strings,
although the balance of decay times is very dependent on the construction.The top C may last around 3 seconds and the same
spread of decay times is apparent within the harmonic series of a single note, with the fundamental or first partial lasting far longer
than the upper harmonics. The dynamic range of a piano, measured at the rather distant reach of 10 metres, varies between
about 85dBC and 70dBC for the loudest playing (the upper notes being weaker than the bass notes). At the quiet end of the
scale, bass notes rest around 50dBC, with mid and upper notes falling to 37dBC.
The radiation of sound from a grand piano is determined fundamentally by its soundboard, but is complicated by reflections
from the floor, lid and ceiling. The body of the instrument, as well as the lid, also significantly affects the radiation pattern towards
the middle and upper frequencies. Further complications arise from the fact that the vibrations within the soundboard are not
only shaped by the frequency of the vibrating string, but also its position on the soundboard. No wonder the instrument is so
hard to record! In the lower registers, the sound radiation is largely symmetrical, although at 250Hz the sound level is about 5dB
higher behind the piano (to the player’s left) compared to the front, because the interference of the lid causes some cancellation
of these frequencies which are generated out of phase at opposite ends of the soundboard. Consequently, when standing behind
the piano these lower frequencies usually seem to localise below the instrument. The main energy lobe in the horizontal plane is
directed forwards over a 60 degree angle to the player’s right.
At middle frequencies, the open lid starts to reflect sounds out of the instrument with greater directivity (the long support typ-
ically angles the lid at about 38 degrees), with the best projection being forwards (to the right from a player’s point of view), and
upwards — typically between horizontal and 55 degrees up. The timbre from directly above the piano is relatively dull due to the
HF screening caused by the lid. In the horizontal plane the middle registers are radiated pretty symmetrically, although the rear
bottom quarter of the instrument suffers from weakened fundamentals (up to 10dB down compared to the front).
“Miking a piano is never easy; I have found it to be the most
frustrating, yet rewarding instrument to work with.”

The upper registers of the instrument are
much more strongly affected by the lid, with
a strong directivity between 15 and 35
degrees from the horizontal towards the
front — the upper edge more or less follow-
ing the angle of the lid itself. Above and
below these limits the upper harmonics can
be as much as 10dB below the maximum
found ‘on-axis’. In the horizontal plane the
main lobe is directed straight forward with a
second lobe about 30 degrees towards the
bottom end of the instrument. These lobes
are only about 10 degrees wide for the high-
est frequencies, so to capture the true bril-
liance of the instrument a microphone must
be placed within a relatively narrow ‘sweet
spot’. The mechanical noise components of the instruments do not radiate in the same way as the musical sounds, and tend to
be much stronger, relative to the wanted string sounds, behind the piano than in front. Not a good idea to mic a piano from
behind then!
The changes to the sound radiation when the piano lid is closed are fairly obvious. The sound becomes duller as the high fre-
quencies can not radiate as effectively, and the overall level decreases slightly. The radiation pattern loses its tendency to lobe
upwards and towards the front, and a stronger lobe appears towards the player (principally through the opening behind the
music stand). If the lid is half open, on the short stand, it sets an angle of about 10 degrees but, surprisingly, the radiation pattern
is remarkably similar to the condition with the lid fully open. The principal radiation lobes are between 10 and 60 degrees again,
although the maximum amplitude is less than with the lid fully open, particularly at the higher frequencies of course. The overall
effect is of a slightly duller sound projection, without the full brilliance and clarity of which the instrument is capable.
Taking the lid completely off the piano really messes up the radiation pattern, with a reduction in energy in the horizontal plane
and a marked increase in the vertical plane. All obvious stuff really, and it results in the tone of the instrument becoming duller,
although this is very dependent on the proximity and reflective characteristics of the ceiling, and the tone often also becomes
thinner as there is a pronounced reduction in the low-frequency components. The main high-frequency directional lobe in the
horizontal plane is out across the player’s right shoulder, about 60 degrees back from the main frontal axis, and upper-mid com-
ponents (around 1kHz) are mainly directed behind the piano.
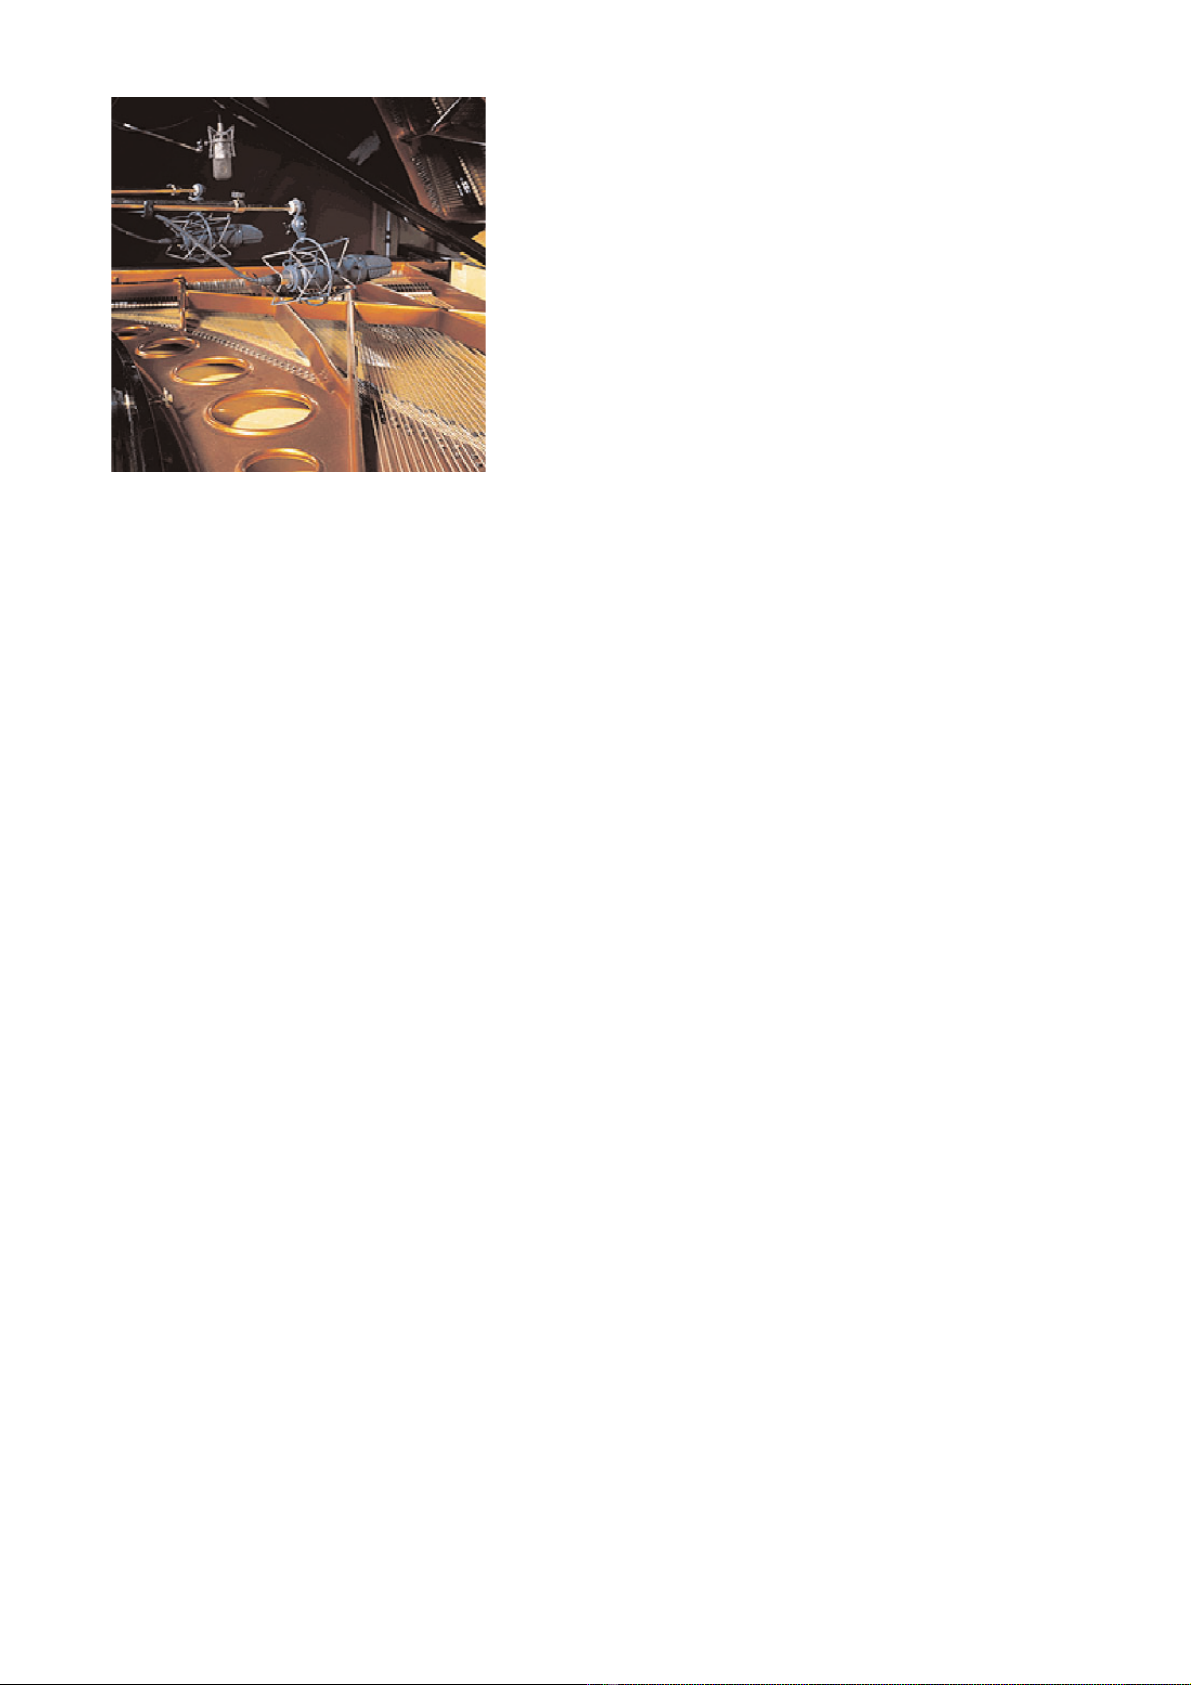
Microphone Techniques
Miking a piano is never easy; I have found it to be the
most frustrating, yet rewarding instrument to work
with. Needless to say, the room plays a very impor-
tant role, as does the position of the instrument with-
in the room. Experiment with this aspect before you
even plug a mic in, because if the instrument is setting
off room resonances, the recorded sound will always
be poor. I will initially consider grand pianos, then
modify the techniques to suit uprights in the box
below. There is no one perfect technique for the
piano and, like many instruments, different perform-
ers can create totally different sounds from the same
instrument in the same conditions, often requiring
totally different mic techniques to capture the best
sound. The suggestions below should only be taken
as starting points, not complete solutions!
As with all instruments, the best sound is obtained at
a distance where the blend of acoustic elements from
the entire piano have combined into their composite
form. However, because of the size of a grand piano
(anything from five to nine feet long), this distance tends to be far greater than for any other instrument, putting rather more
emphasis on the room acoustics and microphone technique. The required sound is a combination of all the constituent parts —
Upright Pianos
The constricted physical nature of an upright piano makes life even harder
for the engineer than with grand pianos. However, we can immediately dis-
card all the distant-mic techniques (see above) because the piano simply
does not radiate sound in an appropriate way. The easiest technique is to
open the top lid and mic from above with one or two mics as appropriate.
Positioning the mics inside the cavity provides greater isolation but tends to
sound coloured, particularly at the top end. Another good technique for
isolation is to tape pressure-zone mics to the wall directly behind the sound-
board (remove the casework first), or use a bespoke contact mic like the C-
Ducers.
A better solution is to remove the kick board at the front of the piano below
the keyboard and use a pair of mics to pick up the bass and treble strings to
the right and left (respectively). Better still is to remove the back of the piano
to reveal the soundboard, and use a pair of mics, one each side as before —
all the positioning rules previously discussed still apply. This gives rather less
hammer noise and a better balance of sound to my ears, but make sure the
piano is well away from walls — the soundboard should be facing into the
room, not the wall! If there is sufficient space, another technique is to put
pressure-zone mics on the floor anything up to a metre away from the piano
and slightly wider. It makes little difference whether in front or behind the
piano.
Small peaks
and troughs in
radiation to
rear
Main lobe
1 KHz
2 KHz
4 KHz
Second lobe
Ideal mic
position
the hammers on the strings, direct radiation, sound emerging from the soundboard, reflections and guidance from the lid, and
reflections from the floor and ceiling — and these sources are spread over a wide physical area, so very close miking is unlikely to
be successful! In my experience, this kind of technique typically results in over-emphasis of a particular aspect of the piano sound,
producing a coloured and unnatural result, although it is often the only solution.
My ideal technique, used in a large nice-sounding room or hall, would be a coincident or near-coincident pair of mics (typically
cardioid or hypercardioid depending on the required image width of the instrument) placed about four metres back from the
front of the piano and about two to three metres up, positioned to be just below an imaginary line extending along the axis of
the fully open lid. Moving the mics towards the tail of the piano tends to decrease brilliance and increase warmth, whilst com-
ing round more towards the keyboard does the opposite. Often a move of only a few centimetres can make a large difference
but there is usually a well defined position somewhere on that arc which sounds just right and a little experimentation will quick-
ly locate it. Use microphones with the smoothest off-axis response and extended bass end if possible — typically large-
diaphragm capacitor mics like the Neumann KM86 or AKG C414. Many of the lower-cost electret mics are equally suitable, but
avoid mics with presence peaks.
To s ave setup time, I would normally rig several pairs of mics
in likely positions so that I can quickly compare them and
home in on the best array. This helps to win over the pianist,
who is usually keyed up to record and doesn’t want hours of tedious rehearsing while you find a decent mic position!
It is a matter of personal taste, but for serious solo piano music I would set the microphones such that the piano occupies the
central area of the stereo image, say from half left to half right, with the hall acoustic filling the rest of the sound stage. In an orches-
tral setting, the piano image would be smaller still, allowing it to nestle within, but forward of, the wider orchestra’s image. A near-
full width image might be more appropriate in pop music, particularly if the piano is not a solo instrument in the final recording.
If you have a vocalist with the piano, make sure the vocalist mic is positioned to minimise pickup of the piano as the spill will pro-
duce unwanted coloration and reduce your control.
In pop music, the piano is typically recorded from a much closer and drier perspective, giving a perception of greater clarity and
detail, and helping to reduce spill from other instruments. Moving the mics in much closer puts far greater demands on them as
much of the sound is likely to arrive off-axis. Ideally, use omnidirectional mics, but if you need directional mics to reduce spill from
other instruments it is essential that they have the most smooth and progressive off-axis response possible — sharp dips or peaks
in sensitivity at specific frequencies will become very audible as a coloration which can not be removed with desk EQ. It is also
important that you don’t position the mics too close, because the size of the soundboard and spread of the strings means you
will over-emphasise a small part of the instrument’s compass. Try to stay at least a quarter of a metre (nine inches) away if at all
possible. In a professional studio it should be possible to position the piano so that it fires into a trap, or to position it within a
separate booth, both of which will help reduce spill considerably.
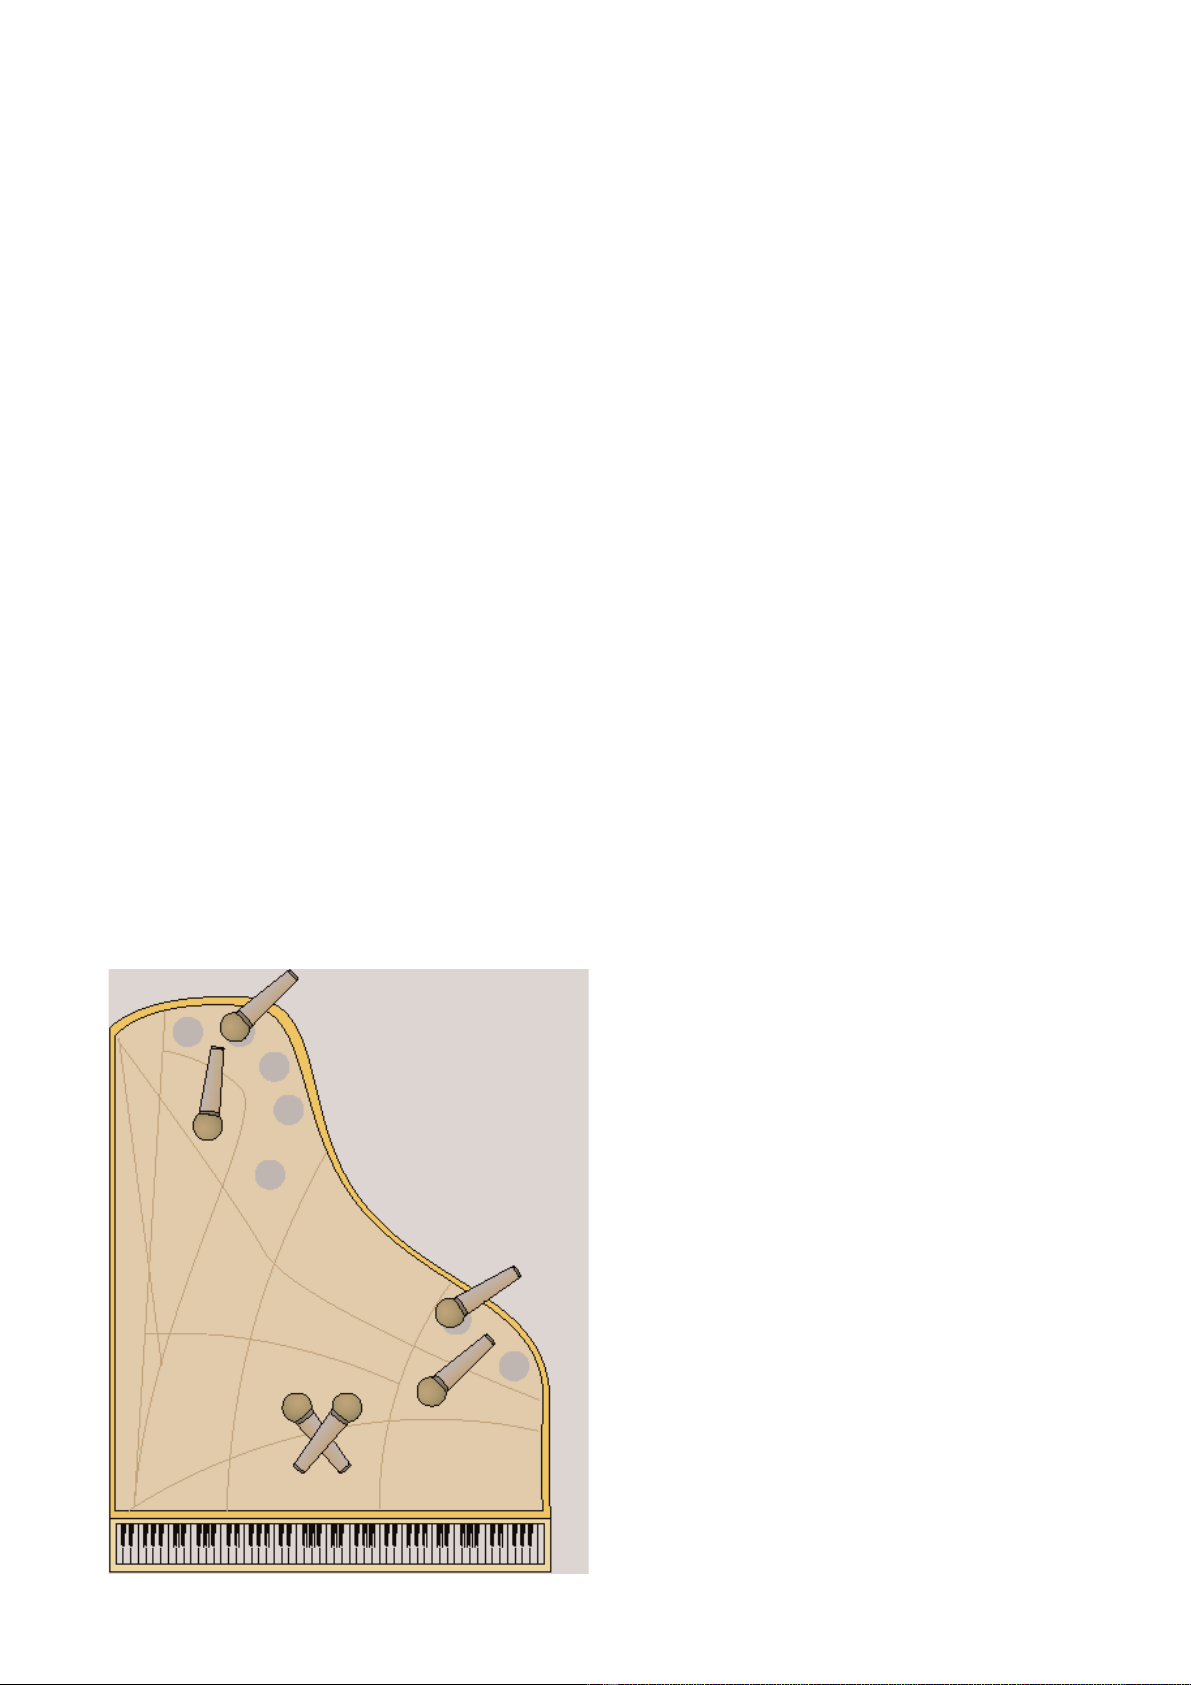
There are lots of ‘perfect’ close mic techniques for the piano,
although they are all compromised to some degree. It is worth
experimenting with a variety of techniques to find the best for the
particular situation. A single mic looking into the piano from
about halfway around the curve, half a metre back and about
25cm above the lip can produce pleasant results for a mono con-
tribution — experiment with its position along the curve for the
best balance. A very common stereo technique is a pair of spaced
mics, one directly above the treble strings (typically an octave
above middle C) and the other above the bass strings, both about
a quarter metre above the strings. The top mic needs to be about
a quarter of a metre away from the hammers and the bass mic
positioned in the foot of the instrument where the smoothest
bass response can be obtained. This technique works best with
the lid removed or fully open to get the maximum effect from the
soundboard, and it can be impossible to get sufficient height for
the microphone at the bass end with the lid only partially open.
The two mics can be panned partially left and right as required,
but beware phase cancellations in mono. A way around this is to
use a coincident pair of cardioids around the middle of the piano,
but at a greater mutual angle than normal — say 110 degrees —
to minimise the tendency to over-emphasise the strings directly
below the mic. Again, mics with a very smooth off-axis response
“In pop music, the piano is typically recorded from a much closer
and drier perspective, giving a perception of greater clarity and
detail, and helping to reduce spill from other instruments.”
AClose mics over sound holes
CSpaced pair over strings
A
B
A
C
C
BCoincident pair

are essential: the more accurate and consistent the polar
pattern, the better the results.
In general, placing mics closer to the hammers produces a
more percussive and dynamic sound, but one lacking in
sonority, sustain and warmth. It can be very effective in
the right context, but beware transient distortion in the
mics, mixing console, and recorders (particularly analogue
recorders — digital machines tend to have very accurate
peak-reading meters); consider using microphone pre-
attenuators, and leave more headroom than you would
normally. Moving the mics towards the tail of the instru-
ment generally reduces the dynamics and creates a richer,
smoother sound, free of the clatter of the hammers.
If isolation is a real problem, pressure-zone mics can be
taped to the inside of the lid in roughly the same posi-
tions as previously described with the lid open, half open,
or even shut entirely (dress the cables carefully, though, so
that the weight of the lid does not damage them). Apart
from the inevitable CLANG as the tape supporting one
of the mics gives up half way through the best take, this
can be a very effective technique, although some heavy
EQ is often needed to remove the boxiness when the lid
is shut completely. The other solution to the problem is
provided by contact mics like the C-Ducer range. These
may be affixed to the underside of the piano, or on to the
soundboard from above and give a very clean sound, and
although it is rather strange compared to the natural
acoustic output of the instrument, it is extremely free of
spill!
Many engineers favour miking a piano in a rhythm-sec-
tion context near its sound holes in the frame on the
curved edge of the instrument, as this gives a good
punchy sound and, with the lid closed, great isolation too.
For a single-mic technique try a central sound hole, but I
prefer two mics, one in the second hole from the top and
the other in the first or second hole from the bottom.
Position the mics so that they look directly into the hole
and make sure that they are below the line of the closed
lid. Use heavy low-table stands with felt or sponge on
their base, and take care dressing the mic cables so that
the weight of the lid does not damage them and they do
not vibrate or rattle. Small omni mics work well in this
application, and it is often worth using the pre-attenua-
tors. This isolation can be further improved if necessary
with heavy drapes over the piano (all the way to the floor
preferably), although extensive EQ will be required to
make the piano sound more natural and less closed-in —
particularly in the 2 to 6kHz region. Mics with presence
peaks can be used to advantage in this context.
For the ultimate in isolation, do as Tori Amos does in her
concert tours. Use a piano equipped with MIDI to drive a
decent sound module — the result is total isolation,
which is perfectly suitable for live sound when the full
band is playing. For the quieter numbers, revert to the
mics over the piano.
Published in SOS May 1999
A Little History
The practical invention around 1709 of the ‘gravicembalo com piano e forte’
is attributed to an Italian, Bartolommeo, who effectively combined the two
most popular keyboard instruments of the time, the clavichord and harpsi-
chord. He took the action from the clavichord, replacing its metal blades
(which struck the string) with leather-covered wooden hammers, and incor-
porated the string-damping techniques of the harpsichord. His invention
brought viable solutions for the three main problems with this kind of
action: an effective mechanism to project the hammer to the string, an
‘escapement’ allowing the hammer to fall back without rebound regardless
of whether the key has been released, and the controlled damping of the
resulting sound.
The new instrument was proclaimed at the time as being capable of “pro-
ducing a sound more or less powerful according to the force with which one
depresses the key”. However, although these early instruments contain all
the elements of a modern piano, they were not an immediate success and
much of the pioneering work was forgotten. An organist, Gottlieb Schroter,
is often credited as the German inventor of the piano as he reinvented a suit-
able hammer mechanism in 1717, but it was not until the 1740s that the idea
was widely accepted. Another German, Gottlieb Silbermann, came up with
the ‘Prell Mechanism’ to solve the problem of rapid repetition of notes, and
Andreas Stein added an escapement to this in the 1770s to produce the cel-
ebrated ‘German or Viennese Action’, which was when composers started
taking the instrument seriously. Instruments of this period are generally
known as Fortepianos and tend to have a rather dull and overdamped
sound in comparison with modern instruments. Many of these pianos
retained the overall shape of the harpsichord and resembled a rectangular
table (hence the term ‘square pianos’) with the keyboard along the long side
of the instrument, and the strings running perpendicular to the keys, with a
single string in the bass and double strings in the treble.
Not all the development of the piano occurred in continental Europe,
though; in 1783, John Broadwood took out a patent for an ‘English Grand
Action’ which gained considerable fame for its “rich and powerful sonority”.
Frenchman Sebastian Erard produced his first piano in 1777 and built a con-
siderable reputation under royal protection, but he left France in 1792 due
to the Revolution there, and continued developing the instrument in
London. His major claim to fame is the invention of the ‘double escapement’
in 1818, a mechanism perfected and patented by his nephew, Pierre Erard in
1821. This new action held the hammer close to the string so that notes
could be repeated quickly without having to wait for the hammer to fall
back to its normal resting position, and most of the major piano makers
adopted the action under license — Steinway in America, Bechstein and
Steinweg in Germany, and Broadwood in Britain, for example.
Around this time the piano had a compass of six octaves, piano and sustain
pedals, and had acquired an iron frame which made it more powerful and
allowed triple strings in the treble and single-wound steel strings in the bass.
The iron frame of a full-size modern grand piano has to sustain some 20 tons
of string tension! In 1828 the idea of an upright piano was conceived, with
the strings arranged vertically and crossing diagonally to reduce the overall
height, bass from top left to bottom right and treble in the opposite direc-
tion. It was in this domestically acceptable form that the piano conquered
the drawing rooms of Europe through the end of the 19th and much of the
20th century. The instrument continued to develop in minor ways, Steinway
introducing in 1880 a third pedal on their largest instruments to sustain the
lowest three octaves independently of the rest of the keyboard, for example.
The modern eight-octave instrument employs felt-covered hammers to
strike the strings and a damper mechanism which only damps the string
when the key is fully released. A sustain pedal holds the dampers away from
the strings regardless of the position of the keys, and the soft pedal either
reduces the throw or travel of the hammers so that they strike with less
force, or shifts their position so that they strike fewer of the available strings
for each note.

IVORY POWER
Acoustic Piano Miking Workshop
PAUL WHITE
With so many excellent and inexpensive MIDI piano modules currently on the market, you might wonder why anyone bothers
to go to the trouble of recording the real thing — or at least, you might if you haven’t already listened to the difference between
a good piano and its sample-based emulation. Now, I didn’t get where I am today without knowing the difference between a
good piano and its sample-based emulation; the truth of the matter is that a piano is a living, breathing instrument full of reso-
nances and vibrations that are far too complex to emulate with absolute accuracy. For example, whenever you play a note on a
real piano, the other strings also vibrate in sympathy, but in different ways depending on which note you’ve played and how hard.
If you play two notes at a time, the pattern of sympathetic resonances gets more complex, but because of the way in which most
electronic pianos are sampled, the best you can hope for is that each note will be accompanied by the sympathetic resonances
that occur when that note is played in isolation. And unless each separate note is sampled (as opposed to one note being trans-
posed to cover several keys), the resonances will also be transposed depending on the note you play.
Then there’s the way in which the timbre changes with dynamics to consider. Velocity crossfading between a few discrete sam-
ples or using a velocity-controlled filter is never going to capture the subtle nuances of a real piano played by a virtuoso per-
former, and while a MIDI piano might be fine as part of a mix, few piano players feel entirely comfortable using them for solo per-
formances or prominent parts. In such cases, there’s no alternative but to get out the mics and record the real thing.
The Piano Sound
When it comes to recording, the acoustic piano isn’t without its problems; for a start, the sound doesn’t just emanate from one
convenient point but from the strings, the soundboard and the casework of the instrument, and it’s only when all these vibrat-
ing parts make their contribution that a true sound can be captured. To further frustrate the recording engineer, there are vari-
ous mechanical noises, such as the pedals and dampers, that must be minimised. A change in playing style is sometimes all that’s
needed, but it’s not uncommon to have to wrap the pedals in cloth to stop them thumping. And, of course, you have acoustic
spill and room acoustics to worry about.
The Grand Gesture
Most important piano recordings are made using a grand piano unless the musical style specifically needs the sound of an
upright, and it’s generally thought that the larger the piano, the better the sound, especially at the bass end.
Before getting into mic positions, it’s necessary to think about the sound of the instrument and the type of mics that will be need-
ed to do it justice. The piano spans the entire musical spectrum, from deep bass to almost ultrasonic harmonics, so a microphone
with a wide frequency response is a must. A good capacitor or back-electret microphone is the preferred choice, though you can
exercise a degree of artistic choice in deciding to go for a ruthlessly honest small capsule model, or a more flattering but less accu-
rate large-diaphragm mic. Aside from their excellent frequency response, capacitor mics are very sensitive, which means they’ll be
able to capture the dynamic range of the instrument without introducing unwanted noise, even when you’re recording from sev-
eral feet away. For demo work, good dynamic mics will produce acceptable results, but capacitor models are really the only choice
for release-quality recordings.
Pianos are most often recorded in stereo and any of the standard stereo mic techniques may be applied. You can use spaced
omnis, coincident cardioids, MS pairs or PZM mics, though if you’re worried about mono compatibility, you may feel safer stick-
ing to a coincident mic setup rather than a spaced arrangement, as spaced mics, by their very geometry, introduce phase effects
which may cause the sound to change for the worse when you hit the console’s mono button. On the other hand, spaced micro-
phones do allow more control in balancing the upper and lower registers of the instrument if you opt for a close-miking
approach.
Some engineers habitually use three or more mics, but this runs the risk of more serious phase problems, so unless you’ve got
plenty of time to experiment, it may be safer to stick to a stereo pair. The only exception to this rule is when using spaced omnis
at a distance from the piano, as this often leads to a lack of definition in the centre of the soundstage — an additional centre mic
can help to hold the sound together.
Mic Positions
Before deciding on a mic position, decide on the sound you want. Pop recordings may require a bright, up-front sound, where
accuracy is less important than getting the right type of sound, while for classical and jazz work, you will probably want to cap-
ture the instrument as accurately as possible, including a little ambience from the environment.
Assuming that the room is sympathetic to the piano and that spill from nearby instruments isn’t a problem, a simple stereo pair


![Giáo trình Guitar điện và Acoustic [chuẩn nhất]](https://cdn.tailieu.vn/images/document/thumbnail/2026/20260508/vispacex_27/135x160/351778217016.jpg)
![Giáo trình Fingerstyle chuyển soạn [mới nhất]](https://cdn.tailieu.vn/images/document/thumbnail/2026/20260508/vispacex_27/135x160/8701778219948.jpg)
![Giáo trình Đệm hát nâng cao (Tập 2) [Mới nhất]](https://cdn.tailieu.vn/images/document/thumbnail/2026/20260508/vispacex_27/135x160/7001778218731.jpg)


%20--%3e%3cdefs%3e%3cstyle%3e%20.st0%20{%20fill:%20%23fff;%20}%20.st1%20{%20fill:%20%237800fa;%20}%20%3c/style%3e%3c/defs%3e%3cpath%20class='st1'%20d='M117.78,12.18H43.11c2.9,3.47,4.65,7.94,4.65,12.82,0,5.6-2.3,10.66-6.01,14.29h76.02l7.22-13.56-7.22-13.56Z'/%3e%3cg%3e%3cpath%20class='st0'%20d='M53.58,26.17h-.59v-1.46h.59v-4.96h2.83c1.78,0,2.67.94,2.67,2.82v5.76c0,1.87-.89,2.81-2.67,2.81h-2.83v-4.96ZM55.36,21.37v3.34h1.1v1.46h-1.1v3.34h1.01c.61,0,.91-.37.91-1.1v-5.93c0-.74-.3-1.1-.91-1.1h-1.01Z'/%3e%3cpath%20class='st0'%20d='M65.99,31.14h-1.8l-.31-2.07h-2.19l-.31,2.07h-1.64l1.82-11.39h2.62l1.82,11.39ZM65.28,18.04c-.25.46-.51.77-.75.94-.21.15-.47.22-.79.22-.26,0-.57-.07-.92-.22l-.38-.15c-.14-.05-.26-.07-.37-.07-.3,0-.53.18-.71.54l-.91-.68c.25-.46.51-.77.75-.94.21-.14.48-.21.79-.21.26,0,.57.07.92.21l.38.15c.14.05.26.07.37.07.3,0,.53-.18.71-.54l.91.68ZM61.91,27.52h1.73l-.87-5.76-.87,5.76Z'/%3e%3cpath%20class='st0'%20d='M74.53,26.89v1.52c0,1.91-.89,2.86-2.67,2.86s-2.67-.95-2.67-2.86v-5.93c0-1.91.89-2.86,2.67-2.86s2.67.95,2.67,2.86v1.11h-1.69v-1.22c0-.75-.31-1.12-.93-1.12s-.93.37-.93,1.12v6.15c0,.74.31,1.11.93,1.11s.93-.37.93-1.11v-1.63h1.69Z'/%3e%3cpath%20class='st0'%20d='M81.4,31.14h-1.8l-.31-2.07h-2.19l-.31,2.07h-1.64l1.82-11.39h2.62l1.82,11.39ZM75.9,19.2l1.52-1.91h1.71l1.51,1.91h-1.61l-.76-.95-.75.95h-1.61ZM77.32,27.52h1.73l-.87-5.76-.87,5.76ZM83.1,15.99l-1.76,1.91h-1.26l1.17-1.91h1.86Z'/%3e%3cpath%20class='st0'%20d='M84.86,19.75c1.78,0,2.67.94,2.67,2.82v1.48c0,1.87-.89,2.81-2.67,2.81h-.85v4.28h-1.79v-11.39h2.64ZM84.01,21.37v3.86h.85c.58,0,.87-.36.87-1.08v-1.71c0-.71-.29-1.07-.87-1.07h-.85Z'/%3e%3cpath%20class='st0'%20d='M93.51,19.75c1.78,0,2.67.94,2.67,2.82v1.48c0,1.87-.89,2.81-2.67,2.81h-.85v4.28h-1.79v-11.39h2.64ZM92.66,21.37v3.86h.85c.58,0,.87-.36.87-1.08v-1.71c0-.71-.29-1.07-.87-1.07h-.85Z'/%3e%3cpath%20class='st0'%20d='M98.8,31.14h-1.79v-11.39h1.79v4.88h2.03v-4.88h1.83v11.39h-1.83v-4.88h-2.03v4.88Z'/%3e%3cpath%20class='st0'%20d='M105.36,24.55h2.46v1.62h-2.46v3.34h3.09v1.63h-4.88v-11.39h4.88v1.63h-3.09v3.18ZM108.17,17.29l-1.76,1.91h-1.26l1.17-1.91h1.86Z'/%3e%3cpath%20class='st0'%20d='M112.2,19.75c1.78,0,2.67.94,2.67,2.82v1.48c0,1.87-.89,2.81-2.67,2.81h-.85v4.28h-1.79v-11.39h2.64ZM111.35,21.37v3.86h.85c.58,0,.87-.36.87-1.08v-1.71c0-.71-.29-1.07-.87-1.07h-.85Z'/%3e%3c/g%3e%3ccircle%20class='st1'%20cx='25'%20cy='25'%20r='20'/%3e%3cpath%20class='st0'%20d='M32.78,19.27c2.92,0,4.43,2.55,5.28,5.33l.71,2.17c.14.38-.33.75-.71.75h-5.61c.19-.33.24-.71.09-1.08l-.75-2.45c-.43-1.32-.99-2.64-1.79-3.77.75-.57,1.65-.94,2.78-.94h0ZM25,18.38c3.25,0,4.9,2.78,5.89,5.89l.76,2.45c.14.42-.33.8-.8.8h-11.69c-.42,0-.94-.38-.8-.8l.75-2.45c.99-3.11,2.64-5.89,5.89-5.89h0ZM25,11.35c1.74,0,3.11,1.37,3.11,3.11s-1.37,3.11-3.11,3.11-3.11-1.41-3.11-3.11,1.41-3.11,3.11-3.11h0ZM17.27,19.27c1.08,0,1.98.38,2.73.94-.8,1.13-1.37,2.45-1.74,3.77l-.8,2.45c-.14.38-.05.75.09,1.08h-5.56c-.42,0-.9-.38-.75-.75l.71-2.17c.9-2.78,2.41-5.33,5.33-5.33h0ZM17.27,12.91c1.51,0,2.78,1.27,2.78,2.83s-1.27,2.83-2.78,2.83-2.83-1.27-2.83-2.83,1.27-2.83,2.83-2.83h0ZM32.78,12.91c1.56,0,2.78,1.27,2.78,2.83s-1.23,2.83-2.78,2.83-2.83-1.27-2.83-2.83,1.27-2.83,2.83-2.83h0ZM27.07,28.56v.09c0,.57-.24,1.08-.61,1.46h0v.05c-.38.33-.9.57-1.46.57s-1.08-.24-1.46-.61h0c-.38-.38-.61-.9-.61-1.46v-.09h1.41v.09c0,.19.05.38.19.47v.05c.09.09.28.19.47.19s.38-.09.47-.19v-.05c.14-.09.24-.28.24-.47t-.05-.09h1.41ZM30.99,28.56v.09c0,1.65-.66,3.16-1.74,4.24-1.08,1.08-2.59,1.79-4.24,1.79s-3.16-.71-4.24-1.79l-.05-.05c-1.04-1.08-1.7-2.55-1.7-4.2v-.09h1.41v.09c0,1.27.47,2.4,1.27,3.25h.05c.85.85,1.98,1.37,3.25,1.37s2.4-.52,3.25-1.37c.85-.8,1.37-1.98,1.37-3.25v-.09h1.37ZM34.99,28.56v.09c0,2.78-1.13,5.28-2.92,7.07-1.79,1.79-4.29,2.92-7.07,2.92s-5.23-1.13-7.07-2.92c-1.79-1.79-2.92-4.29-2.92-7.07v-.09h1.41v.09c0,2.4.94,4.53,2.5,6.08,1.56,1.56,3.72,2.5,6.08,2.5s4.52-.94,6.08-2.5c1.56-1.56,2.5-3.68,2.5-6.08v-.09h1.41Z'/%3e%3c/svg%3e)