Folder redirection can be seen as a subset of roaming profiles. By specifying an alternate location
for these folders on a network share, the user has access to these folders no matter which computer
he or she uses to log on.
Of the four folders that can be redirected, setting the My Documents folder for redirection is
probably the most advantageous. Not only will the user have his or her data available at any com-
puter, but storing this data on the server allows the data to be easily backed up to tape or other
offline storage media. As an administrator, you can also set quotas on server storage, helping to keep
the size of the My Documents folder in check.You can also take advantage of the offline folders
feature of Windows 2000 and Windows XP to keep the data available to users when they are not on
the network.
When setting up folder redirection, you should allow the system to create the folders in the
location where the data will be directed. A number of permissions must be set correctly to maintain
security on the redirected folders.Your best bet is to let the system handle this part of the process.
Folder redirection settings are located in the User Configuration area of the GPO under
Windows Settings.To enable redirection of one of the four folders, follow these steps:
1. Right-click the folder name and select Properties.
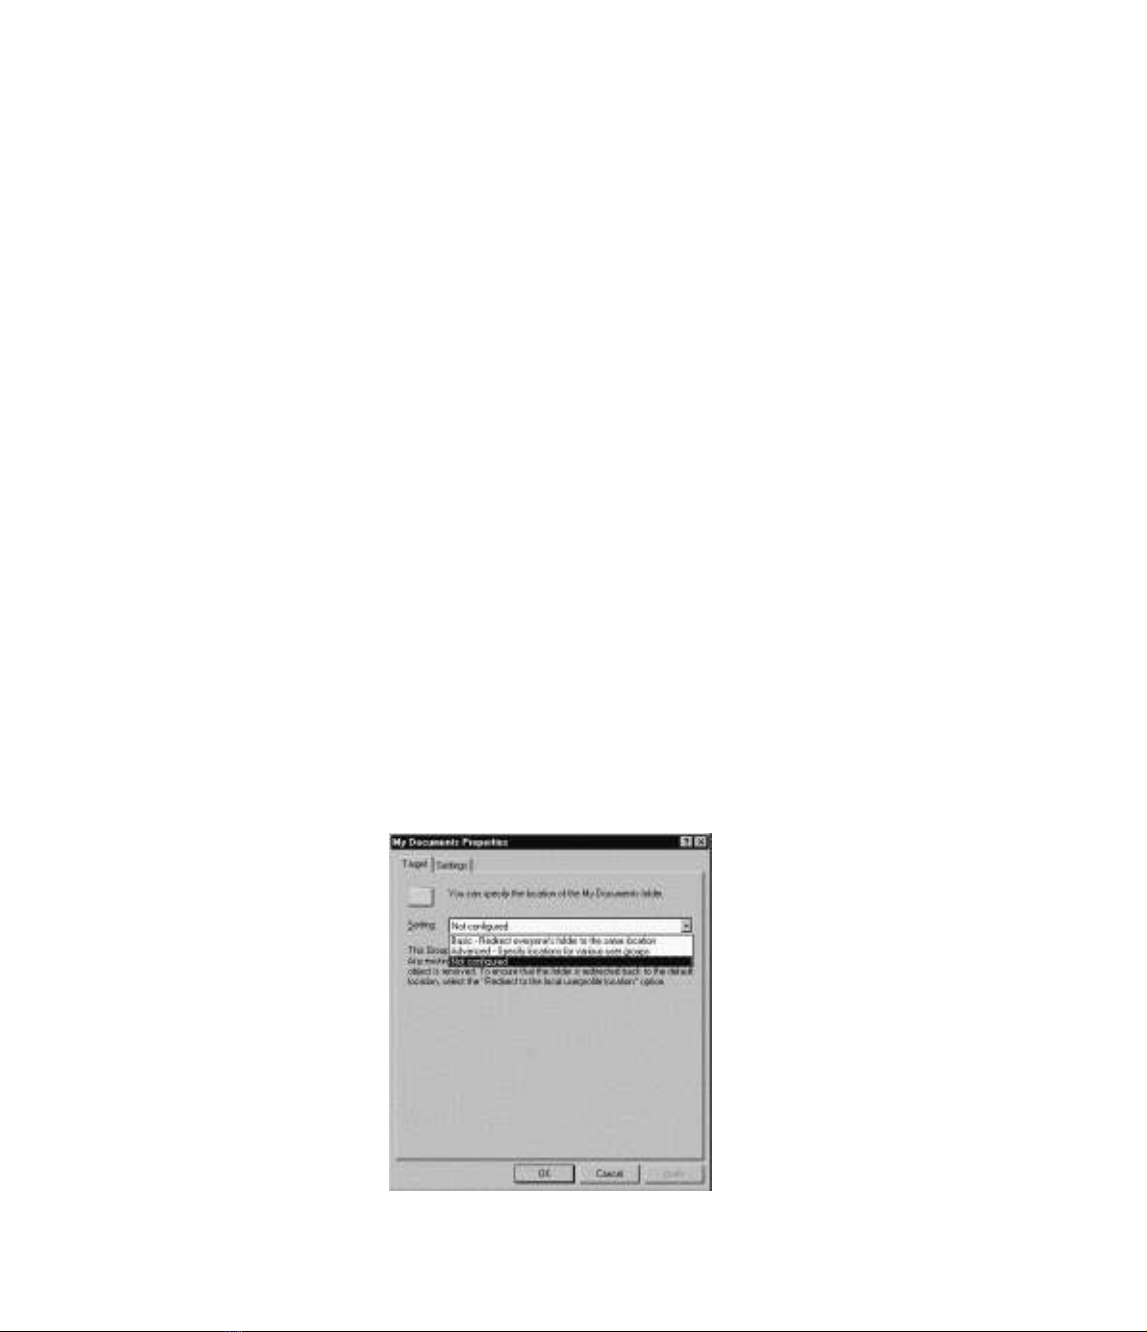
2. In the Target tab of the window, you can select the setting to use for redirection, as
shown in Figure 17.18.You can select between two options for the location of the redi-
rected folder.The basic option redirects the folder to the same folder path for all users. For
the Application Data and Desktop folders, there are three options for the folder location:
■Creating a directory for each user in the path specified
■Redirecting all users to the same location
■Pointing the folder to the local user profile location
586 Chapter 17 • Working with Group Policy in an Active Directory Environment
Figure 17.18 Selecting Options for Redirecting My Documents
If you choose to point the folder to the path in the user profile, the folder will point to the
default location as if no redirection had been applied. Redirecting the folder to a specific location
will create that location either on the network or on a local path, and all users who have this policy
applied will point to the same folder. For the Start Menu and Desktop folders, this might be a bene-
ficial setting, as you can centrally control the appearance and contents of those folders in one loca-
tion, but you need to be aware of the security settings on the folder.
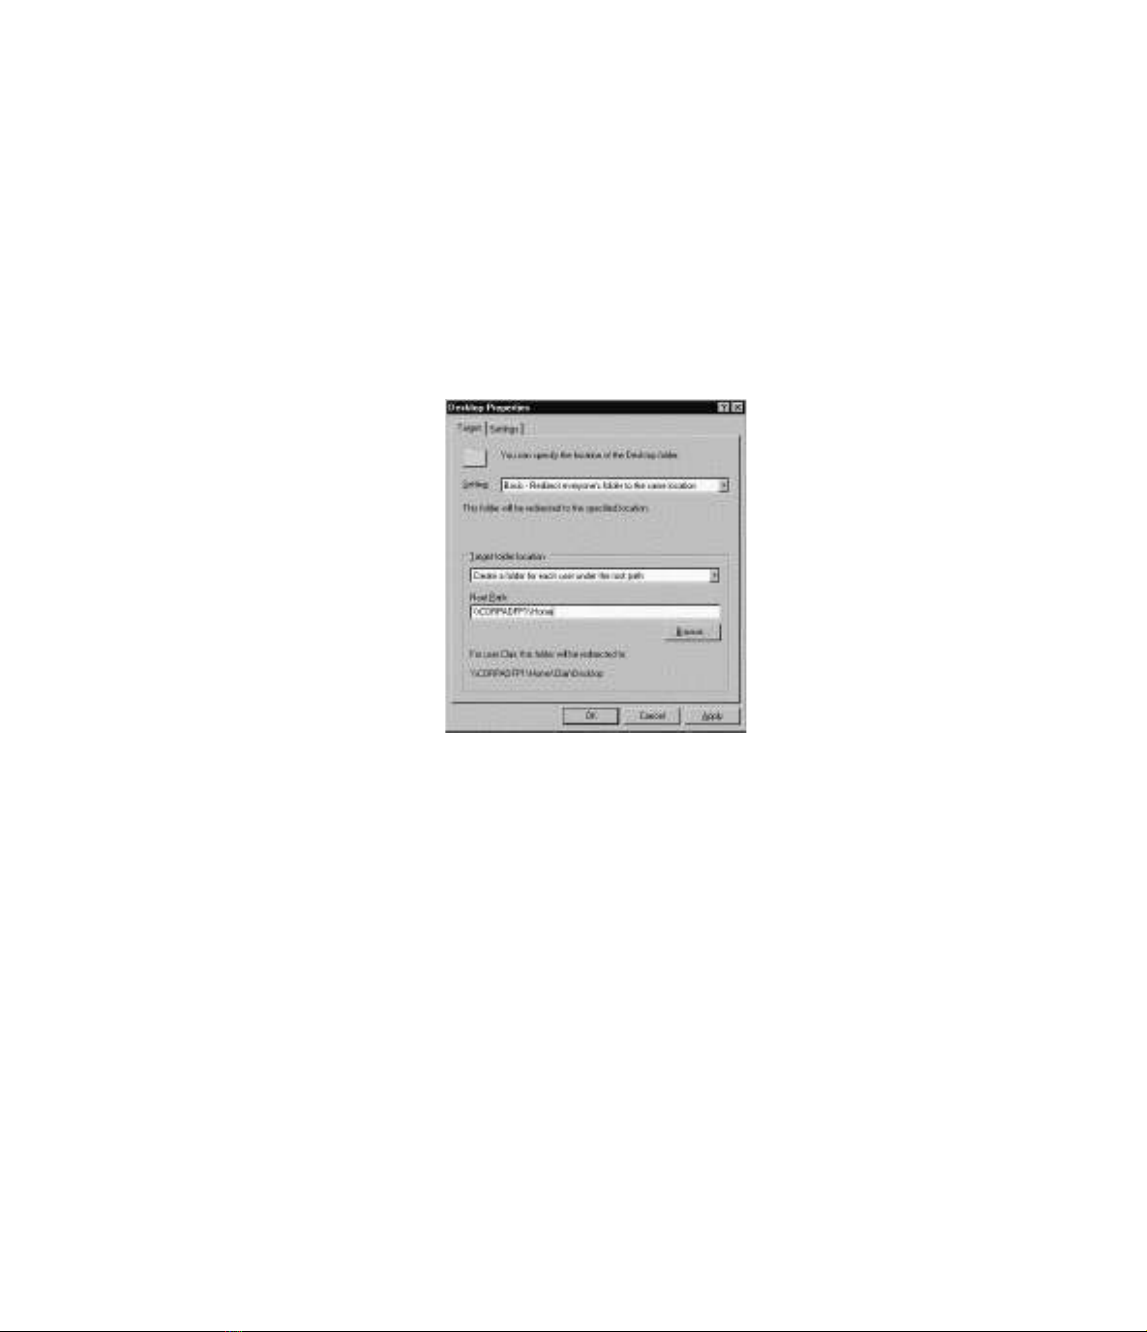
The primary choice for this setting will probably be to create a folder for each user in a loca-
tion specified, as shown in Figure 17.19.As you can see, when the root path is specified, the dialog
box gives you an example of what the folder path will be.
The Start Menu and My Documents folders have slightly different options for redirection.
When redirecting the Start Menu, you do not have the option of specifying a unique path for each
individual user. Whether setting up basic or advanced redirection of the Start Menu, you can only
specify one common location for all users or redirect the folder back to the local user profile.
The Start Menu options are simpler than the Application Data and Desktop folder settings, but
the My Documents options are more complex. When redirecting the My Documents folder, there
are four location options for storing the folder. As with the Application Data and Desktop folders,
you can store the My Documents folder in the local user profile, a common directory for all users,
or have the system create a folder for each user in a common location.There is a fourth option,
however, for My Documents.That option allows you to redirect the My Documents folder to the
user’s home folder on the network.This option will not create a My Documents folder in the user’s
home folder. It will simply point the My Documents folder to the user’s home directory on the
network.
There are a few items you should pay attention to if you consider implementing this option.
First, you must have implemented the home folder settings for all users, and you must have created
those folders prior to implementing this option. Second, the security settings on the home folder are
not changed by the folder redirection policy, so you need to be aware of the settings applied to the
user home folder on the network. Finally, you have the choice of including the My Pictures folder
Working with Group Policy in an Active Directory Environment • Chapter 17 587
Figure 17.19 Setting the Folder Location for Redirection

with the redirected My Documents folder, or having the My Pictures folder stored in a different
location.This might be advisable if server disk storage is a concern. If you choose this option, the
My Pictures item in the My Documents folder will be a shortcut pointing to the correct location
for the actual folder.
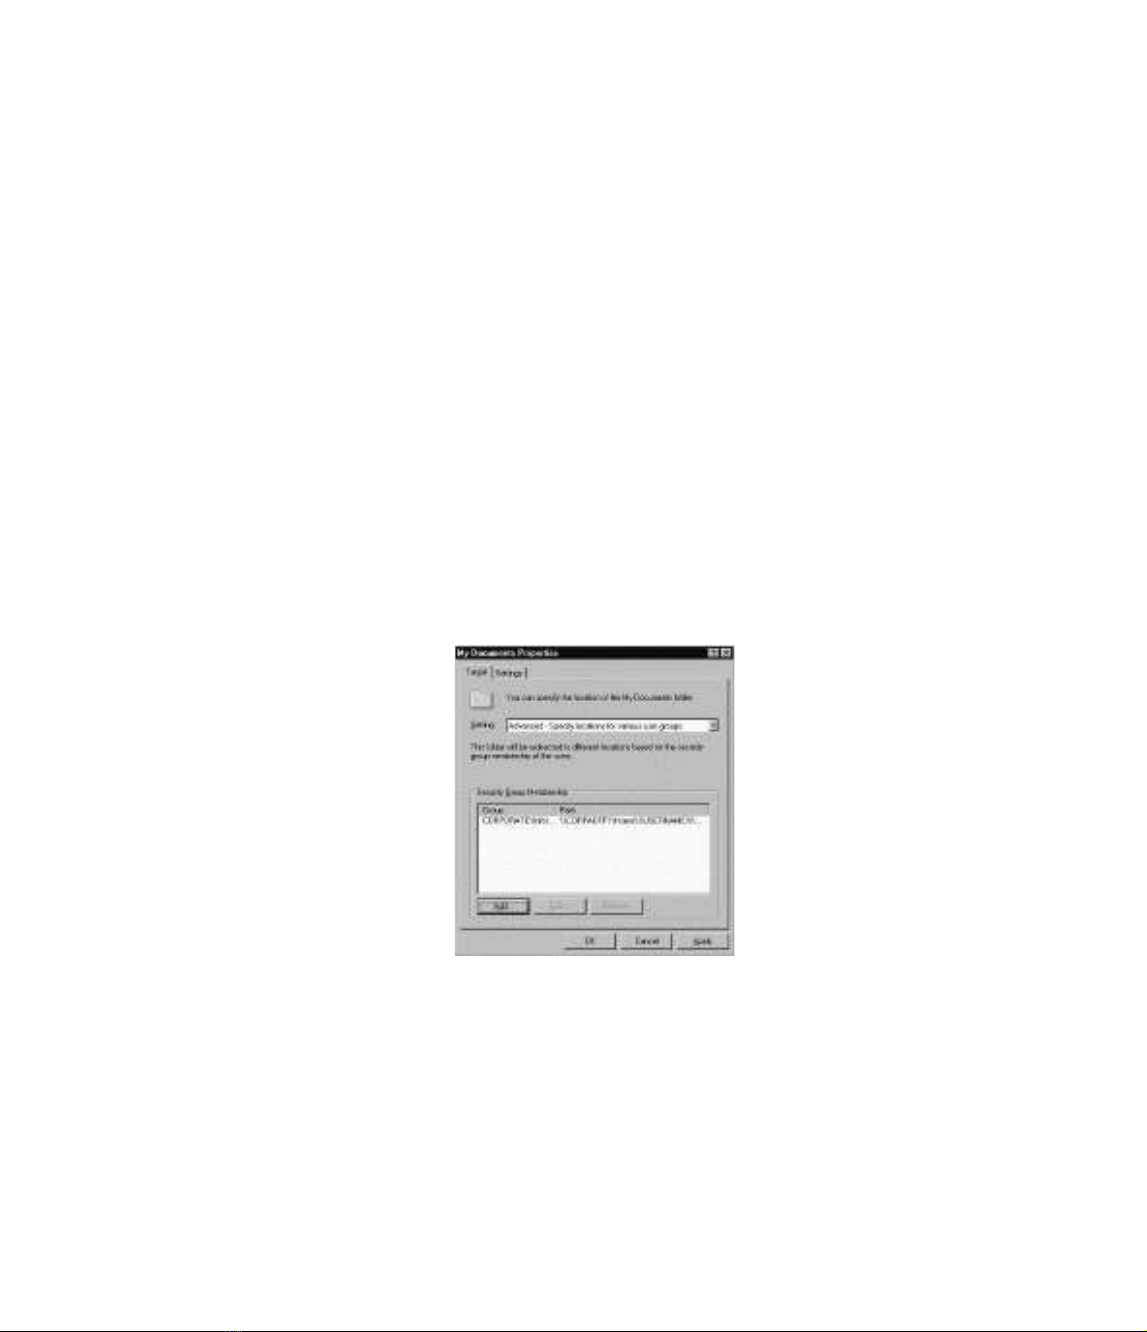
The advanced option allows you to select the folder location based on security group.This is
one way to specify a different target location for the folder for different groups of users.You can set
multiple security groups to have different target locations within a single GPO in the domain.
Another way to accomplish this, especially if you only have a small set of users whose folders should
be redirected, is to set folder redirection GPOs at other locations within the directory and filter
access to those GPOs based on security.
When selecting the advanced redirection option, you can add the individual security groups for
redirection, and have the same choices for folder location as with the basic option. Setting advanced
folder redirection is functionally equivalent to setting up multiple GPOs with basic redirection settings
and security filtering.The difference is that there is only one GPO to manage instead of several.
Configuring User and Computer Security Settings
When browsing through the Group Policy Object Editor, you might have noticed that there are
security settings for both the user configuration and computer configuration. Some of these settings
are the same for both configurations, such as the Autoenrollment Settings for certificates discussed
earlier.There are many differences between the two options, however, and we cover some of those
differences in this section.
Computer Configuration
With these security settings, you can provide additional control and management over objects in the
directory.The settings contained in this area can govern how users authenticate to computers and
other resources on the network, can provide additional permissions or restrictions for resources in
the directory, can control audit settings, and can alter group membership.The settings in this area of
group policy are primarily used to specify alternate settings for specific computers on the network.
Table 17.2 lists the main option groups under Security Settings in the Computer Configuration
in the Group Policy Object Editor, along with a description of the security setting.
Table 17.2 Security Settings for Computer Configuration
Security Setting
Collection Description
Account Policies Contains setting groups for password policy settings, account
lockout settings, and Kerberos policy settings.
Local Policies Contains setting groups for auditing policy settings, user rights
assignment settings, and security options settings.
Event Log Contains settings for application, system, and security event logs.
Restricted Groups Contains groups for specific security restrictions.
588 Chapter 17 • Working with Group Policy in an Active Directory Environment
Continued

Table 17.2 Security Settings for Computer Configuration
Security Setting
Collection Description
System Services Contains settings for controlling startup and permissions for
system services.
Registry Keys Contains Registry keys and permissions to add.
File System Contains files or folders and permissions to add.
Wireless Network Contains policies governing specific wireless network connections.
Policies
Public Key Policies Contains setting groups for Encrypted File System policy settings,
Automatic Certificate Request settings, Trusted Root Certification
Authorities settings, and Enterprise Trust settings.
Software Restriction Contains settings, when enabled, for restricting access to certain
Policies software, such as 16-bit applications.
User Configuration
There are fewer options for configuring security settings in the User Configuration area of group
policy.The two groups of policies in this area are listed in Table 17.3.
Table 17.3 Security Settings for User Configuration
Security Setting
Collection Description
Public Key Policies Contains settings for certificate autoenrollment and Enterprise
Trust.
Software Restriction Contains settings that identify, through various means,
Policies applications that are authorized to run on a system.
Redirect the My Documents Folder
In this example, we walk through the process of redirecting the My Documents folder for a specific
group of users in the directory. We will take the Information Technology group and redirect their
folders to a shared location on the network, and use advanced redirection to limit folder redirection
only to members of that group. We will point the My Documents directory to a common location
and use the network’s home directory path as the root folder for the redirected folder.
1. Open Active Directory Users and Computers.
2. Right-click the domain container and select Properties.
3. Click the Group Policy tab and click New.
4. Name the policy Folder Redirection Policy and click Edit.
Working with Group Policy in an Active Directory Environment • Chapter 17 589
5. Under User Configuration, expand Windows Settings.
6. Expand Folder Redirection.
7. Right-click My Documents and select Properties.
8. In the Setting drop-down menu, select Advanced – Specify locations for various user
groups.
9. In the Security Group Membership pane, click Add.
10. In the Security Group Membership pane, enter the name of the security group, or
click Browse and find the group in the directory.This example uses the Information
Technology group.
11. In the Target Folder Location pane, select Create a folder for each user under the root
path from the drop-down menu.
12. Enter the UNC path to the desired folder in the Root Path field, or click Browse to find
the desired path.This example uses the path \\CORPADFP1\Home for the root path.
13. Click OK.
14. The My Documents Properties window should now appear as shown in Figure 17.20.
Click the Settings tab.
15. Make sure the check boxes for Grant the user exclusive rights to My Documents
and Move the contents of My Documents to the new location are enabled.
16. Click the Redirect the folder back to the local user profile location when policy
is removed option button.
17. The Settings tab should appear as shown in Figure 17.21. Click OK.
590 Chapter 17 • Working with Group Policy in an Active Directory Environment
Figure 17.20 Viewing the Redirection Settings for My Documents


![Top 5 mẹo SEO không thể thiếu cho người làm SEO [Chuẩn nhất]](https://cdn.tailieu.vn/images/document/thumbnail/2013/20130831/lilinn/135x160/6171377918395.jpg)


%20--%3e%3cdefs%3e%3cstyle%3e%20.st0%20{%20fill:%20%23fff;%20}%20.st1%20{%20fill:%20%237800fa;%20}%20%3c/style%3e%3c/defs%3e%3cpath%20class='st1'%20d='M117.78,12.18H43.11c2.9,3.47,4.65,7.94,4.65,12.82,0,5.6-2.3,10.66-6.01,14.29h76.02l7.22-13.56-7.22-13.56Z'/%3e%3cg%3e%3cpath%20class='st0'%20d='M53.58,26.17h-.59v-1.46h.59v-4.96h2.83c1.78,0,2.67.94,2.67,2.82v5.76c0,1.87-.89,2.81-2.67,2.81h-2.83v-4.96ZM55.36,21.37v3.34h1.1v1.46h-1.1v3.34h1.01c.61,0,.91-.37.91-1.1v-5.93c0-.74-.3-1.1-.91-1.1h-1.01Z'/%3e%3cpath%20class='st0'%20d='M65.99,31.14h-1.8l-.31-2.07h-2.19l-.31,2.07h-1.64l1.82-11.39h2.62l1.82,11.39ZM65.28,18.04c-.25.46-.51.77-.75.94-.21.15-.47.22-.79.22-.26,0-.57-.07-.92-.22l-.38-.15c-.14-.05-.26-.07-.37-.07-.3,0-.53.18-.71.54l-.91-.68c.25-.46.51-.77.75-.94.21-.14.48-.21.79-.21.26,0,.57.07.92.21l.38.15c.14.05.26.07.37.07.3,0,.53-.18.71-.54l.91.68ZM61.91,27.52h1.73l-.87-5.76-.87,5.76Z'/%3e%3cpath%20class='st0'%20d='M74.53,26.89v1.52c0,1.91-.89,2.86-2.67,2.86s-2.67-.95-2.67-2.86v-5.93c0-1.91.89-2.86,2.67-2.86s2.67.95,2.67,2.86v1.11h-1.69v-1.22c0-.75-.31-1.12-.93-1.12s-.93.37-.93,1.12v6.15c0,.74.31,1.11.93,1.11s.93-.37.93-1.11v-1.63h1.69Z'/%3e%3cpath%20class='st0'%20d='M81.4,31.14h-1.8l-.31-2.07h-2.19l-.31,2.07h-1.64l1.82-11.39h2.62l1.82,11.39ZM75.9,19.2l1.52-1.91h1.71l1.51,1.91h-1.61l-.76-.95-.75.95h-1.61ZM77.32,27.52h1.73l-.87-5.76-.87,5.76ZM83.1,15.99l-1.76,1.91h-1.26l1.17-1.91h1.86Z'/%3e%3cpath%20class='st0'%20d='M84.86,19.75c1.78,0,2.67.94,2.67,2.82v1.48c0,1.87-.89,2.81-2.67,2.81h-.85v4.28h-1.79v-11.39h2.64ZM84.01,21.37v3.86h.85c.58,0,.87-.36.87-1.08v-1.71c0-.71-.29-1.07-.87-1.07h-.85Z'/%3e%3cpath%20class='st0'%20d='M93.51,19.75c1.78,0,2.67.94,2.67,2.82v1.48c0,1.87-.89,2.81-2.67,2.81h-.85v4.28h-1.79v-11.39h2.64ZM92.66,21.37v3.86h.85c.58,0,.87-.36.87-1.08v-1.71c0-.71-.29-1.07-.87-1.07h-.85Z'/%3e%3cpath%20class='st0'%20d='M98.8,31.14h-1.79v-11.39h1.79v4.88h2.03v-4.88h1.83v11.39h-1.83v-4.88h-2.03v4.88Z'/%3e%3cpath%20class='st0'%20d='M105.36,24.55h2.46v1.62h-2.46v3.34h3.09v1.63h-4.88v-11.39h4.88v1.63h-3.09v3.18ZM108.17,17.29l-1.76,1.91h-1.26l1.17-1.91h1.86Z'/%3e%3cpath%20class='st0'%20d='M112.2,19.75c1.78,0,2.67.94,2.67,2.82v1.48c0,1.87-.89,2.81-2.67,2.81h-.85v4.28h-1.79v-11.39h2.64ZM111.35,21.37v3.86h.85c.58,0,.87-.36.87-1.08v-1.71c0-.71-.29-1.07-.87-1.07h-.85Z'/%3e%3c/g%3e%3ccircle%20class='st1'%20cx='25'%20cy='25'%20r='20'/%3e%3cpath%20class='st0'%20d='M32.78,19.27c2.92,0,4.43,2.55,5.28,5.33l.71,2.17c.14.38-.33.75-.71.75h-5.61c.19-.33.24-.71.09-1.08l-.75-2.45c-.43-1.32-.99-2.64-1.79-3.77.75-.57,1.65-.94,2.78-.94h0ZM25,18.38c3.25,0,4.9,2.78,5.89,5.89l.76,2.45c.14.42-.33.8-.8.8h-11.69c-.42,0-.94-.38-.8-.8l.75-2.45c.99-3.11,2.64-5.89,5.89-5.89h0ZM25,11.35c1.74,0,3.11,1.37,3.11,3.11s-1.37,3.11-3.11,3.11-3.11-1.41-3.11-3.11,1.41-3.11,3.11-3.11h0ZM17.27,19.27c1.08,0,1.98.38,2.73.94-.8,1.13-1.37,2.45-1.74,3.77l-.8,2.45c-.14.38-.05.75.09,1.08h-5.56c-.42,0-.9-.38-.75-.75l.71-2.17c.9-2.78,2.41-5.33,5.33-5.33h0ZM17.27,12.91c1.51,0,2.78,1.27,2.78,2.83s-1.27,2.83-2.78,2.83-2.83-1.27-2.83-2.83,1.27-2.83,2.83-2.83h0ZM32.78,12.91c1.56,0,2.78,1.27,2.78,2.83s-1.23,2.83-2.78,2.83-2.83-1.27-2.83-2.83,1.27-2.83,2.83-2.83h0ZM27.07,28.56v.09c0,.57-.24,1.08-.61,1.46h0v.05c-.38.33-.9.57-1.46.57s-1.08-.24-1.46-.61h0c-.38-.38-.61-.9-.61-1.46v-.09h1.41v.09c0,.19.05.38.19.47v.05c.09.09.28.19.47.19s.38-.09.47-.19v-.05c.14-.09.24-.28.24-.47t-.05-.09h1.41ZM30.99,28.56v.09c0,1.65-.66,3.16-1.74,4.24-1.08,1.08-2.59,1.79-4.24,1.79s-3.16-.71-4.24-1.79l-.05-.05c-1.04-1.08-1.7-2.55-1.7-4.2v-.09h1.41v.09c0,1.27.47,2.4,1.27,3.25h.05c.85.85,1.98,1.37,3.25,1.37s2.4-.52,3.25-1.37c.85-.8,1.37-1.98,1.37-3.25v-.09h1.37ZM34.99,28.56v.09c0,2.78-1.13,5.28-2.92,7.07-1.79,1.79-4.29,2.92-7.07,2.92s-5.23-1.13-7.07-2.92c-1.79-1.79-2.92-4.29-2.92-7.07v-.09h1.41v.09c0,2.4.94,4.53,2.5,6.08,1.56,1.56,3.72,2.5,6.08,2.5s4.52-.94,6.08-2.5c1.56-1.56,2.5-3.68,2.5-6.08v-.09h1.41Z'/%3e%3c/svg%3e)