
- 1 -
Thiết kế & triển khai mạng IP
Bài thực hành: Quality of Service
Mục lục
1 Chuẩn bị môi trường ............................................................................................................................. 2
1.1 Thiết lập môi trường kết nối mạng ............................................................................................... 2
1.2 Thiết lập tốc độ kết nối mạng R2 – R3 ........................................................................................... 4
1.3 Kiểm tra ảnh hưởng tốc độ giữa các dòng dữ liệu cạnh tranh ...................................................... 5
1.4 Kiểm tra ảnh hưởng mất gói tin giữa các dòng dữ liệu cạnh tranh ............................................... 7
2 Thực hành DiffServ ............................................................................................................................... 8
2.1 Cài đặt PHB cho router R2 ............................................................................................................. 8
2.2 Triển khai các luồng cạnh tranh trên router R2 đã được xử lý PHB ............................................ 10
2.3 Áp dụng DSCP codepoint vào filter thay cho địa chỉ IP................................................................ 12
2.4 DiffServ networking .................................................................................................................... 13
3 MPLS ................................................................................................................................................... 16
3.1 LSR implementation by Linux Traffic Control .............................................................................. 16
3.2 LS Path by connecting LSR ........................................................................................................... 18
3.3 MPLS by Linux kernel: static label setting ................................................................................... 20
3.4 Dynamic Label Distribution (LDP) ................................................................................................ 22
- 2 -
1 Chuẩn bị môi trường
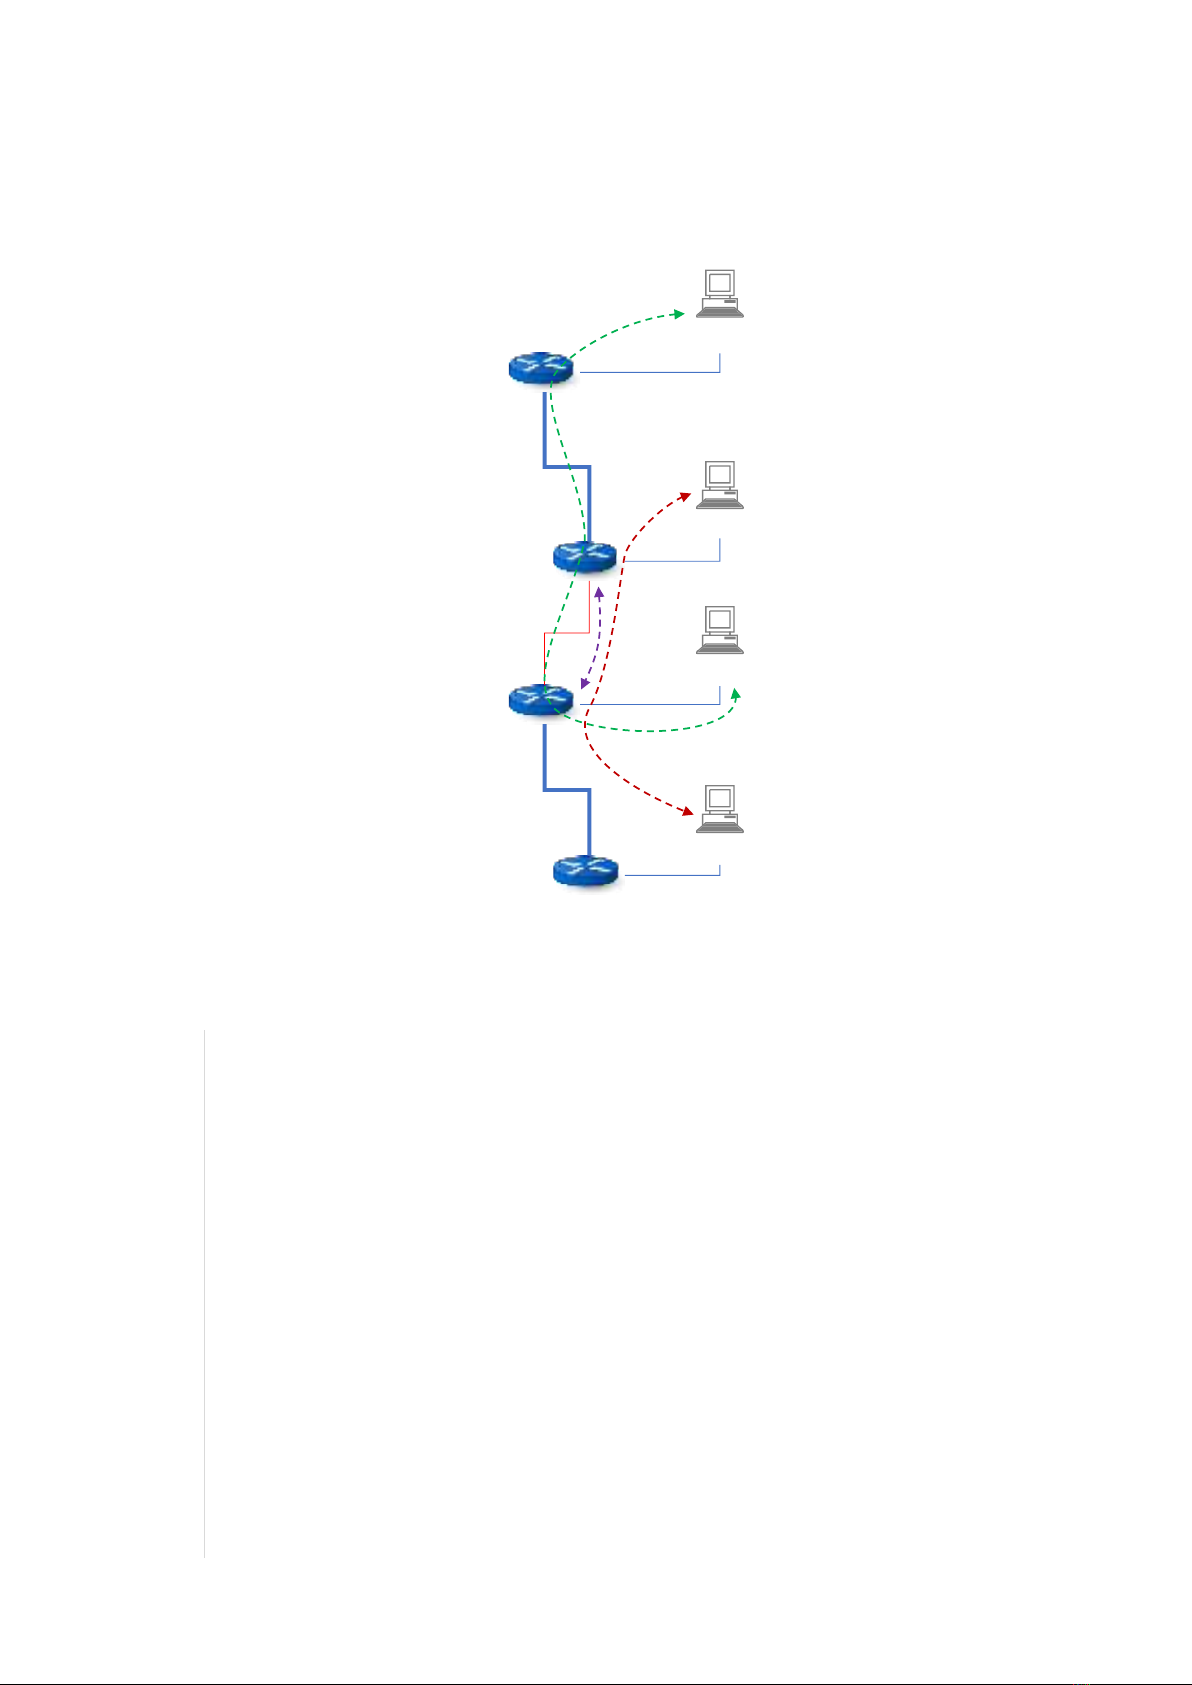
Sử dụng các kiến thức của bài trước, dựng môi trường mạng ảo với các kết nối mặc định có tốc độ cao
(500Mbps) và 1 kết nối tốc độ thấp (10Mbps). Các luồng dữ liệu cạnh tranh trên kết nối tốc độ thấp này.
1.1 Thiết lập môi trường kết nối mạng
1. Cấu hình R1:
R1:~$ sudo nano /etc/netplan/01-network-manager-all.yaml
network:
ethernets:
enp0s3:
dhcp4: true
enp0s8:
addresses:
- 192.168.156.11/24
enp0s9:
addresses:
- 10.10.1.1/24
routes:
- to: 192.168.2.0/24
via: 10.10.1.2
- to: 192.168.3.0/24
via: 10.10.1.2
- to: 192.168.4.0/24
via: 10.10.1.2
enp0s10:
addresses:
- 192.168.1.1/24
R1:~$ sudo netplan apply
R1:~$ route -n
Kernel IP routing table
Destination Gateway Genmask Flags Metric Ref Use Iface
10.10.1.0 0.0.0.0 255.255.255.0 U 0 0 0 enp0s9
10.10.2.0 10.10.1.2 255.255.255.0 UG 0 0 0 enp0s9
R1 192.168.1.120
R2
R3
192.168.3.1
192.168.1.1
192.168.3.115
10.10.1.1
10.10.1.2
10.10.2.2
192.168.2.123
192.168.2.1
10.10.2.1
H1
H2
H3
R4
10.10.3.2
10.10.3.1
192.168.4.1
192.168.4.130
H4
500Mbps
500Mbps
10Mbps

- 3 -
192.168.1.0 0.0.0.0 255.255.255.0 U 0 0 0 enp0s10
192.168.2.0 10.10.1.2 255.255.255.0 UG 0 0 0 enp0s9
192.168.3.0 10.10.1.2 255.255.255.0 UG 0 0 0 enp0s9
192.168.4.0 10.10.1.2 255.255.255.0 UG 0 0 0 enp0s9
2. Cấu hình H1:
R1:~$ sudo nano /etc/netplan/01-network-manager-all.yaml
network:
ethernets:
enp0s8:
addresses:
- 192.168.156.120/24
enp0s9:
addresses:
- 192.168.1.120/24
gateway4: 192.168.1.1
H1:~$ sudo netplan apply
H1:~$ route -n
Kernel IP routing table
Destination Gateway Genmask Flags Metric Ref Use Iface
0.0.0.0 192.168.1.1 0.0.0.0 UG 0 0 0 enp0s9
192.168.1.0 0.0.0.0 255.255.255.0 U 0 0 0 enp0s9
3. Cấu hình R2:
R2:~$ sudo nano /etc/netplan/01-network-manager-all.yaml
network:
ethernets:
enp0s3:
addresses:
- 192.168.2.1/24
enp0s9:
addresses:
- 10.10.1.2/24
routes:
- to: 192.168.1.0/24
via: 10.10.1.1
enp0s10:
addresses:
- 10.10.2.1/24
routes:
- to: 192.168.3.0/24
via: 10.10.2.2
- to: 192.168.4.0/24
via: 10.10.2.2
R2:~$ sudo netplan apply
R2:~$ route -n
Kernel IP routing table
Destination Gateway Genmask Flags Metric Ref Use Iface
10.10.1.0 0.0.0.0 255.255.255.0 U 0 0 0 enp0s9
10.10.2.0 0.0.0.0 255.255.255.0 U 0 0 0 enp0s10
192.168.1.0 10.10.1.1 255.255.255.0 UG 0 0 0 enp0s9
192.168.2.0 0.0.0.0 255.255.255.0 U 0 0 0 enp0s3
192.168.3.0 10.10.2.2 255.255.255.0 UG 0 0 0 enp0s10
192.168.4.0 10.10.2.2 255.255.255.0 UG 0 0 0 enp0s10
4. Tương tự, cấu hình các router khác và các host khác. Kiểm tra các host kết nối được với nhau qua
các router:
H1:~$ ping 192.168.4.130
PING 192.168.4.130 (192.168.4.130) 56(84) bytes of data.
64 bytes from 192.168.4.130: icmp_seq=1 ttl=60 time=3.48 ms
64 bytes from 192.168.4.130: icmp_seq=2 ttl=60 time=3.19 ms
^C
--- 192.168.4.130 ping statistics ---
2 packets transmitted, 2 received, 0% packet loss, time 1002ms
rtt min/avg/max/mdev = 3.185/3.331/3.478/0.146 ms
H1:~$ tracepath -n 192.168.4.130
1?: [LOCALHOST] pmtu 1500
1: 192.168.1.1 0.633ms

- 4 -
1: 192.168.1.1 0.616ms
2: 10.10.1.2 1.270ms
3: 10.10.2.2 2.031ms
4: no reply
5: 192.168.4.130 3.352ms reached
Resume: pmtu 1500 hops 5 back 5
1.2 Thiết lập tốc độ kết nối mạng R2 – R3
5. Sử dụng tool VboxManage đi kèm Virtualbox để thiết lập tốc độ cho các link kết nối giữa router
R2 và R3. Đầu tiên là liệt kê các máy ảo trong hệ thống. Khi thực hiện thay đổi cấu hình băng
thông này cần shutdown router R2:
$ VBoxManage list vms
"R1 (QoS)" {7e034d5a-c892-4107-9383-7db2fea07b37}
"R2 (QoS)" {05d73c23-84bc-49ef-8b83-396cbdde5bdb}
"R3 (QoS)" {597d5326-bdd8-48a3-b2a5-b25b93867cea}
"R4 (QoS)" {6001cf5b-4425-43a3-925b-09488fa9951d}
6. Xem chi tiết thông tin các kết nối mạng của máy ảo R2. Kết nối R2-R3 năm ở NIC 4 và không hạn
chế băng thông (bandwidth group: none):
$ VBoxManage showvminfo "R2 (QoS)" | grep NIC
NIC 1: MAC: 080027870C4C, Attachment: Internal Network 'lan02',
Cable connected: on, Trace: off (file: none), Type: 82540EM, Reported speed: 0 Mbps, Boot
priority: 0, Promisc Policy: deny, Bandwidth group: none
NIC 2: MAC: 08002766D4EC, Attachment: Host-only Interface
'vboxnet0', Cable connected: on, Trace: off (file: none), Type: 82540EM, Reported speed: 0
Mbps, Boot priority: 0, Promisc Policy: deny, Bandwidth group: none
NIC 3: MAC: 08002761DE17, Attachment: Internal Network 'serial1',
Cable connected: on, Trace: off (file: none), Type: 82540EM, Reported speed: 0 Mbps, Boot
priority: 0, Promisc Policy: deny, Bandwidth group: none
NIC 4: MAC: 080027F9AF90, Attachment: Internal Network 'serial2',
Cable connected: on, Trace: off (file: none), Type: 82540EM, Reported speed: 0 Mbps, Boot
priority: 0, Promisc Policy: deny, Bandwidth group: none
NIC 5: disabled
NIC 6: disabled
NIC 7: disabled
NIC 8: disabled
7. Thiết lập hạn chế băng thông của NIC 4 là 10Mbps:
$ VBoxManage bandwidthctl "R2 (QoS)" add Limit10m --type network --limit 10m
$ VBoxManage modifyvm "R2 (QoS)" --nicbandwidthgroup4 Limit10m
$ VBoxManage showvminfo "R2 (QoS)" | grep NIC
NIC 1: MAC: 080027870C4C, Attachment: Internal Network 'lan02',
Cable connected: on, Trace: off (file: none), Type: 82540EM, Reported speed: 0 Mbps, Boot
priority: 0, Promisc Policy: deny, Bandwidth group: none
NIC 2: MAC: 08002766D4EC, Attachment: Host-only Interface
'vboxnet0', Cable connected: on, Trace: off (file: none), Type: 82540EM, Reported speed: 0
Mbps, Boot priority: 0, Promisc Policy: deny, Bandwidth group: none
NIC 3: MAC: 08002761DE17, Attachment: Internal Network 'serial1',
Cable connected: on, Trace: off (file: none), Type: 82540EM, Reported speed: 0 Mbps, Boot
priority: 0, Promisc Policy: deny, Bandwidth group: none
NIC 4: MAC: 080027F9AF90, Attachment: Internal Network 'serial2',
Cable connected: on, Trace: off (file: none), Type: 82540EM, Reported speed: 0 Mbps, Boot
priority: 0, Promisc Policy: deny, Bandwidth group: Limit10m
NIC 5: disabled
NIC 6: disabled
NIC 7: disabled
NIC 8: disabled
8. Để hủy hạn chế băng thông trên một kết nối mạng thì thiết lập với group = none:
VBoxManage modifyvm "R2 (QoS)" –nicbandwidthgroup4 none

- 5 -
1.3 Kiểm tra ảnh hưởng tốc độ giữa các dòng dữ liệu cạnh tranh
1. Chạy iperf trên H4 ở chế độ server (nghe) và trên H3 ở chế độ client (truyền). Thấy tốc độ truyền
dữ liệu giữ H3 và H4 là khoảng 500Mbps
H4:~$ iperf -s -i 1
------------------------------------------------------------
Server listening on TCP port 5001
TCP window size: 128 KByte (default)
------------------------------------------------------------
[ 4] local 192.168.4.130 port 5001 connected with 192.168.3.115 port 51936
[ ID] Interval Transfer Bandwidth
[ 4] 0.0- 1.0 sec 53.4 MBytes 448 Mbits/sec
[ 4] 1.0- 2.0 sec 61.2 MBytes 513 Mbits/sec
[ 4] 2.0- 3.0 sec 68.5 MBytes 574 Mbits/sec
[ 4] 3.0- 4.0 sec 66.1 MBytes 554 Mbits/sec
[ 4] 4.0- 5.0 sec 49.7 MBytes 417 Mbits/sec
H3:~$ iperf -c 192.168.4.130 -i 1 -t 3
------------------------------------------------------------
Client connecting to 192.168.4.130, TCP port 5001
TCP window size: 196 KByte (default)
------------------------------------------------------------
[ 3] local 192.168.3.115 port 51940 connected with 192.168.4.130 port 5001
[ ID] Interval Transfer Bandwidth
[ 3] 0.0- 1.0 sec 69.6 MBytes 584 Mbits/sec
[ 3] 1.0- 2.0 sec 50.4 MBytes 423 Mbits/sec
[ 3] 2.0- 3.0 sec 61.0 MBytes 511 Mbits/sec
[ 3] 0.0- 3.0 sec 181 MBytes 505 Mbits/sec
2. Chạy iperf trên H2 ở chế độ client (truyền). Thấy tốc độ H4 nhận dữ liệu từ H2 và H4 là khoảng
dưới 10Mbps (do dòng dữ liệu này đi qua kết nối R2-R3 chỉ có tốc độ 10Mbps). Trên H2 ban đầu
tốc độ truyền cao hơn 10Mbps rồi giảm dần về tương đương với tốc độ nhận dữ liệu trên H4
(nhớ lại cơ chế flow control của giao thức TCP với phương pháp điều khiển kích thước cửa sổ
trượt sliding window):
H4:~$ iperf -s -i 1
------------------------------------------------------------
Server listening on TCP port 5001
TCP window size: 128 KByte (default)
------------------------------------------------------------
[ 4] local 192.168.4.130 port 5001 connected with 192.168.2.123 port 51804
[ ID] Interval Transfer Bandwidth
[ 4] 0.0- 1.0 sec 1.19 MBytes 9.96 Mbits/sec
[ 4] 1.0- 2.0 sec 1.18 MBytes 9.92 Mbits/sec
[ 4] 2.0- 3.0 sec 1.17 MBytes 9.82 Mbits/sec
H2:~$ iperf -c 192.168.4.130 -i 1 -t 30
------------------------------------------------------------
Client connecting to 192.168.4.130, TCP port 5001
TCP window size: 348 KByte (default)
------------------------------------------------------------
[ 3] local 192.168.2.123 port 51806 connected with 192.168.4.130 port 5001
[ ID] Interval Transfer Bandwidth
[ 3] 0.0- 1.0 sec 1.88 MBytes 15.7 Mbits/sec
[ 3] 1.0- 2.0 sec 1.50 MBytes 12.6 Mbits/sec
[ 3] 2.0- 3.0 sec 1.48 MBytes 12.4 Mbits/sec
[ 3] 3.0- 4.0 sec 1.12 MBytes 9.44 Mbits/sec
[ 3] 4.0- 5.0 sec 1.11 MBytes 9.33 Mbits/sec
[ 3] 5.0- 6.0 sec 1.12 MBytes 9.38 Mbits/sec
[ 3] 6.0- 7.0 sec 1.12 MBytes 9.44 Mbits/sec
[ 3] 7.0- 8.0 sec 1012 KBytes 8.29 Mbits/sec
3. Nếu thiết lập dòng dữ liệu iperf giữa H1 và H3 như trên thì thấy tốc độ cũng đạt mức ổn định ở
khoảng 9Mbps giống như dòng H2-H4 bên trên. Trong khi dòng H1-H3 đang được thực hiện thì
thiết lập dòng iperf từ H2 đến H4. Quan sát tốc độ dòng này thấy chỉ còn 1Mbps, thậm chí là chỉ
còn 500Kbps:
H1:~$ iperf -c 192.168.3.115 -i 1 -t 300
------------------------------------------------------------


%20--%3e%3cdefs%3e%3cstyle%3e%20.st0%20{%20fill:%20%23fff;%20}%20.st1%20{%20fill:%20%237800fa;%20}%20%3c/style%3e%3c/defs%3e%3cpath%20class='st1'%20d='M117.78,12.18H43.11c2.9,3.47,4.65,7.94,4.65,12.82,0,5.6-2.3,10.66-6.01,14.29h76.02l7.22-13.56-7.22-13.56Z'/%3e%3cg%3e%3cpath%20class='st0'%20d='M53.58,26.17h-.59v-1.46h.59v-4.96h2.83c1.78,0,2.67.94,2.67,2.82v5.76c0,1.87-.89,2.81-2.67,2.81h-2.83v-4.96ZM55.36,21.37v3.34h1.1v1.46h-1.1v3.34h1.01c.61,0,.91-.37.91-1.1v-5.93c0-.74-.3-1.1-.91-1.1h-1.01Z'/%3e%3cpath%20class='st0'%20d='M65.99,31.14h-1.8l-.31-2.07h-2.19l-.31,2.07h-1.64l1.82-11.39h2.62l1.82,11.39ZM65.28,18.04c-.25.46-.51.77-.75.94-.21.15-.47.22-.79.22-.26,0-.57-.07-.92-.22l-.38-.15c-.14-.05-.26-.07-.37-.07-.3,0-.53.18-.71.54l-.91-.68c.25-.46.51-.77.75-.94.21-.14.48-.21.79-.21.26,0,.57.07.92.21l.38.15c.14.05.26.07.37.07.3,0,.53-.18.71-.54l.91.68ZM61.91,27.52h1.73l-.87-5.76-.87,5.76Z'/%3e%3cpath%20class='st0'%20d='M74.53,26.89v1.52c0,1.91-.89,2.86-2.67,2.86s-2.67-.95-2.67-2.86v-5.93c0-1.91.89-2.86,2.67-2.86s2.67.95,2.67,2.86v1.11h-1.69v-1.22c0-.75-.31-1.12-.93-1.12s-.93.37-.93,1.12v6.15c0,.74.31,1.11.93,1.11s.93-.37.93-1.11v-1.63h1.69Z'/%3e%3cpath%20class='st0'%20d='M81.4,31.14h-1.8l-.31-2.07h-2.19l-.31,2.07h-1.64l1.82-11.39h2.62l1.82,11.39ZM75.9,19.2l1.52-1.91h1.71l1.51,1.91h-1.61l-.76-.95-.75.95h-1.61ZM77.32,27.52h1.73l-.87-5.76-.87,5.76ZM83.1,15.99l-1.76,1.91h-1.26l1.17-1.91h1.86Z'/%3e%3cpath%20class='st0'%20d='M84.86,19.75c1.78,0,2.67.94,2.67,2.82v1.48c0,1.87-.89,2.81-2.67,2.81h-.85v4.28h-1.79v-11.39h2.64ZM84.01,21.37v3.86h.85c.58,0,.87-.36.87-1.08v-1.71c0-.71-.29-1.07-.87-1.07h-.85Z'/%3e%3cpath%20class='st0'%20d='M93.51,19.75c1.78,0,2.67.94,2.67,2.82v1.48c0,1.87-.89,2.81-2.67,2.81h-.85v4.28h-1.79v-11.39h2.64ZM92.66,21.37v3.86h.85c.58,0,.87-.36.87-1.08v-1.71c0-.71-.29-1.07-.87-1.07h-.85Z'/%3e%3cpath%20class='st0'%20d='M98.8,31.14h-1.79v-11.39h1.79v4.88h2.03v-4.88h1.83v11.39h-1.83v-4.88h-2.03v4.88Z'/%3e%3cpath%20class='st0'%20d='M105.36,24.55h2.46v1.62h-2.46v3.34h3.09v1.63h-4.88v-11.39h4.88v1.63h-3.09v3.18ZM108.17,17.29l-1.76,1.91h-1.26l1.17-1.91h1.86Z'/%3e%3cpath%20class='st0'%20d='M112.2,19.75c1.78,0,2.67.94,2.67,2.82v1.48c0,1.87-.89,2.81-2.67,2.81h-.85v4.28h-1.79v-11.39h2.64ZM111.35,21.37v3.86h.85c.58,0,.87-.36.87-1.08v-1.71c0-.71-.29-1.07-.87-1.07h-.85Z'/%3e%3c/g%3e%3ccircle%20class='st1'%20cx='25'%20cy='25'%20r='20'/%3e%3cpath%20class='st0'%20d='M32.78,19.27c2.92,0,4.43,2.55,5.28,5.33l.71,2.17c.14.38-.33.75-.71.75h-5.61c.19-.33.24-.71.09-1.08l-.75-2.45c-.43-1.32-.99-2.64-1.79-3.77.75-.57,1.65-.94,2.78-.94h0ZM25,18.38c3.25,0,4.9,2.78,5.89,5.89l.76,2.45c.14.42-.33.8-.8.8h-11.69c-.42,0-.94-.38-.8-.8l.75-2.45c.99-3.11,2.64-5.89,5.89-5.89h0ZM25,11.35c1.74,0,3.11,1.37,3.11,3.11s-1.37,3.11-3.11,3.11-3.11-1.41-3.11-3.11,1.41-3.11,3.11-3.11h0ZM17.27,19.27c1.08,0,1.98.38,2.73.94-.8,1.13-1.37,2.45-1.74,3.77l-.8,2.45c-.14.38-.05.75.09,1.08h-5.56c-.42,0-.9-.38-.75-.75l.71-2.17c.9-2.78,2.41-5.33,5.33-5.33h0ZM17.27,12.91c1.51,0,2.78,1.27,2.78,2.83s-1.27,2.83-2.78,2.83-2.83-1.27-2.83-2.83,1.27-2.83,2.83-2.83h0ZM32.78,12.91c1.56,0,2.78,1.27,2.78,2.83s-1.23,2.83-2.78,2.83-2.83-1.27-2.83-2.83,1.27-2.83,2.83-2.83h0ZM27.07,28.56v.09c0,.57-.24,1.08-.61,1.46h0v.05c-.38.33-.9.57-1.46.57s-1.08-.24-1.46-.61h0c-.38-.38-.61-.9-.61-1.46v-.09h1.41v.09c0,.19.05.38.19.47v.05c.09.09.28.19.47.19s.38-.09.47-.19v-.05c.14-.09.24-.28.24-.47t-.05-.09h1.41ZM30.99,28.56v.09c0,1.65-.66,3.16-1.74,4.24-1.08,1.08-2.59,1.79-4.24,1.79s-3.16-.71-4.24-1.79l-.05-.05c-1.04-1.08-1.7-2.55-1.7-4.2v-.09h1.41v.09c0,1.27.47,2.4,1.27,3.25h.05c.85.85,1.98,1.37,3.25,1.37s2.4-.52,3.25-1.37c.85-.8,1.37-1.98,1.37-3.25v-.09h1.37ZM34.99,28.56v.09c0,2.78-1.13,5.28-2.92,7.07-1.79,1.79-4.29,2.92-7.07,2.92s-5.23-1.13-7.07-2.92c-1.79-1.79-2.92-4.29-2.92-7.07v-.09h1.41v.09c0,2.4.94,4.53,2.5,6.08,1.56,1.56,3.72,2.5,6.08,2.5s4.52-.94,6.08-2.5c1.56-1.56,2.5-3.68,2.5-6.08v-.09h1.41Z'/%3e%3c/svg%3e)