Get Started with IIS 7.0’s Confi guration • Chapter 15 797
2. Right click Default Web Site and choose Add Application.
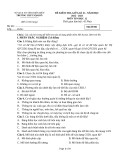
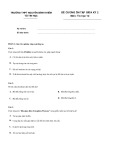
3. In the Add Application dialog box, enter the information as shown in Figure 15.13, then click OK.
Figure 15.13 Add Application Information
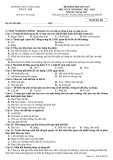
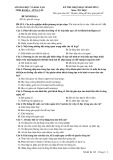
4. You should now see your application listed below Default Web Site in IIS Manager (see Figure 15.14).
798 Chapter 15 • Get Started with IIS 7.0’s Confi guration
Figure 15.14 Application app in IIS Manager
5. Now click on the server’s name in the far left pane. In our example the server’s name is ALDERON.
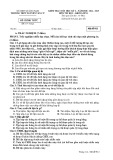
6. In the middle pane of IIS Manager, scroll down to the IIS Group and double-click
Directory Browsing. After doing so you should see a screen similar to the one shown in Figure 15.15.
7. On the right side under Actions, select Enable. This will now allow directory browsing to be available to site administrators and application developers.
Get Started with IIS 7.0’s Confi guration • Chapter 15 799
Figure 15.15 Authentication Section Group
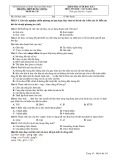
8. Open a text editor or Visual Studio and create a web.confi g fi le similar to the one in Figure 15.16. Save it in the C:\Test directory. Notice that in the web.confi g fi le has directoryBrowse enabled.
800 Chapter 15 • Get Started with IIS 7.0’s Confi guration
Figure 15.16 New Location Tag in ApplicationHost.confi g
9. Now open Internet Explorer to the following URL: http://localhost/app.
10. You should now see the C:\Test directory with your web.confi g fi le in it (see Figure 15.17).
Get Started with IIS 7.0’s Confi guration • Chapter 15 801
Figure 15.17 Results of Unlocking Confi guration Sections
11. To disable it in your web.confi g change