YOMEDIA
ADSENSE
Statistical Concepts in Metrology_3
23
lượt xem 2
download
lượt xem 2
download
Download
Vui lòng tải xuống để xem tài liệu đầy đủ
Tham khảo tài liệu 'statistical concepts in metrology_3', kỹ thuật - công nghệ, cơ khí - chế tạo máy phục vụ nhu cầu học tập, nghiên cứu và làm việc hiệu quả
AMBIENT/
Chủ đề:
Bình luận(0) Đăng nhập để gửi bình luận!
Nội dung Text: Statistical Concepts in Metrology_3
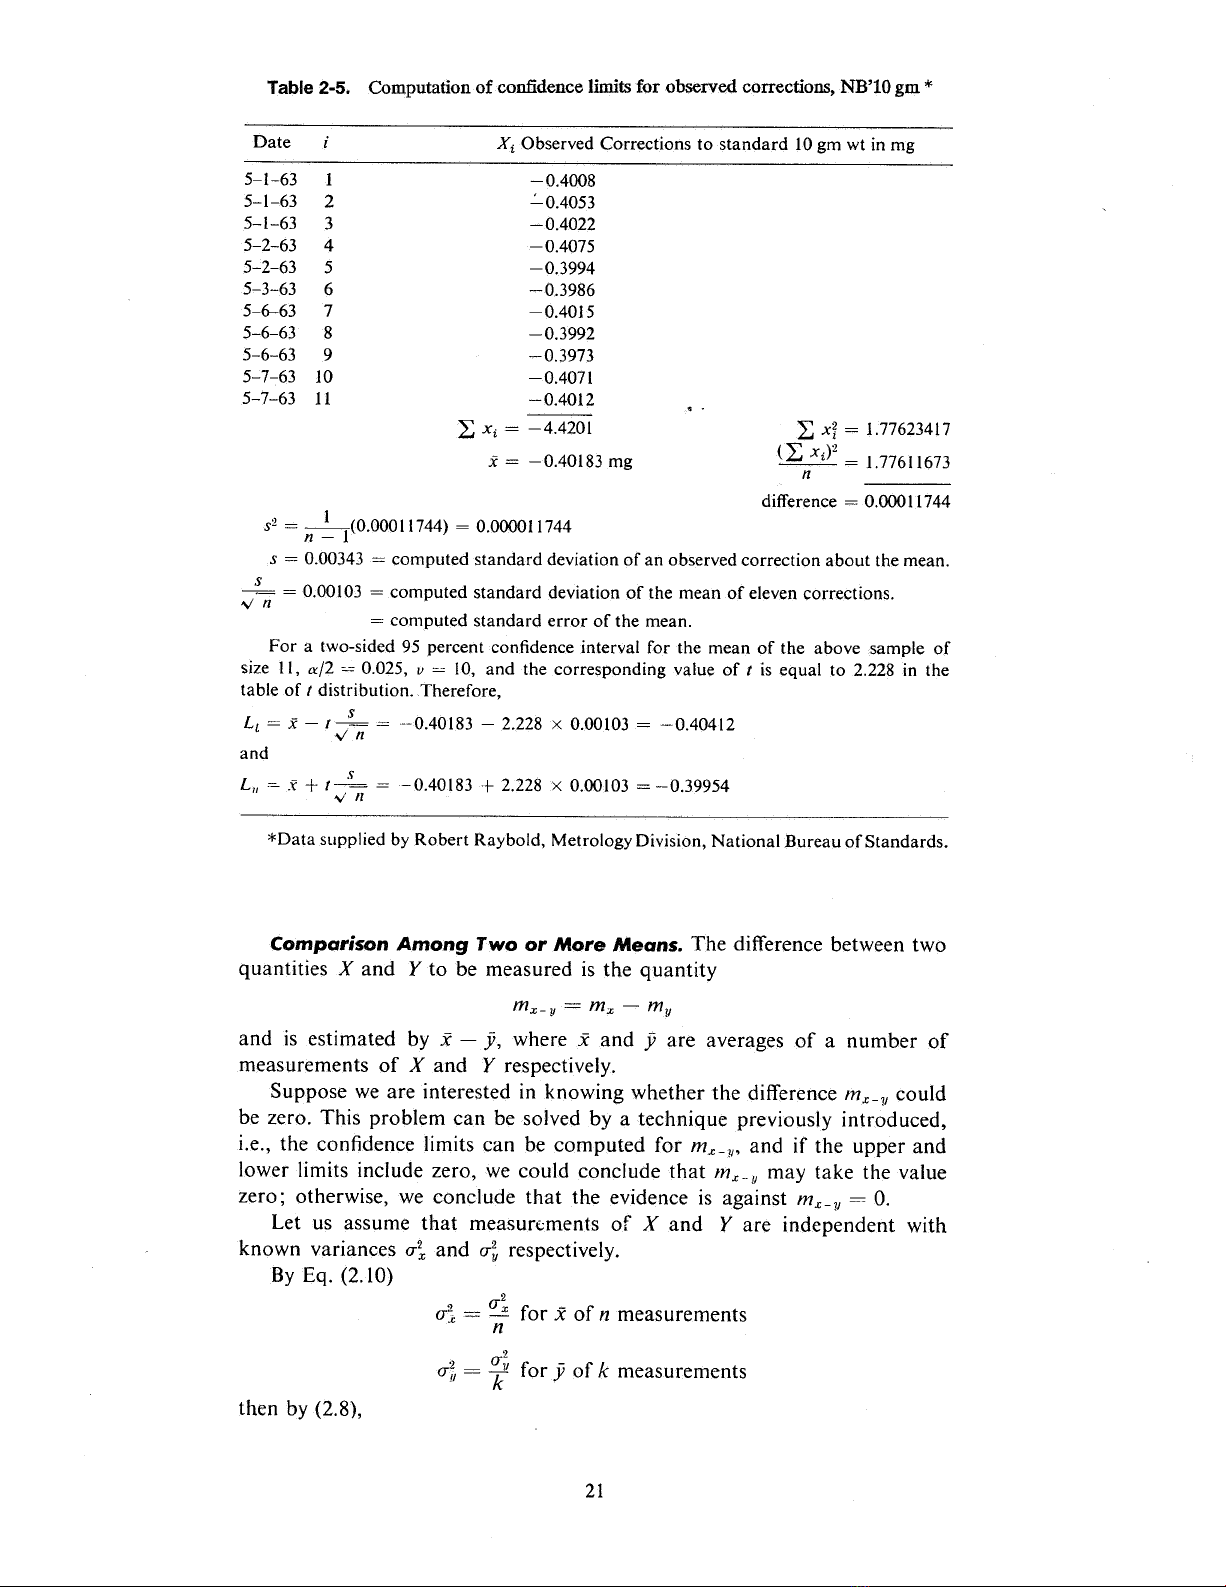
- Table 2-5. Computation of confidence limits for ob:;erved corrections, NB' lO gm Simpo PDF Merge and Split Unregistered Version - http://www.simpopdf.com "' Date Observed Corrections to standard 10 gm wt in mg Xi 63 0.4008 63 2 ~0.4053 63 ~0.4022 63 4 4075 63 0.3994 63 6 0.3986 6-63 7 0.4015 63 3992 63 3973 63 0.4071 63 0.4012 4.4201 = 1.77623417 Xi xI 0.40183 mg = 1.77611673 difference = 0. 00011744 2= (0, 00011744) = 0, 000011744 S = 0, 00343 = computed standard deviation of an observed correction about the mean. = 0. 00103 = computed standard deviation of the mean of eleven corrections. = computed standard error of the mean, For a two-sided 95 percentcon.fidenceinterval for the mean of the above sample of = 0. 025, is equal to 2, 228 in the size 11 a/2 10, and the corresponding value of distribution. Therefore table of 0.40183 - 2.228 x 0, 00103 = - 0.40412 Ll and 0.40183 + 2, 228 x 0. 00103 39954 =- X' + lI *Data supplied by Robert Raybold , Metrology Division , National Bureau of Standards. The difference between two or More Comparison Among Two Means. to be measured is the quantity quantities and mx_ mx and is number of and yare averages of a where estimated by :X respectively. measurements of and Suppose we are interested in knowing whether the difference mx- could be zero. This problem can be solved by a technique previously introduced, mx_ and if the upper and , the confidence limits can be computed for lower limits include zero , we could conclude that mx_ may take the value mx- zero; otherwise , we conclude that the evidence is against Let us assume that and Yare independent with measur(;ments of known variances ()~ and (); respectively. By Eq. (2. 10) measurements 2 = ,2. for of measurements for of then by (2. 8),
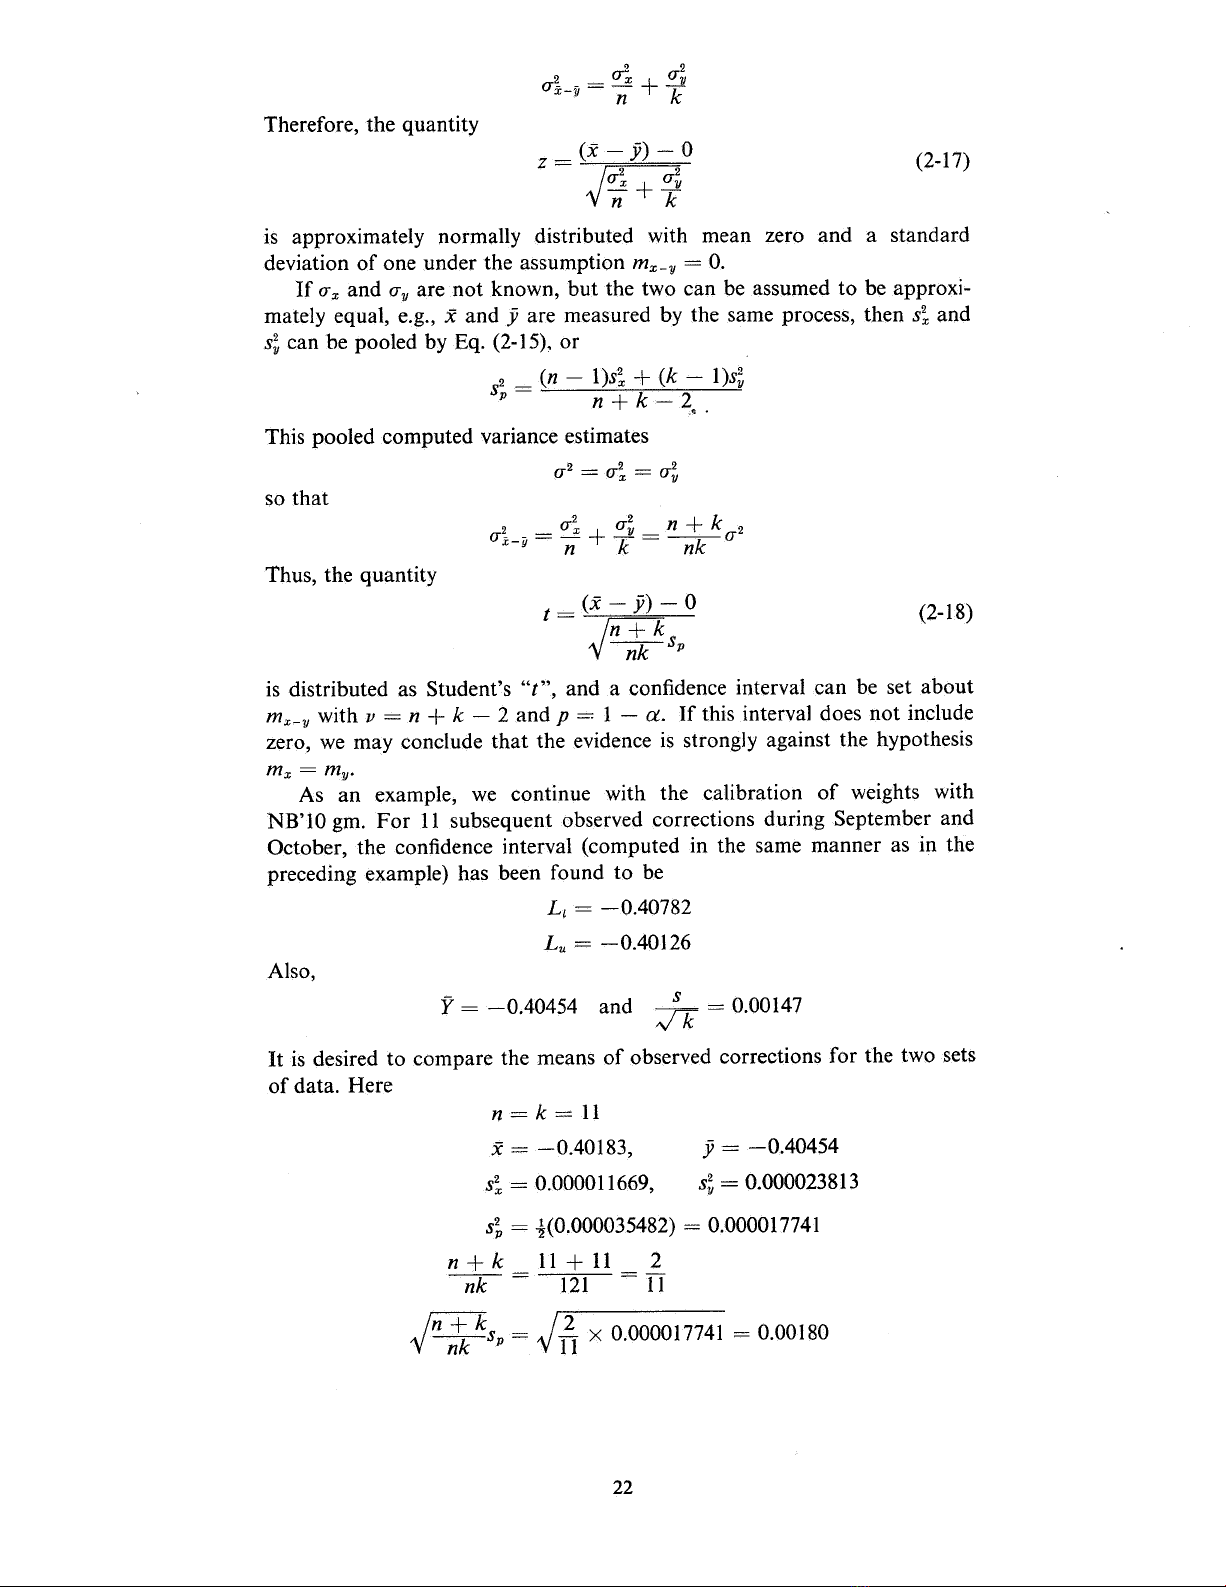
- u;, Uy 2. - Simpo PDF Merge and Split Unregistered Version - http://www.simpopdf.com Therefore, the quantity -0 (x (2- 17) J:~ distributed with mean zero and a standard is approximately normally mx- deviation of one under the assumption are not known , but the two can be assumed to be approxi- Ux and If and and yare measured by mately equal , s~ the same process, then e. can be pooled by Eq. (2- 15), or s~ l)s~ (k l)s~ (n .~ 2 This pooled computed variance estimates u~ so that 2. Thus , the quantity -0 (x (2- 18) In ;tk k interval . can be set about is distributed as Student's " , and a confidence If this interval does not include I-a. mx-y - 2 and with zero , we may conclude that the evidence is strongly against the hypothesis mx calibration of weights with As an example , we continue with the subsequent observed corrections during September and NB' II lO gm. For October , the confidence interval (computed in the same manner as in the preceding example) has been found to be 0.40782 Ll 0.40126 Lu Also 00147 0.40454 and '"Jk It is desired to compare the means of observed corrections for the two sets of data. Here 40454 0.40183 = 0. 000023813 = 0. 000011669 s~ s~ -!(0. 000035482) = 0.000017741 s~ 11+11 n+k 121 = ---rik 000017741 = 0. 00180 ---rik . TI X 0. In
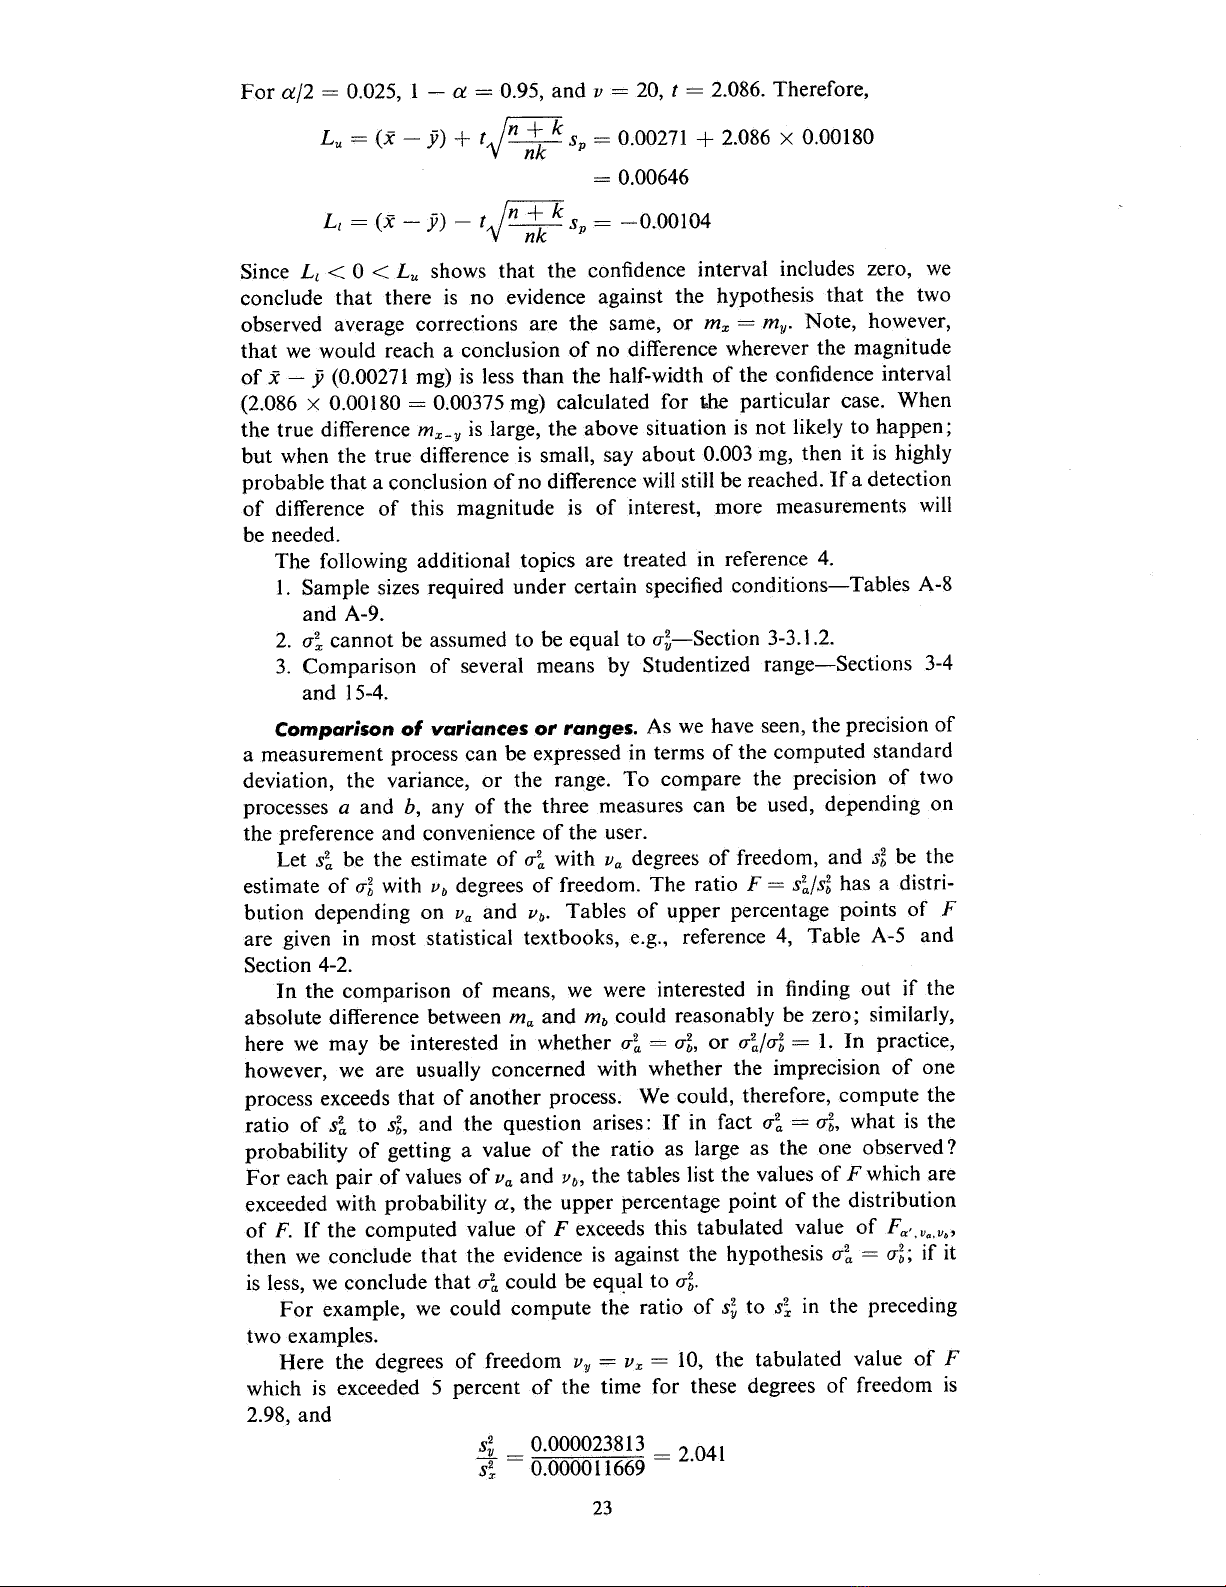
- = 0. and Simpo PDF Merge and0Split, Unregistered, Version - http://www.simpopdf.com = . 025 1 ~ 086. Therefore For al2 -/n ;tk k 00271 + 2.086 x 0. 00180 (x ji) = 0. 00646 -/n 001O4 ji) (x Lt ;tk k confidence interval includes zero, we shows that the Lu Ll Since ~0~ conclude that there is no evidence against the hypothesis that the two Note , however observed average corrections are the same , or mx that we would reach a conclusion of no difference wherever the magnitude ~ ji (0. 00271 mg) is less than the half-width of the confidence interval of (2. 086 X 0. 00180 = 0. 00375 mg) calculated for the particular case. When mx- is large , the above situation is not likely to happen; the true difference but when the true difference is small , say about 0. 003 mg, then it is highly probable that a concl usion of no difference will still be reached. If a detection of difference of this magnitude is of interest , more measurements will be needed. The following additional topics are treated in reference 4. l. Sample sizes required under certain specified conditions-Tables and 2. ()~ cannot be assumed to be equal to ()~- Section 3- 3. Comparison of several means by Studentized range- Sections 3- and 15- As we have seen , the precision of Comparison of variances or ranges. a measurement process can be expressed in terms of the computed standard deviation , the variance , or the range. To compare the precision of two any of the three measures can be used , depending on processes and the preference and convenience of the user. degrees of freedom , and be the be the estimate of ()~ with s~ Va Let s~ has a distri- estimate of (J"~ with s~/s~ Vb degrees of freedom. The ratio Tables of upper percentage points of Va and Vb' bution depending on and are given in most statistical textbooks , e. , reference 4 , Table Section 4- we were interested in finding out if the In the comparison of means , similarly, could reasonably be zero; and mb absolute difference between here we may be interested in whether ()~, or 1. In practice however , we are usually concerned with whether the imprecision of one We could , therefore , compute the process exceeds that of another process. ()~, what is the and the question arises: If in fact to s~, s~ ratio of probability of getting a value of the ratio as large as the one observed? which are and Vb, the tables list the values of For each pair of values of the upper percentage point of the distribution exceeded with probability F. exceeds this tabulated value of If the computed value of of then we conclude that the evidence is against the hypothesis ()~; if it is less , we conclude that ()~ could be eql!al to in the preceding For example , s~ s~ to we could compute the ratio of two examples. Here the degrees of freedom = 10 , the tabulated value of Vx these degrees of freedom is which is exceeded 5 percent of the time for , and 000023813 - 2041 - 0. 000011669 s~
- Simpo PDF Merge and Split Unregistered we conclude that there is no reason to believe Since 2. 04 is less than 2. , Version - http://www.simpopdf.com that the precision of the calibration process in September and October is poorer than that of May. For small degrees of freedom , is rather large the critical value of = 0. = 3, is 9. 28. It follows Vb , for and 05, the value of is not likely to be detected with a that a small difference between O"~ and O"E small number of measurementsfrom each process. The table below gives the approximate number of measurements required to have a four-out- of- five chance of detecting whether (while is the indicated multiple of (Tb maintaining at 0. 05 the probability of incorrectly concluding that O"b, O"b when in fact Multiple No. of measurements 1.5 Table A- II in reference 4 gives the critical values of the ratios of ranges and Tables A- 20 and A- 21 give confidence limits on the standard deviation of the process based on computed standard deviation. Cont.rol Charts Technique for Maintaining .Stability and Precision A laboratory which performs routine measurement or calibration opera- tions yields , as its daily product , numbers-averages , standard deviations and ranges. The control chart techniques therefore could be applied to these numbers as products of a manufacturing process to furnish graphical evidence on whether the measurement process is in statistical control or out of statistical control. If it is out of control , these charts usually also indicate where and when the trouble occurred. The basic concept of a control chart is Control for Averages, Chart in accord with what has been disctlssed thus far. A measurement process is assumed. The sequence with limiting mean and standard deviation (J of numbers produced is divided into " rational" subgroups , e. , by day, by a set of calibrations , etc. The averages of these subgroups are computed. where 0"/ vn These averages will have a mean and a standard deviation is the number of measurements within each subgroup. These averages are approximately normally distributed. is plotted as the In the construction of the control chart for averages center line are plotted as control limits, k(O"/vn) and k(O"/vn) is taken to be 3 and the averages are plotted in an orderly sequence. If we know that the chance of a plotted point falling outside of the limits if the process is in control , is very small. Therefore , if a plotted point falls outside these limits, a warning is sounded and investigative action to locate the " assignable " cause that produced the departure , or corrective measures are called for. The above reasoning would be applicable to actual cases only if we have (T. If the standard deviation is estimated chosen the proper standard deviation 0" w by pooling the estimates computed from each subgroup and denoted by , if any, between group averages have (within group), obviously differences
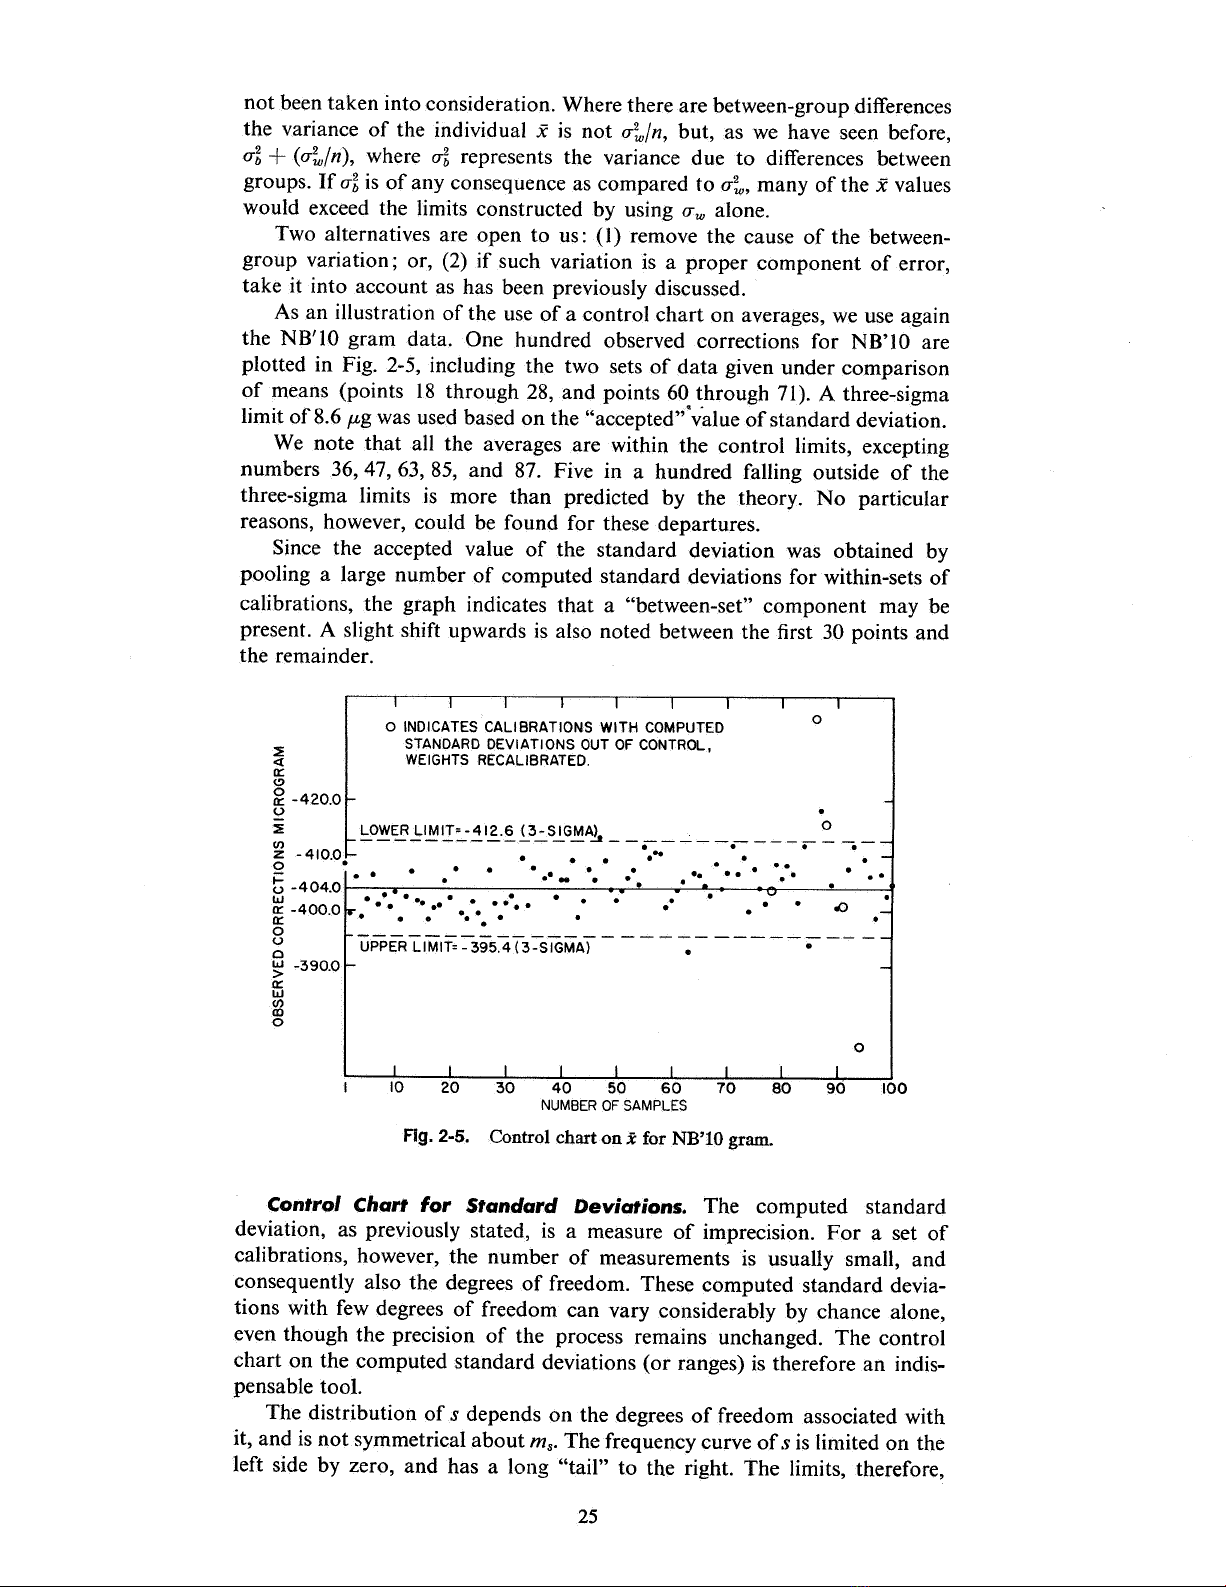
- .. :::;: ---------- -----. ---------. -- . ---- . . .. ---- -------- ~----- --~------ .. ~ -- .. :::;: .. .. Simpo PDF Merge and Split Unregistered Versionthere are between- not been taken into consideration. Where - http://www.simpopdf.com group differences u;,/n but , as we have seen before the variance of the individual is not represents the variance due to differences between u~ (u;,/n), where u~ values u~ is of any consequence as compared to groups. If u;" many of the alone. would exceed the limits constructed by using Two alternatives are open to us: (l) remove the cause of the between- group variation; or , (2) if such variation is a proper component of error take it into account as has been previously discussed. As an illustration of the use of a control chart on averages , we use again the NB' lO gram data. One hundred observed corrections for NB' lO are plotted in Fig. 2- , including the two sets of data given under comparison of means (points 18 through 28 , and points 60 through 71). A three-sigma limit of 8. 6 p,g was used based on the " accepted" valueof standard deviation. We note that all the averages are within the control limits , excepting numbers 36 , 47 , 63 , 85 , and 87. Five in a hundred falling outside of the three-sigma limits is more than predicted by the theory. No particular reasons , however , could be found for these departures. Since the accepted value of the standard deviation was obtained pooling a large number of computed standard deviations for within-sets of calibrations , the graph indicates that a " between-set" component may be present. A slight shift upwards is also noted between the first 30 points and the remainder. 0 INDICATES CALIBRATIONS WITH COMPUTED STANDARD DEVIATIONS OUT OF CONTROl, WEIGHTS RECALIBRATED. c:( a:: 0 . SIGMA) :E - 20. 0 o o. LOWER lIMIT=- 412. 6 (3- i= ~ - 410, .0 00 u - 404, ..o 400. SIGMA) UPPER LlMIT=- 395.4(3- 390, a:: CJ) 100 FIg. 2-5. Control chart on j for NB' 10 gram. The computed standard lor StQndQrd f)ev;(Jf;ons. Control ChQrt deviation , as previously stated, is a measure of imprecision. For a set of calibrations , however , the number of measurements is usually small , and consequently also the degrees of freedom. These computed standard devia- tions with few degrees of freedom can vary considerably by chance alone process remains unchanged. The control even though the precision of the chart on the computed standard deviations (or ranges) is therefore an indis- pensable tool. depends on the degrees of freedom associated with The distribution of is limited on the , and is not symmetrical about mo. The frequency curve of left side by zero , and has a long " tail" to the right. The limits , therefore
- Simpo PDF Merge not symmetrical about and Split Unregistered mVersion - http://www.simpopdf.com Furthermore, if the standard deviation of s. are where the process is known to be (1" is not equal to (1" , (1" ms but is equal to is a constant associated with the degrees of freedom in s. C2 The constants necessary control for the construction of three-sigma limits for averages , computed standard deviations , and ranges , are given 3 of in most textbooks on quality reference 4 gives control. Section 18- such a table. A more comprehensive treatment on control charts is given in ASTM " Manual on Quality Control of Materials " Special Technical Publication IS- Unfortunately, the notation employed in quality control work differs in some respect from what is now standard in statistics , and correction factors have to be applied to some of these constants when the computed standard deviation is calculated by the definition given in this chapter. These corrections are explained in the footnote under the table. As an example of the use of control charts on the precision of a cali- bration process , we will use data from NBS calibration of standard cells. * Standard cells in groups of four or six are usually compared with an NBS A typical data sheet for a group of standard cell on ten separate days. six cells , after all the necessary corrections , appears in Table 2- 6. The stan- dard deviation of a comparison is calculated from the ten comparisons for each cell and the standard deviation for the average value of the ten com- parisons is listed in the line marked SDA. These values were plotted as in Fig. 2- II points 6 through (521)6 (f) (.393) ....J (.334) 0:: 3? CECC' CALIBR ATE ..s UPPER LlMIT= 190(3-SIGMA) 0:: CENTER LlNE= . 111 ~I (f) a.. LOWER LlMIT= O31 (:3- SIGMA) u0 CELL CALIBRATIONS Fig. 2-6. Control chart ons for the calibration of standard cells. Let us assume that the precision of the calibration process remains the same. We can therefore pool the standard deviations computed for each cell (with nine degrees of freedom) over a number of cells and take this value as the current value of the standard deviation of a comparison , (1". The corresponding current value of standard deviation of the average of (1"/,.jT(j. The control chart will be (1" ten comparisons will be denoted by s/,.jT(j. made on *IIlustrative data supplied by Miss Catherine Law , Electricity Division , National Bureau of Standards.
- ,,)) For example , the SDA's for 32 cells calibrated between June 29 and Simpo PDF Merge and Split Unregistered Version 2 points in Fig. 2- August 8 , 1962 , are plotted as the first 3 - http://www.simpopdf.com 6. The pooled standard deviation of the average is 0. 114 with 288 degrees of freedom. The between- group component is assumed to be negligible. Table 2- Calibration data for six standard cells Day Corrected Emf' s and standard deviations , Microvolts 27. 24. 31.30 33.30 32. 23. 25. 24. 31.06 34.16 33. 23. 26. 24, 31. 33. 33. 24. 26. 24. 31.26 33. 24.16 33. 27. 25. 31.53 34. 24.43 33. 25. 24.40 31.80 33. 24.10 32. 26. 24, 32. 34. 33.39 24. 26. 24. 32.18 35. 24. 33. 26. 25. 31.97 34. 33. 23. 26. 25. 31.96 34. 32. 24. 1.169 1.331 1.127 777 677 233 AVG 26. 378 24. 738 34. 168 31. 718 33. 168 24. 058 0.482 0.439 402 0.495 0.425 366 SDA 0.127 153 139 157 134 116 Position Emf, volts Position Emf, volts 1.0182264 1.0182342 1.0182247 1.0182332 1.0182317 1.0182240 Since 10, we find our constants for three-sigma control limits on in Section 18- 3 of reference 4 and apply the corrections as follows: 1.054 x 0. 9227 x 0. 114 111 Center line nn 1.054 x 0. 262 x 0. 114 = 0.031 Lower limit = nn x 0. 114 = 0. 190 1.054 x 1.584 Upper limit = nn The control chart (Fig. 2- 6) was constructed using these values of center line and control limits computed from the 32 calibrations. The standard deviations of the averages of subsequent calibrations are then plotted. Three points in Fig. 2- 6 far exceed the upper control limit. All three cells which were from the same source , showed drifts during the period of calibration. A fourth point barely exceeded the limit. It is to be noted that the data here were selected to include these three points for purposes of illustration only, and do not represent the normal sequence of calibrations. The main function of the chart is to justify the precision statement on the report of calibration , which is based on a value of u estimated with perhaps thousands of degrees of freedom and which is shown to be in control. The report of calibration for these cells (u 12) could read: 0.117 Each value is the mean of ten observations made between and . Based on a standard deviation of O. I2 microvolts for the means, these values are correct to 0.36 microvolts relative to the volt as maintained by the national reference group.
- Linear Relationship and Fitting of Simpo PDF Merge and Split Unregistered Version - http://www.simpopdf.com Constants by Least Squares mean of n measurements as an estimate of the In using the arithmetic we have , knowingly or unknowingly, fitted a constant to limiting mean , the data by the method of least squares , i.e. , we have selected a value such that for L d~ m)2 (Yt The deviations dt = is a minimum. The solution is Yt Yt are called residuals. Here we can express our measurements in the form of a mathematical model (2- 19) Y. the limiting mean (a constant), where Y stands for the observed values measurement with a limiting mean zero and € the random error (normal) of By (2- 1) and (2-9), it follows that (T. and a standard deviation and (1'; such for The method of least squares requires us to use that estimator that the sum of squares of the residuals is a minimum (among all possible estimators). As a corollary, the method also states that the sum of squares of residuals divided by the number of measurements n less the number of estimated constants p will give us an estimate of p n~ m)2 y)2 (2-20) (Yt (Yt ~L It is seen that the above agrees with our definition of S Suppose Y, the quantity measured , exhibits a linear functional relation- + € (2- ship with a variable which can be controlled accurately; then a model can be written as 21) bX Y= (the where , as before, Y is the quantity measured, (the intercept) and slope) are two constants to be estimated , and € the random error with For at Xi, and observe limiting mean zero and variance We set Yt. Yi might be the change in length of a gage block steel observed for example, n equally spaced temperatures Xi within a certain range. The quantity of interest is the coefficient of thermal expansion For any and we can compute a value and say estimates of for each Xi, or bxt Yt If we require the sum of squares of the residuals (Yt i=1 to be a minimum, then it can be shown that (Xt X)(Yi '" L (2- 22) t=1 x)2 (x! t=1
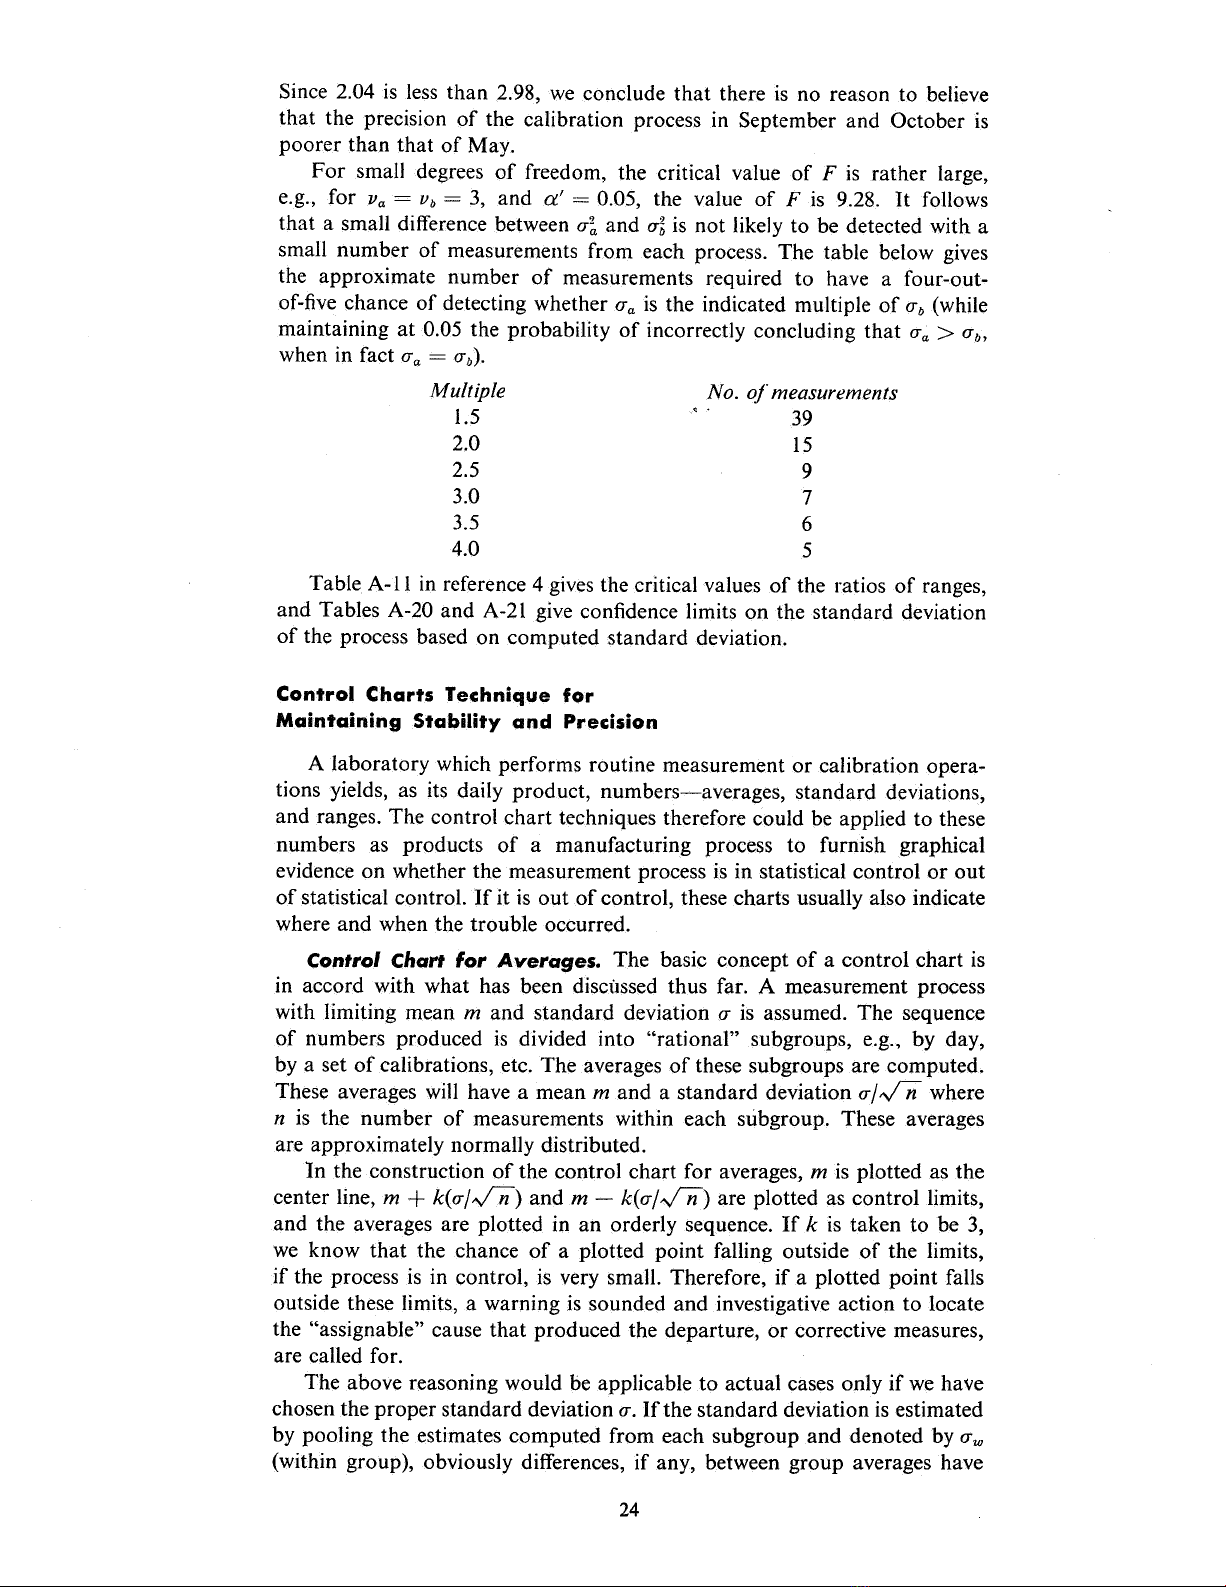
- and Simpo PDF Merge and Split Unregistered Version - http://www.simpopdf.com (2- 23) can be estimated by The variance of (2- 24) L; (Yi -2 - 2 degrees of freedom since two constants have been estimated with from the data. Sa, Sh and and are respectively estimated by The standard errors of where (2- 25) s~ - xY L; (Xi J (2- 26) sa L; (X~=-' X)2 con- With these estimates and the degrees of freedom associated with for the confidence coefficient fidence limits can be computed for and selected if we assume that errors are normally distributed. respectively, are: Thus , the lower and upper limits of and Isa, ISa Ish Ish, corresponding to the degree of freedom and the selected for the value of confidence coefficient. The following problems relating to a linear relationship between two variables are treated in reference 4, Section 5- 1. Confidence intervals for a point on the fitted line. 2. Confidence band for the line as a whole. 3. Confidence interval for a single predicted value of for a given Polynomial and multivariate relationships are treated in Chapter 6 the same reference. REFERENCES The following references are recommended for topics introduced in the first section of this chapter: Jr. , E. B. An Introduction to Scientific Research McGraw- HilI Book I. Wilson , Company, New York , 1952 , Chapters 7 , 8 , and 9. Eisenhart , Churchill, " Realistic Evaluation of the Precision and Accuracy of 2. Instrument Calibration System Journal of Research of the National Bureau of Standards Vol. 67C , No. , 1963. Experimentation and Measurement National Science Teacher 3. Youden , W. J., Association Vista of Science Series No. , Scholastic Book Series, New York. In addition to the three general references given above, the following are selected with special emphasis on their ease of understanding and applicability in the measurement science:
- Statistical Methods Simpo PDF Merge and Split Unregistered Version - http://www.simpopdf.com 4. Natrella ,M. G. Experimental Statistics NBS Handbook 91 , U. S. Government Printing Office, Washington , D. , 1963. 5. Youden , W. J. Statistical Methods for Chemists John Wiley & Sons , Inc., New York , 1951. 6. Davies , O. L (3rd ed. ), Hafner Statistical Method in Research and Production Publishing Co. , Inc. , New York , 1957. Textbooks 7. Dixon, W. J. and F. J. Massey, (2nd ed. Introduction to Statistical Analysis McGraw- Hill Book Company, New York , 1957. 8. Brownlee , K. A. Statistical Theory and Methodology in Science and Engineering, John Wiley & Sons, Inc. , New York , 1960.. . 9. Areley, N. and K. R. Buch Introduction to the Theory of Probability and Statis- tics John Wiley & Sons , Inc. , New York , 1950. Additional Books on Treatment of Data 10. American Society for Testing and Materials Manual on Presentation of Data (STP 15D), 1976, 162 p. and Control Chart Analysis 11. American Society for Testing and Materials ASTM Standard on Precision and Accuracy for Various Applications 1977, 249 p. 12. Box, G. E. P. , Hunter, W. G. , and Hunter , J. S. Statistics for Experimenters an Introduction to Design, Data Analysis. and Model Building, John Wiley and Sons, Inc., New York, 1978, 575 p. 13. Cox, D. R. Planning of Experiments John Wiley and Sons, Inc. , New York, 1958, 308 p. 14. Daniel , C. and Wood, F. S. Fitting Equations to Data, Computer Analysis of Multifactor Data 2d ed. , John Wiley and Sons, Inc. , New York, 1979, 343 p. 15. Deming, W. E. Statistical Adjustment of Data John Wiley and Sons, Inc., New York, 1943 261 p. 16. Draper, N. R. and Smith, H. Applied Regression Analysis John Wiley and Sons, Inc. , New York, 1966, 407 p. 17. Him.m.elblau, D. M. John Wiley . and Process Analysis by Statistical Methods, Sons, Inc., New York, 1970, 464 p. 18. Ku, H. H. , Precision Measurement and Calibration: Statistical Concepts ed. and Procedures Nati. Bur. Stand. (U. ) Spec. Pub!. 300, 1969, v.p. 19. Mandel , Interscience, New J., The Statistical Analysis of Experimental Data, York, 1964, 410 p. and Tukey, J. W. DataAnalysis and Regression, a Second Course 20. Mosteller, F. Addison-Wesley, Reading, Massachusetts, 1977, 588 p. in Statistics
- ," POSTSCRIPT Simpo PDF Merge and Split Unregistered Version - http://www.simpopdf.com STATISTICAL GRAPHICS Over the years since the publication of the abo.ve article , it has become additio.ns o.n recent develo.pments for the treatment o.f apparent that so.me data may be useful. It is equally apparent that the concepts and techniques intro.duced in the o.riginal article remain as valid and appro.priate as when first written. For this reaso.n , a few additio.nal sectio.ns on statistical graphics are added as . a postscript. The po.wer of small computers and the asso.ciated so.phisticated so.ftware have pushed graphics into. the forefront. Plots and graphs have always been po.pular with engineers and scientists , but t~e~r use has been limited by the time and wo.rk involved. Graphics packages now-a- days allo.w the user ease , and a good statistical package will also to. do. plo.ts and graphs with auto.matically present a number o.f pertinent plo.ts for examination. As John Tukey said the greatest value o.f a picture is when it fo.rces us to. no.tice what we never expected to see. " 11J An o.utlier? Skewed distributio.n o.f values? Po.o.r mo.delling? What is the data trying to. say? Answers to. through inspectio.n o.f plots . and graphs , whereas all these co.me naturally co.lumns o.f numbers reveal little , if anything. Co.ntro.l charts for the mean (Fig. 2- 5) and standard deviatio.n (Fig. 2- are classical examples o.f graphical metho.ds. Co.ntro.l charts were intro.duced by Walter Shewhart so.me 60 years ago. , yet the technique remains a po.pular and most useful tool in business and industry. Simplicity (o.nce co.nstructed), self-explanato.ry nature , and robustness (no.t depending o.n assumptions) are and sho.uld be , the main desirable attributes o.f all graphs and plo.ts. Since statistical graphics is a huge subject , only a few basic techniques to. the treatment o.f measurement data will be that are particularly useful , together with references fo.r further reading. discussed Plots for Summary and Display of Data The stem and leaf plot is a clo.se relative o.f the his- Stem and Leaf. togram , but it uses digits of data values themselves to sho.w features of the data set instead o.f areas of rectangles. First pro.posed by John W. Tukey, a stem and leaf plo.t retains mo.re info.rmatio.n from the data than the his- to.gram and is particularly suited fo.r the display of small to mo.derate-sized data sets.
- Fig. 1 is a stem and leaf plot of 48 measurements of the isotopic ratio Simpo PDF Merge 79BromineUnregistered Version - these 48 data points , listed in Table of and Split to 81Bromine. Values of http://www.simpopdf.com , range from 1.0261 to 1.0305 , or 261 to 305 after coding. The leaves .are the last digits of the data values , 0 to 9. The stems are 26 , 27 , 28, 29 , and 30. Thus 261 is split into two parts , plotted as 26 11. In this case , because of the heavy concentration of values in stems 28 and 29 , two lines are given to each stem, with leaves 0 to 4 on the first line , and 5 to 9 on the second. Stems are shown on the left side of the vertical line and individual leaves on the right side. There is no need for a separate table of data values - they are all shown in the plot! The plot shows . a slight skew towards lower values. The smallest value separates from the next by 0. 7 units. Is that an outlier? These data will be examined again later. 26. 034 27. 00334 566678889 28. 001233344444 29. 5666678999 0022 30. Stem and leaf plot. 48 values of isotopic ratios, (79/81). Fig. 1. bromine x 10', thus 26/1= 1. 0261. Unit = (Y -1. 0) for reference sample 79/81 Table 1. y- Ratios DETERMINATION I DETERMINATION II Instrument #4 Instrument Instrument #4 Instrument #1 #1 0292 1.0289 1.0296 1.0284 1.0285 1.02. 1.0293 0270 1.0298 1.0287 0302 1.0279 1.0302 1.0297 1.0305 1.0269 0294 1.0290 1.0288 1.0273 1.0296 1.0286 1.0294 1.0261 1.0293 1.0291 1.0299 1.0286 1.0295 1.0293 1.0290 1.0286 1.0300 1.0288 1.0296 1.0293 0297 1.0298 1.0299 1.0283 1.0274 1.02. 0299 1.0263 0294 1.0280 1.0300 1.0280 Ave. 029502 1.028792 1.029675 1.027683 00000086 00000041 00000024 00000069 00029 00064 00049 00083 00008 00018 00014 00024
ADSENSE
CÓ THỂ BẠN MUỐN DOWNLOAD
Thêm tài liệu vào bộ sưu tập có sẵn:
Báo xấu
LAVA
AANETWORK
TRỢ GIÚP
HỖ TRỢ KHÁCH HÀNG
Chịu trách nhiệm nội dung:
Nguyễn Công Hà - Giám đốc Công ty TNHH TÀI LIỆU TRỰC TUYẾN VI NA
LIÊN HỆ
Địa chỉ: P402, 54A Nơ Trang Long, Phường 14, Q.Bình Thạnh, TP.HCM
Hotline: 093 303 0098
Email: support@tailieu.vn