The Soma Cube
A TelExperiment by Sebastian Marius Kirsch
[soma-e.tex,v 1.3 1997/06/17 17:08:30 skirsch Exp]
©
1996,1997 Sebastian Marius Kirsch. All rights reserved. Reproduction and distribution is al-
lowed under the terms of the GNU General Public License. For personal/non-commercial use only.
The Soma Cube was invented
in 1936 by Piet Hein, a Danish
poet and puzzle inventor. It rep-
resents all possibilities of combin-
ing three or four cubes in a ‘not-
straight’ way. Its seven pieces can
be assembled to form thousands
of figures; it is a kind of three-
dimensional Tangram in this as-
pect.
A first origami versionof the Soma
Cube was introduced by Steve
Biddle in his book ‘The New Ori-
gami’. Steve Biddle uses Sonobé
units to produce the pieces and ar-
rives at the impressive number of
120 units. Maarten van Gelder
has developed a Soma Cube whose
pieces are each folded from a single square; he uses box pleating techniques developed
by Max Hulme. I am presenting a version that is folded from ticker tape. My version
gets by with seven 1.1 m long strips of ticker tape; each piece requires between 40 and
60 squares.
All seven elements are folded from the same principles. Instead of describing each
element step-by-step, I will therefore describe the basic elements and the methods of
extending them. These methods are then presented with four of the pieces; the remain-
ing pieces are only described verbally, but are constructed from the elements that have
already been described.
Before I start, I would like to thank two people: Philip Noble, whose FlexiCube has
contributed much inspiration to this model, and Heinz Strobl, who has worked his way
through the whole instruction and who has helped by removing many blunders and
mistakes.
This is a translation of a German article that originally appeared on no. 22 of der falter,
the magazine of Origami Deutschland. I dedicate this translation to Jan Polish, whom
I tried to teach the model at the W"urzburg ’97 Convention at one o’clock at night, but
in vain. I hope that my diagrams are clearer than my verbal instructions.
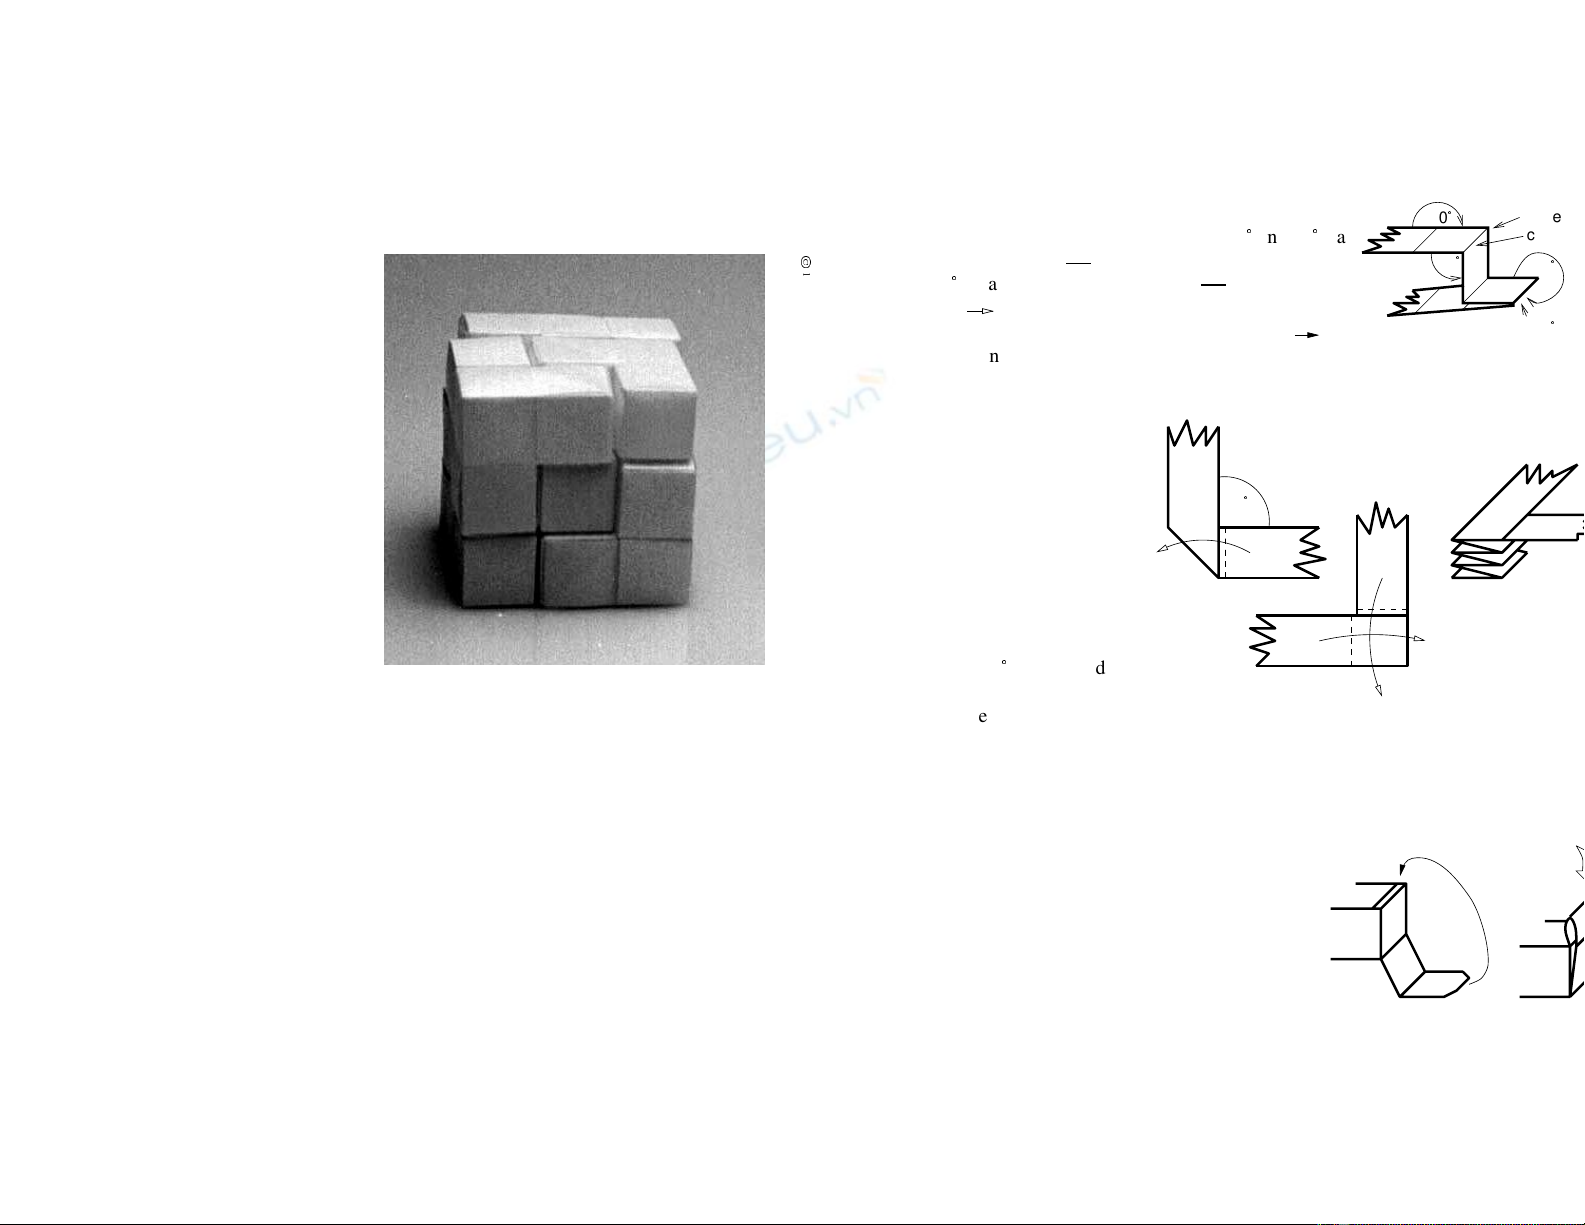
1 Some introductory remarks
1.1 Symbols
The diagrams distinguish between a simple fold
and the edge of the strip. For folds (180
°
and 90
°
), a
thin line is used ( ). For the edge of the strip and
360
°
creases, a thick line is used ( ). An open ar-
row ( ) is used to indicate that the end of the strip
is to be laid across a frame, and a filled arrow ( )is 360
°
cre
a
crease
360
°
90
°
edge
180
°
used to indicate that the strip is to be pulled through under a frame.
1.2 The ‘Witches’ staircase’
Before beginning, the
strip must be divided into
squares. This is done easi-
est with a fold that is called
a ‘Hexentreppe’ in Ger-
man. Some people may
still know this from kinder-
garten, but I will briefly re-
peat how to produce it. You
begin by folding a valley
fold of 45
°
in the middle of
the strip. Both end of the
2
1
A
B
B
A
90
°
A
B
strip are now perpendicular to each other. Now you fold Balong the edge of Ato
t
left, Aalong the edge of Bdown, and so on till the end of the strip. Then you undo
t
resulting staircase.
1.3 Locking the ends
The ends are locked by shortening the remain-
ing strip to two squares, sharpening it a little, and
tucking it into the opposite slot. Long finger-
nails and/or tweezers can be helpful for the last
bit.
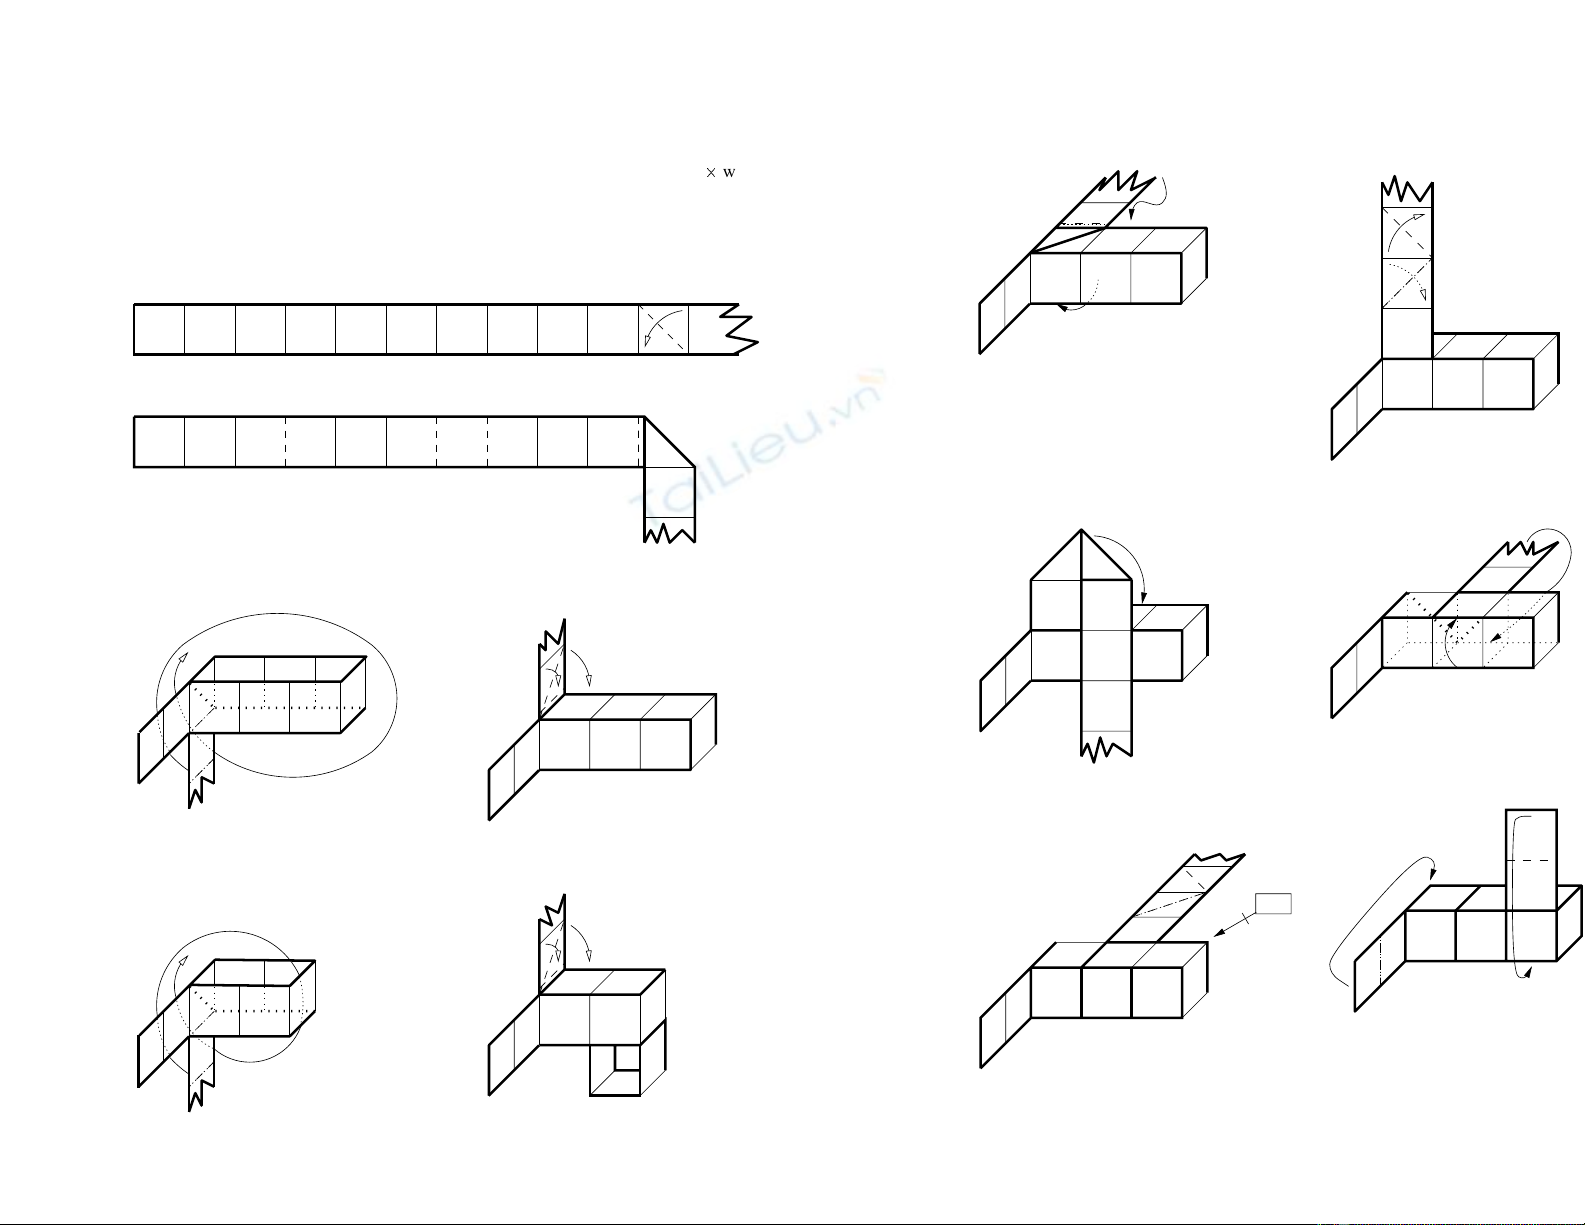
2 The basic unit
Length of the strip = 42
Ö
width
I will now describe how to make a basic unit with three cubes. The variation with
two cubes is easy to produce: Just make each frame two squares shorter.
1Valley fold field no. 11 down. (Field no. 9 for a unit with two cubes.)
2Form a loose horizontal frame, based on the shown valley folds.
3Lay the tape one time around the frame.
This is the vertical frame. 4Valley fold the tape to the back and to
the right.
2
1
3a Variation of step 3 for piece 3, 4, 6 and
7: Pull the tape through under the frame
on the right, lay it over the frame on the
left.
4a Variation of step 4 for piece 4, 6 and 7:
Let a loop stick out on the underside.
2
1
5Pull the tape through under the hori-
zontal frame on the back and in front. 6Valley fold and mountain fold the t
a
a right-angled triangle is produced.
7Tuck this triangle behind the horizontal
frame. 8Pull the tape through under the ver
t
frame underneath and over.
2
1
9Repeat steps 6–8 and pull the tape
through under the horizontal frame one
more time.
6–8
10 Lock the ends.
3 Extension of the basic unit
The described basic unit can be extended by allowing a loop to stick out in step 3 or 8,
and by weaving around it afterwards. If you let the loop stick out on the second frame,
the woven unit is perpendicular to the basic unit. If the loop sticks out while weaving
the basic unit (steps 8–9), the woven unit is in the same direction as the basic unit.
Before continuing, you should first try to make a basic unit with two cubes, since
five of the seven pieces are based on this unit.
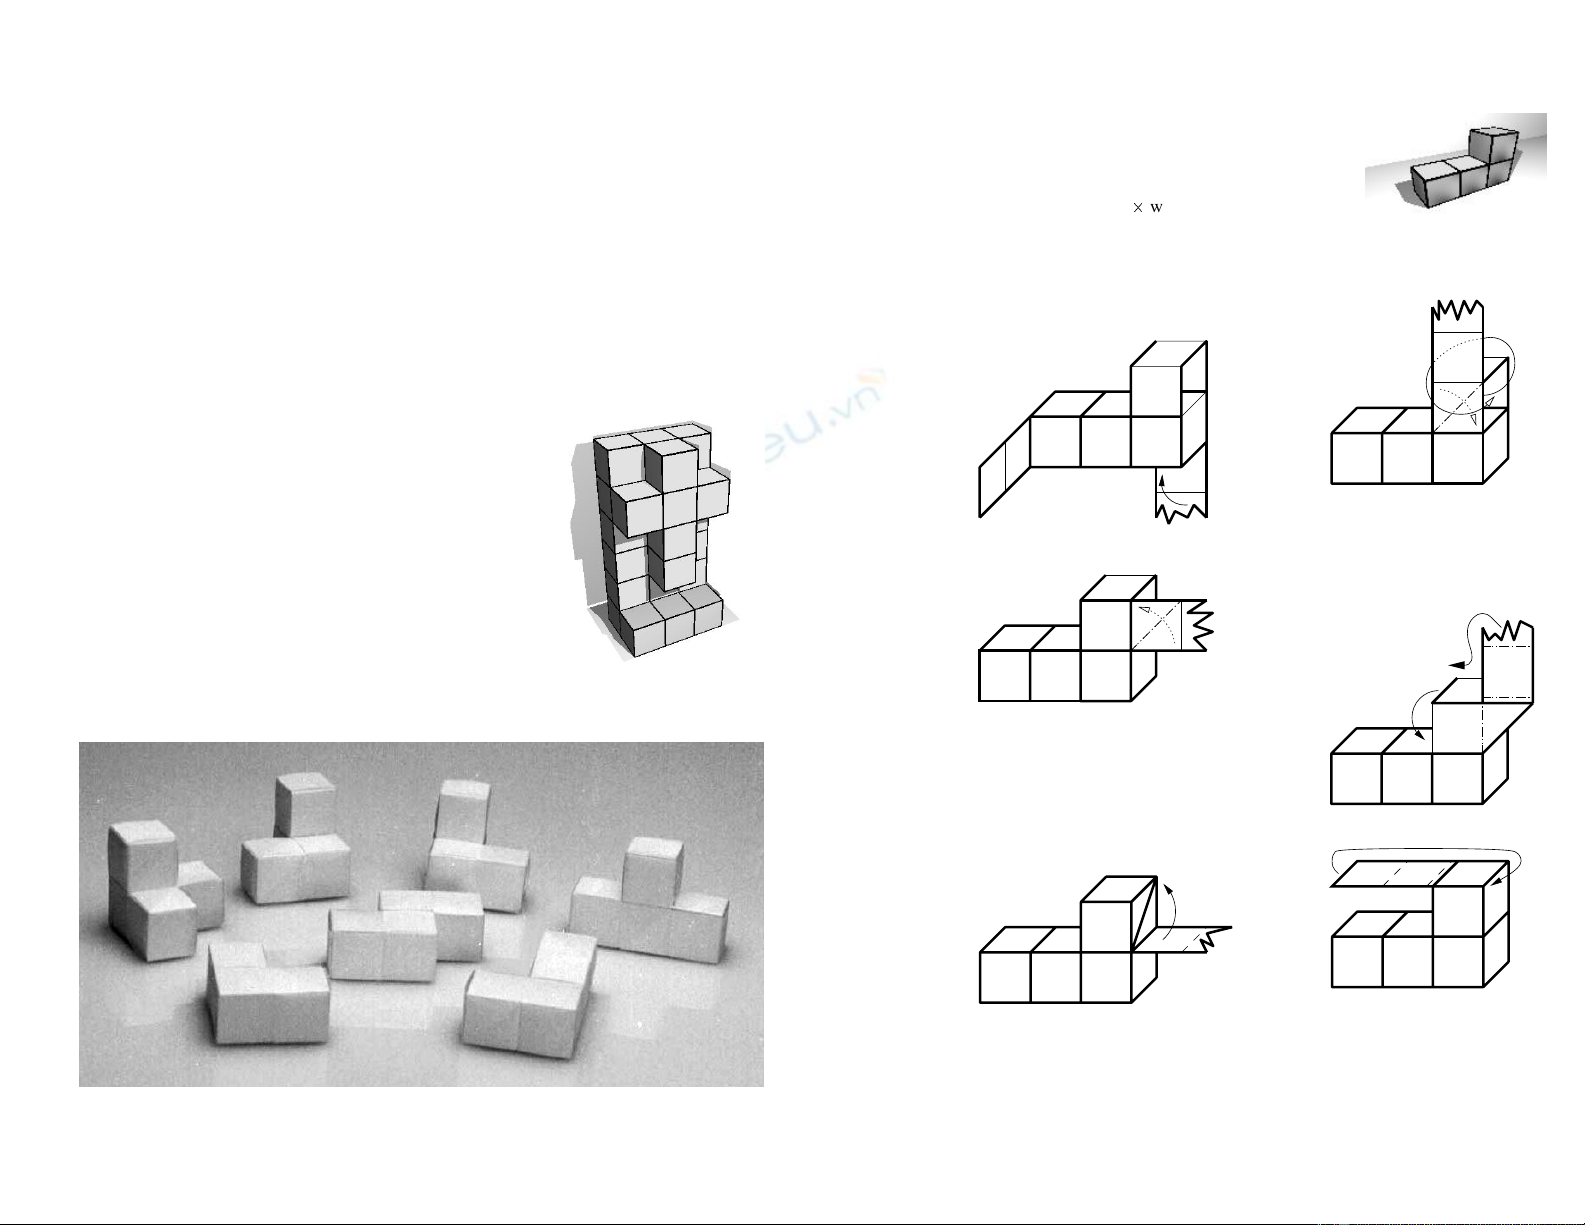
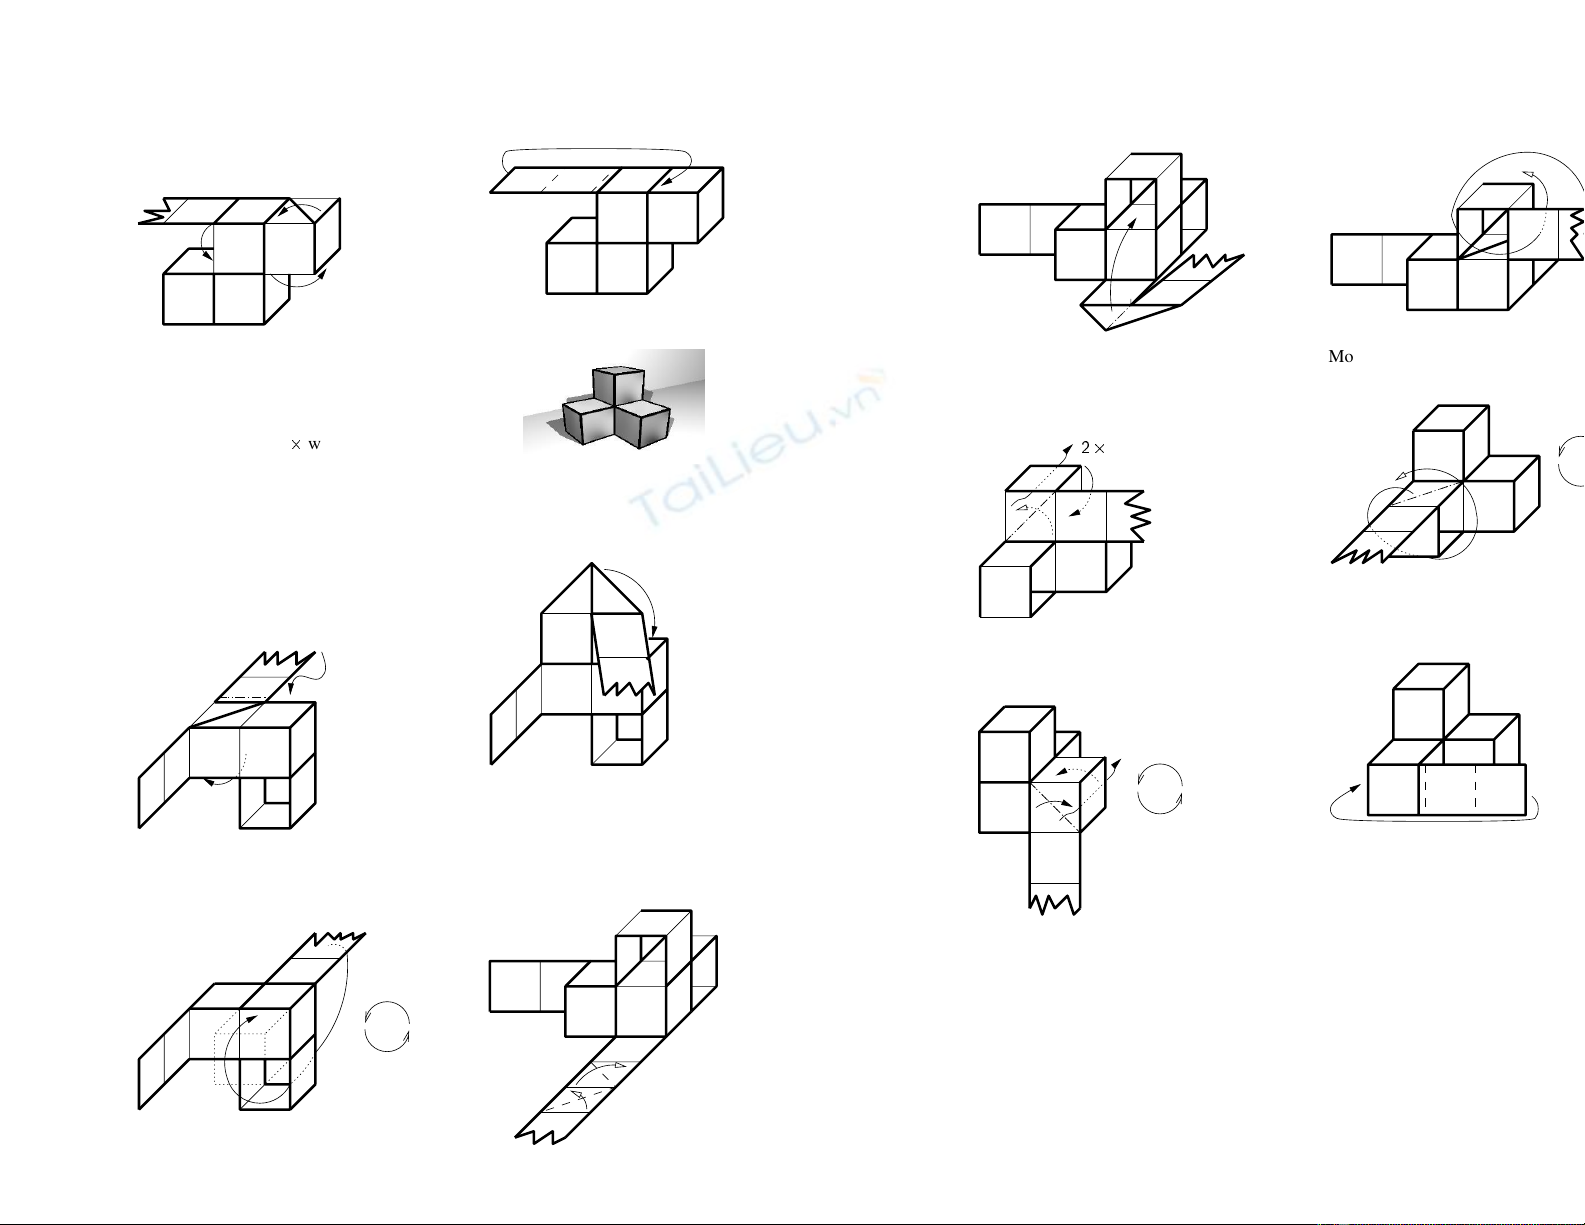
4 The pieces of the cube
Using the basic unit, the seven pieces of the cube can
now be folded. They can be assembled into thousands
of figures—into arches, walls, monuments, snakes, ships
and much more. An example is shown on the left.
While pulling the tape through under a cube, the tape can
occasionally be caught. You can help it by first putting
a small strip of paper in as guidance. Thin tweezers or a
thin metals strip can also be used as guidance for the tape.
After the first steps, the diagrams usually omit the begin-
ning of the strip, because it would get in the way during
later steps. Please do not be alarmed by this omission.
4.1 Piece 1
Length of the strip = 55
Ö
width
1Fold a basic unit with three cubes. Let
a loop stick out during the repetition of
step 8. Pull the tape through under the
frame one more time.
2Mountain-fold the tape to the right
lay it once around the loop.
3Mountain-fold the tape to the top. 4Pull the tape through under the loo
p
the top and between the two cubes i
n
middle.
5Pull the tape through under the loop on
the top. 6Lock the ends.
4.2 Piece 2
Length of the strip = 58
Ö
width
1Leave 16 squares at the beginning, then
fold a basic unit with three cubes. Let a
loop stick out during step 8 of the basic
unit. Then complete the unit.
16 squares
2Valley-fold the beginning twice: A
triangle forms. Tuck this triangle into
the loop.
3(new position) Lay the tape one time
around the loop. (cf. piece 1/2–5) 4(old position) Mountain-fold the tape to
the top.
5Pull the tape through under the loop on
the top, between the two units in the
middle, and once more under the loop
on the top.
6Lock the ends.
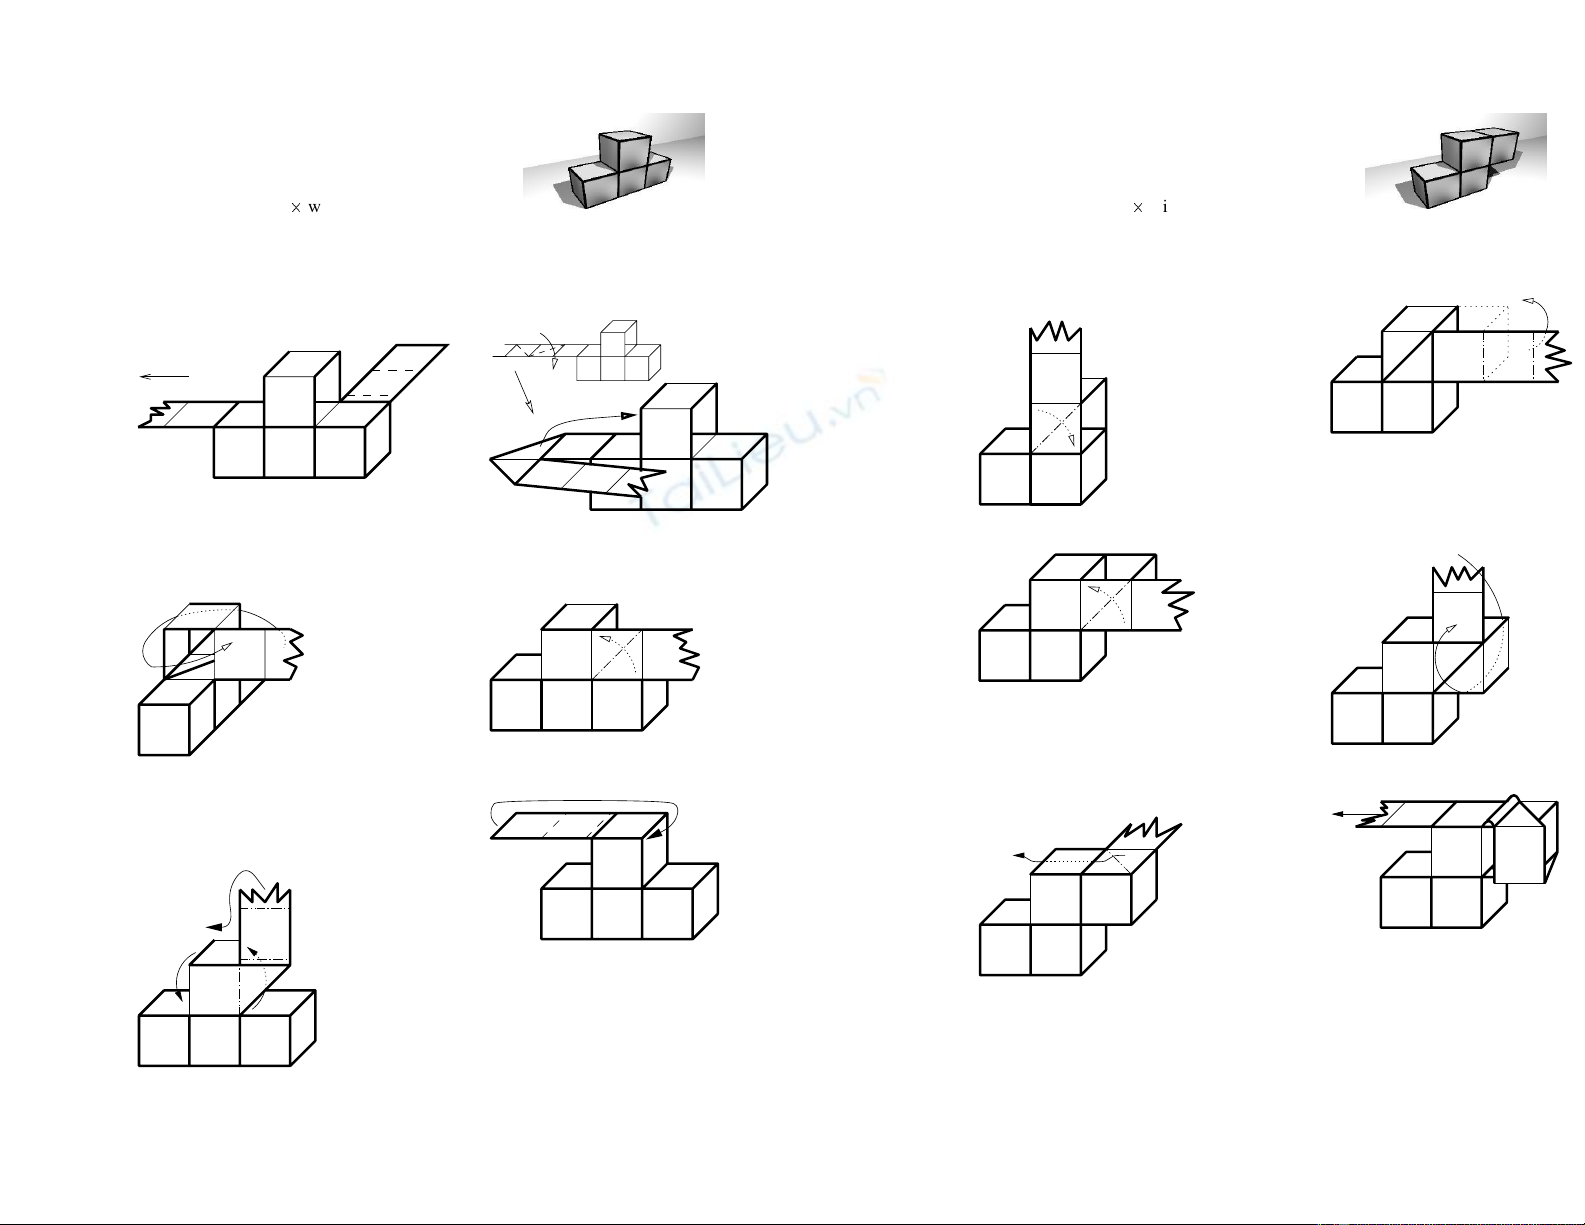
4.3 Piece 3
Length of the strip = 53
Ö
width
1Fold a basic unit with two cubes. Let a
loop stick out during step 8. (cf. piece
1/1)
2Lay a two cube wide frame aroun
d
loop, as indicated by the dotted line
3Mountain-fold the tape to the top. 4Lay the tape once around the new fr
a
5Mountain-fold the tape to the left and
pull it through under the original loop. 6While pulling it through.
7Pull the tape through between the unit,
on the right under the new frame, and
under the loop.
8Lock the ends.
4.4 Piece 4
Length of the strip = 60
Ö
width
This piece is one of the most difficult. Two distinctive loops have to stick out. This
makes the first steps particularly unstable. Persevere!
1Fold a basic unit with two cubes, and
let the vertical frame stick out (cf. steps
3a, 4a of the basic unit). Pull the tape
through under the frame twice and fold
a triangle.
2Tuck this triangle under the frame.
3Pull the tape through on the top and on
the bottom under the vertical frame, let
a loop stick out in front (as indicated by
the dotted lines).
4(new position) The loop on the back is
a result of the last step. Valley-fold the
tape twice.
5Tuck the triangle into the loop. 6Lay the tape once around the loop.
7(new position) Mountain-fold the tape
to the top, pull it through under the loop
on the top and in the middle twice,so
the vertical crease is hidden.
2
8Mountain-fold the tape to the left
lay it once around the loop.
9(new position) Mountain-fold the tape
to the left and pull it through on the right
and in the middle three times.
10 Lock the ends.


![Giáo trình Nghiệp vụ chế biến món ăn 1 (Nấu Ăn) Trường Cao đẳng Nghề An Giang [Mới nhất]](https://cdn.tailieu.vn/images/document/thumbnail/2022/20220815/viastonmartin/135x160/1344928266.jpg)


![Giáo trình Tổng quan bếp bánh (Nghề Kỹ thuật làm bánh) Trường CĐ Du lịch Hải Phòng [Mới nhất]](https://cdn.tailieu.vn/images/document/thumbnail/2021/20211217/caphesuadathemot/135x160/8991639730252.jpg)

![Tài liệu Tổng quan ngành hàng F&B Việt Nam [mới nhất]](https://cdn.tailieu.vn/images/document/thumbnail/2025/20250901/00khoa.vo@gmail.com/135x160/31641756871755.jpg)