
Liferay Portal
Liferay Portal
by Brian Kim
Copyright © 2005 bkim@liferay.com
This is a tutorial for Liferay Portal. Liferay Portal is an open source portal that helps
organizations collaborate more efficiently by providing a consolidated view of disparate
applications via a web browser.
Table of Contents
1. Introduction
1.1. Introduction
1.2. Recommended Requirements
2. Installation
2.1. Setting Up Your Development Environment
2.2. Obtaining Liferay Portal’s Source Code
2.3. Installing Your IDE – Eclipse
2.4. Developing with Liferay’s Core Source
2.4.1. Obtaining Orion Application Server
2.4.2. Configuring Eclipse with Orion
2.4.3. Setting Up Orion
2.4.4. Configuring Your Properties
2.4.5. Deploying to Orion
2.5. Creating an Extension Environment
2.5.1. Setting Up Ext
2.5.2. Adding Plugin support
2.5.3. Hooking Up To a Database
2.5.4. Starting Liferay
Chapter 1. Introduction
1.1. Introduction

✁
In this document, my goal is to help you setup your environment so that you can begin
developing your own custom portlets from scratch. This document assumes that you
have some working knowledge of Servlets, JSPs, and web development in general.
Although I’ll be assuming that you are running on a Windows OS, I’ll try to keep my
explanations general enough so that they can be used for any operating system.
This tutorial will cover the setup of a development environment, from using an IDE
such as Eclipse to setting up your database connections. While my focus will be on
using Liferay Professional – the Tomcat Spring framework version – I will briefly touch
on the Enterprise version as well.
1.2. Recommended Requirements
Although you could probably get away with lesser requirements, when developing and
customizing Liferay, we recommend the following hardware requirements:
1 gig of RAM
2.0 ghz Pentium processor
Chapter 2. Installation
2.1. Setting Up Your Development Environment
As with any enterprise Java application, setting up Liferay can be a daunting task.
Liferay leverages several frameworks. Fortunately for you, most of these frameworks
come bundled with Liferay already. What you do need to install, however, are some of
the basic tools that Liferay uses. Let’s first ensure that you’re using the right Java JDK.
You should be using the latest release of J2SE 1.4.2, which may already be installed on
your machine. If not, download the latest version from http://java.sun.com. Since
we’ll be installing several Java technologies, I typically install/unzip my files under a
common folder such as D:\Java. Obviously you can choose to install them into any
directory of your preference, but from here on out I will reference the installation folder
as {Java}. Although you can use Sun’s default Java compiler, we recommend using
IBM’s Jikes compiler – it is generally more descriptive with compile errors. Make sure

✂
you download version 1.21, since version 1.22 is oriented towards J2SE 1.5, which
Liferay Portal does not use due to backwards compatibility reasons. Finally, you’ll need
to download the latest version of Ant, a Java-based build tool, from
http://ant.apache.org. Once you’ve downloaded and installed/unzipped all the files
described above, you’ll need to set your environmental variables to point to them. In
Windows, open your Control Panel, choose System properties, click the Advanced tab,
and click Environmental Variables.
Figure 2.1. Environmental Variables
Choose New, and then add the following three variables: JAVA_HOME,
JIKES_HOME, and ANT_HOME. Each respective variable needs to point to the
directory in which your tools reside. If you look at Figure 2.1, you can see that my
JAVA_HOME variable points to {Java}\j2sdk1.4.2_05. It is recommended that you
remove the CLASSPATH variable to prevent conflicts when compiling. It is generally
good practice to develop without the use of a classpath variable, since doing so creates
a dependency on the developer’s machine. Once you have your three System variables
setup, you need to edit the Path variable by adding the
following: %ANT_HOME%\bin;%JAVA_HOME%\bin;%JIKES_HOME%\bin
2.2. Obtaining Liferay Portal’s Source Code
In order to keep up-to-date with Liferay’s upgrades, you will want to create an extension
environment. To start, go to http://www.liferay.com/web/guest/downloads/portal_source
✄
and download the latest stable Liferay Portal Enterprise source. I would recommend
unzipping the bundle into a directory like D:\cvsroot\liferay (I use CVS as a code
repository), which I will refer to as {Liferay}. Then download the latest stable Liferay
Portal bundle, in particular Liferay Portal Professional (Bundled with Tomcat) for this
tutorial. I’ll explain what to do with the Tomcat bundle later on in this chapter.
2.3. Installing Your IDE – Eclipse
Despite the fact that you could modify and deploy Liferay Portal with as simple as an
editor as Textpad, a good IDE can help speed up the process. I’ll show you how Eclipse
plugins can make life easier for editing, deploying, and running Liferay Portal.
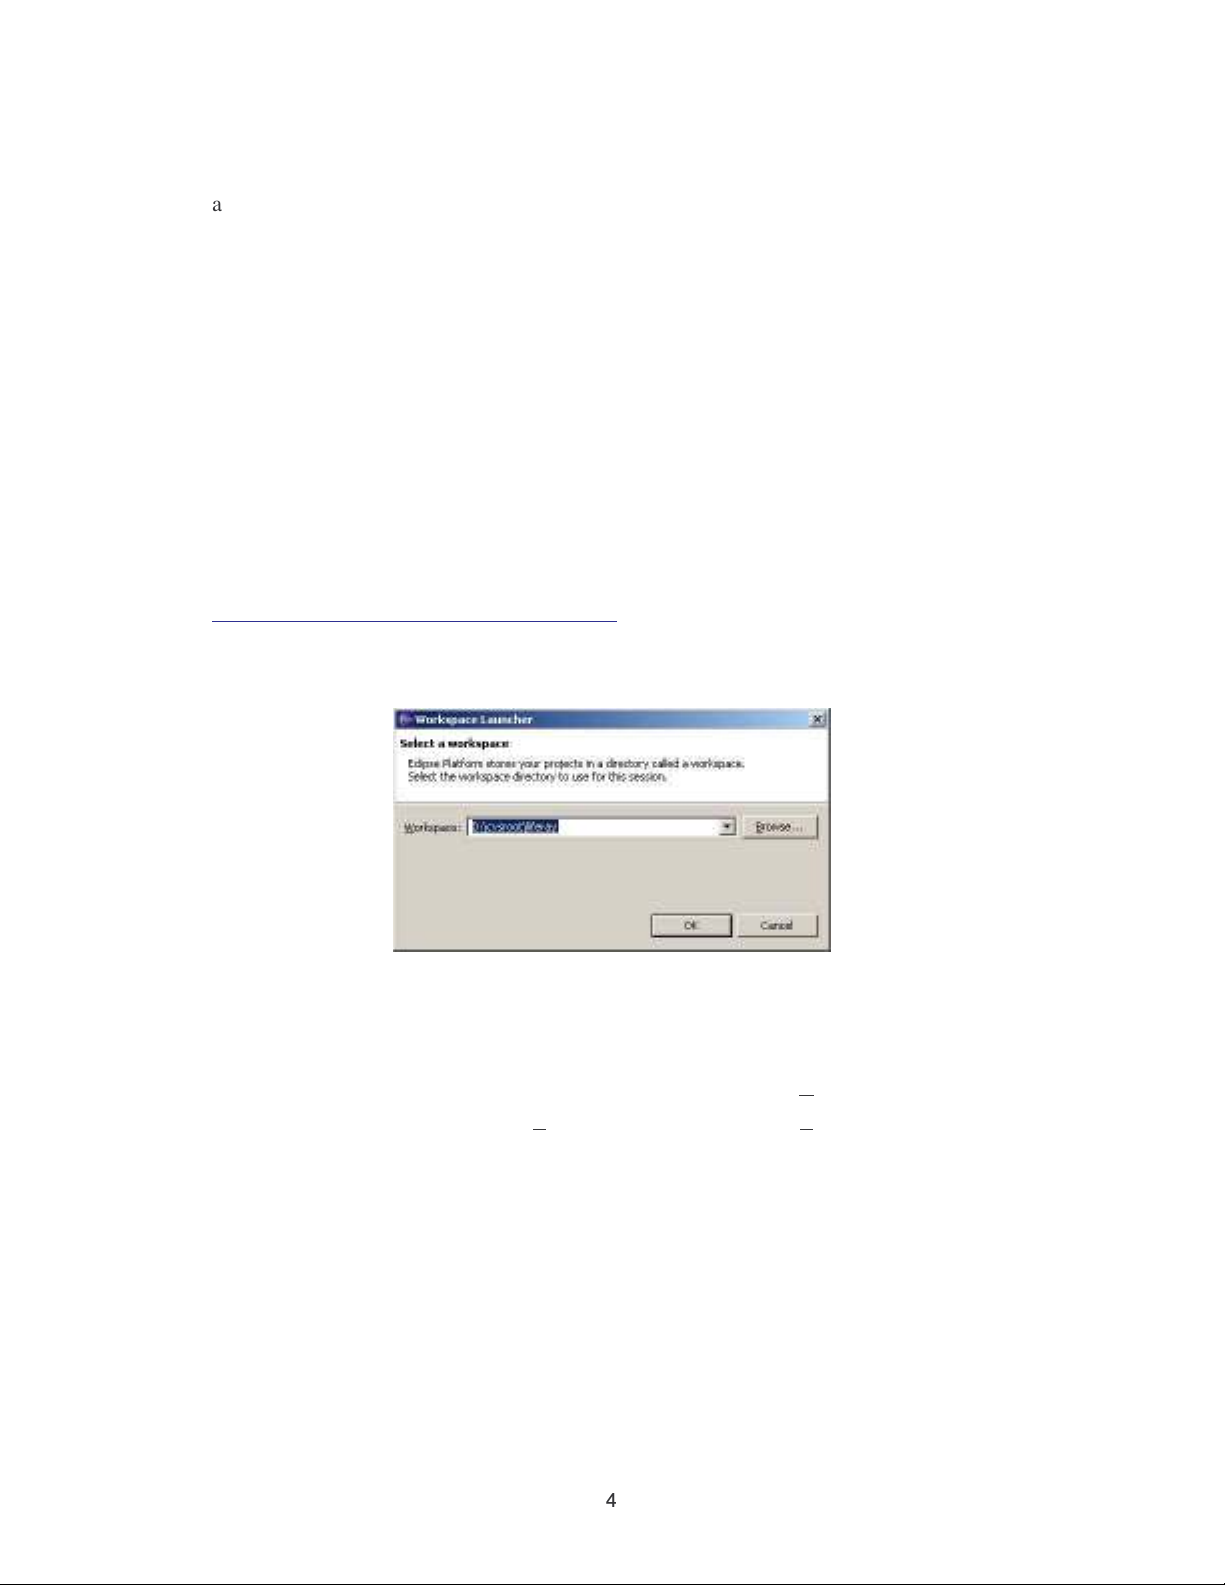
Download the newest version of the Eclipse from
http://www.eclipse.org/downloads/index.php. Install Eclipse into {Java}\eclipse and
then run it. Select File from the menu bar and then choose Switch Workspace…Within
the input box, type the path of {Liferay}, as shown in Figure 2.2.
Figure 2.2. Creating a new Workspace
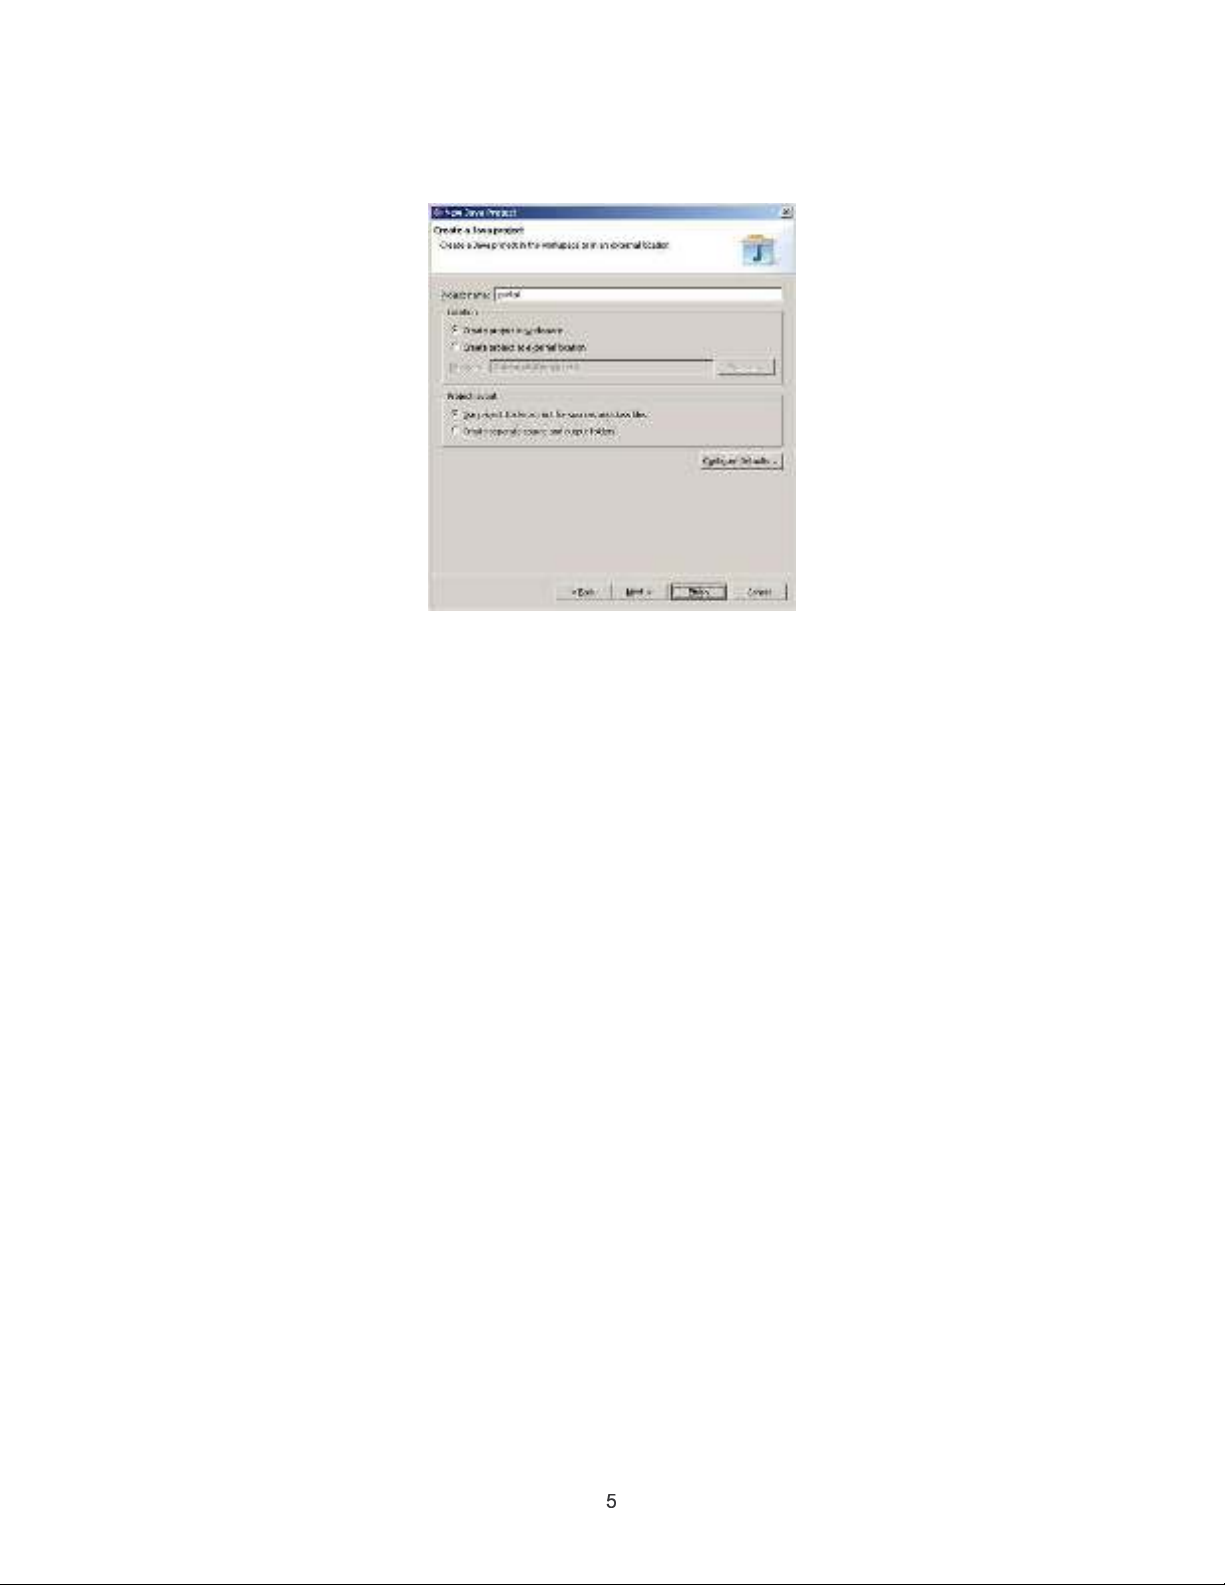
To setup your project within your workspace, select File from the menu bar, New, then
Project. Select Java Project from the dialogue box and click Next. In the New Java
Project window, enter portal as the Project Name, and then click Finish.
☎
Figure 2.3. Adding a new java project
If you’ve setup the Workspace correctly, you should be able to see the portal project
within the Navigator pane of the Resource perspective. If you right click on the root
directory of the project, select Properties, choose Java Build Path from the left
navigation, and the Libraries tab from the right, your portal project should have all the
necessary jars loaded already. These jars are loaded via the .classpath file that exists in
{Liferay}\portal.
Adding plugin support for Eclipse is even easier. Since Eclipse comes bundled with Ant,
setting up Ant is as easy as selecting Window from the menu bar, choosing Show View
and then Ant. You should see the Ant tab displayed within your current perspective.
Adding Liferay’s build files is just as easy. Simply select the Ant tab in your
perspective and then click the Ant icon with the + symbol. Note that each directory
within Liferay contains its own build.xml file, which Ant reads. When clicking the Ant
icon, select the build.xml file within the portal directory. Your Ant setup should look
like Figure 2.3.


![Tài liệu IC3-GS4 [mới nhất]](https://cdn.tailieu.vn/images/document/thumbnail/2016/20160219/01236214770/135x160/1373450532.jpg)


%20--%3e%3cdefs%3e%3cstyle%3e%20.st0%20{%20fill:%20%23fff;%20}%20.st1%20{%20fill:%20%237800fa;%20}%20%3c/style%3e%3c/defs%3e%3cpath%20class='st1'%20d='M117.78,12.18H43.11c2.9,3.47,4.65,7.94,4.65,12.82,0,5.6-2.3,10.66-6.01,14.29h76.02l7.22-13.56-7.22-13.56Z'/%3e%3cg%3e%3cpath%20class='st0'%20d='M53.58,26.17h-.59v-1.46h.59v-4.96h2.83c1.78,0,2.67.94,2.67,2.82v5.76c0,1.87-.89,2.81-2.67,2.81h-2.83v-4.96ZM55.36,21.37v3.34h1.1v1.46h-1.1v3.34h1.01c.61,0,.91-.37.91-1.1v-5.93c0-.74-.3-1.1-.91-1.1h-1.01Z'/%3e%3cpath%20class='st0'%20d='M65.99,31.14h-1.8l-.31-2.07h-2.19l-.31,2.07h-1.64l1.82-11.39h2.62l1.82,11.39ZM65.28,18.04c-.25.46-.51.77-.75.94-.21.15-.47.22-.79.22-.26,0-.57-.07-.92-.22l-.38-.15c-.14-.05-.26-.07-.37-.07-.3,0-.53.18-.71.54l-.91-.68c.25-.46.51-.77.75-.94.21-.14.48-.21.79-.21.26,0,.57.07.92.21l.38.15c.14.05.26.07.37.07.3,0,.53-.18.71-.54l.91.68ZM61.91,27.52h1.73l-.87-5.76-.87,5.76Z'/%3e%3cpath%20class='st0'%20d='M74.53,26.89v1.52c0,1.91-.89,2.86-2.67,2.86s-2.67-.95-2.67-2.86v-5.93c0-1.91.89-2.86,2.67-2.86s2.67.95,2.67,2.86v1.11h-1.69v-1.22c0-.75-.31-1.12-.93-1.12s-.93.37-.93,1.12v6.15c0,.74.31,1.11.93,1.11s.93-.37.93-1.11v-1.63h1.69Z'/%3e%3cpath%20class='st0'%20d='M81.4,31.14h-1.8l-.31-2.07h-2.19l-.31,2.07h-1.64l1.82-11.39h2.62l1.82,11.39ZM75.9,19.2l1.52-1.91h1.71l1.51,1.91h-1.61l-.76-.95-.75.95h-1.61ZM77.32,27.52h1.73l-.87-5.76-.87,5.76ZM83.1,15.99l-1.76,1.91h-1.26l1.17-1.91h1.86Z'/%3e%3cpath%20class='st0'%20d='M84.86,19.75c1.78,0,2.67.94,2.67,2.82v1.48c0,1.87-.89,2.81-2.67,2.81h-.85v4.28h-1.79v-11.39h2.64ZM84.01,21.37v3.86h.85c.58,0,.87-.36.87-1.08v-1.71c0-.71-.29-1.07-.87-1.07h-.85Z'/%3e%3cpath%20class='st0'%20d='M93.51,19.75c1.78,0,2.67.94,2.67,2.82v1.48c0,1.87-.89,2.81-2.67,2.81h-.85v4.28h-1.79v-11.39h2.64ZM92.66,21.37v3.86h.85c.58,0,.87-.36.87-1.08v-1.71c0-.71-.29-1.07-.87-1.07h-.85Z'/%3e%3cpath%20class='st0'%20d='M98.8,31.14h-1.79v-11.39h1.79v4.88h2.03v-4.88h1.83v11.39h-1.83v-4.88h-2.03v4.88Z'/%3e%3cpath%20class='st0'%20d='M105.36,24.55h2.46v1.62h-2.46v3.34h3.09v1.63h-4.88v-11.39h4.88v1.63h-3.09v3.18ZM108.17,17.29l-1.76,1.91h-1.26l1.17-1.91h1.86Z'/%3e%3cpath%20class='st0'%20d='M112.2,19.75c1.78,0,2.67.94,2.67,2.82v1.48c0,1.87-.89,2.81-2.67,2.81h-.85v4.28h-1.79v-11.39h2.64ZM111.35,21.37v3.86h.85c.58,0,.87-.36.87-1.08v-1.71c0-.71-.29-1.07-.87-1.07h-.85Z'/%3e%3c/g%3e%3ccircle%20class='st1'%20cx='25'%20cy='25'%20r='20'/%3e%3cpath%20class='st0'%20d='M32.78,19.27c2.92,0,4.43,2.55,5.28,5.33l.71,2.17c.14.38-.33.75-.71.75h-5.61c.19-.33.24-.71.09-1.08l-.75-2.45c-.43-1.32-.99-2.64-1.79-3.77.75-.57,1.65-.94,2.78-.94h0ZM25,18.38c3.25,0,4.9,2.78,5.89,5.89l.76,2.45c.14.42-.33.8-.8.8h-11.69c-.42,0-.94-.38-.8-.8l.75-2.45c.99-3.11,2.64-5.89,5.89-5.89h0ZM25,11.35c1.74,0,3.11,1.37,3.11,3.11s-1.37,3.11-3.11,3.11-3.11-1.41-3.11-3.11,1.41-3.11,3.11-3.11h0ZM17.27,19.27c1.08,0,1.98.38,2.73.94-.8,1.13-1.37,2.45-1.74,3.77l-.8,2.45c-.14.38-.05.75.09,1.08h-5.56c-.42,0-.9-.38-.75-.75l.71-2.17c.9-2.78,2.41-5.33,5.33-5.33h0ZM17.27,12.91c1.51,0,2.78,1.27,2.78,2.83s-1.27,2.83-2.78,2.83-2.83-1.27-2.83-2.83,1.27-2.83,2.83-2.83h0ZM32.78,12.91c1.56,0,2.78,1.27,2.78,2.83s-1.23,2.83-2.78,2.83-2.83-1.27-2.83-2.83,1.27-2.83,2.83-2.83h0ZM27.07,28.56v.09c0,.57-.24,1.08-.61,1.46h0v.05c-.38.33-.9.57-1.46.57s-1.08-.24-1.46-.61h0c-.38-.38-.61-.9-.61-1.46v-.09h1.41v.09c0,.19.05.38.19.47v.05c.09.09.28.19.47.19s.38-.09.47-.19v-.05c.14-.09.24-.28.24-.47t-.05-.09h1.41ZM30.99,28.56v.09c0,1.65-.66,3.16-1.74,4.24-1.08,1.08-2.59,1.79-4.24,1.79s-3.16-.71-4.24-1.79l-.05-.05c-1.04-1.08-1.7-2.55-1.7-4.2v-.09h1.41v.09c0,1.27.47,2.4,1.27,3.25h.05c.85.85,1.98,1.37,3.25,1.37s2.4-.52,3.25-1.37c.85-.8,1.37-1.98,1.37-3.25v-.09h1.37ZM34.99,28.56v.09c0,2.78-1.13,5.28-2.92,7.07-1.79,1.79-4.29,2.92-7.07,2.92s-5.23-1.13-7.07-2.92c-1.79-1.79-2.92-4.29-2.92-7.07v-.09h1.41v.09c0,2.4.94,4.53,2.5,6.08,1.56,1.56,3.72,2.5,6.08,2.5s4.52-.94,6.08-2.5c1.56-1.56,2.5-3.68,2.5-6.08v-.09h1.41Z'/%3e%3c/svg%3e)